1. Introduction
The Merv TG-174 is a versatile portable speaker designed for audio playback and convenience. It features a built-in digital display for time and temperature, multiple connectivity options including Bluetooth, Micro SD cards, and USB drives, and a Hi-Fi speaker design for clear sound. This manual provides essential information for the safe and effective operation of your device.
2. Safety Information
- Do not expose the speaker to extreme temperatures, direct sunlight, or high humidity.
- Avoid dropping or subjecting the speaker to strong impacts.
- Do not disassemble or attempt to repair the device yourself. Refer all servicing to qualified personnel.
- Keep the speaker away from water and other liquids.
- Use only the provided charging cable or a certified equivalent.
- Clean the speaker with a soft, dry cloth. Do not use abrasive cleaners.
3. Package Contents
Please check the package for the following items:
- Merv TG-174 Portable Bluetooth Speaker
- Power Cable (USB charging cable)
- User Manual (this document)
4. Product Overview
Familiarize yourself with the speaker's components and controls.
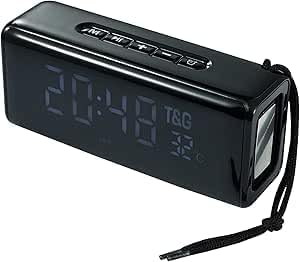
Figure 1: Front view of the Merv TG-174 speaker, showing the digital display and control buttons on top.

Figure 2: Rear view of the Merv TG-174 speaker, illustrating the power switch, charging port, USB port, and Micro SD card slot.
Control Buttons:
- M (Mode Button): Switches between Bluetooth, USB, and Micro SD modes.
- Previous Track / Volume Down: Short press for previous track, long press to decrease volume.
- Play/Pause: Plays or pauses audio.
- Next Track / Volume Up: Short press for next track, long press to increase volume.
- SET: Used for setting time and alarm functions.
5. Setup
5.1 Charging the Speaker
- Connect the provided USB charging cable to the charging port on the speaker.
- Connect the other end of the USB cable to a USB power adapter (not included) or a computer's USB port.
- The digital display will indicate charging status. A full charge typically takes approximately 2-3 hours.
5.2 Powering On/Off
- To power on, slide the power switch (located on the rear panel) to the 'ON' position. The digital display will light up.
- To power off, slide the power switch to the 'OFF' position.
6. Operating Instructions
6.1 Bluetooth Pairing
- Ensure the speaker is powered on and in Bluetooth mode (indicated by 'BT' on the display). If not, press the 'M' button to cycle through modes.
- Enable Bluetooth on your mobile device (smartphone, tablet, etc.).
- Search for available Bluetooth devices. Select "TG-174" from the list.
- Once paired, the speaker will emit a confirmation tone, and you can begin playing audio from your device.
6.2 USB Playback
- Insert a USB flash drive containing MP3 audio files into the USB port on the speaker's rear panel.
- The speaker will automatically switch to USB mode and begin playing audio. If not, press the 'M' button to select USB mode.
6.3 Micro SD (TF) Card Playback
- Insert a Micro SD (TF) card containing MP3 audio files into the Micro SD card slot on the speaker's rear panel.
- The speaker will automatically switch to TF card mode and begin playing audio. If not, press the 'M' button to select TF card mode.
6.4 Digital Display Functions (Time, Temperature, Alarm)

Figure 3: The speaker's digital display showing time and temperature, highlighting its alarm clock capability.
- Time Display: The digital display shows the current time.
- Temperature Display: The display also shows the ambient temperature.
- Setting Time: Press and hold the 'SET' button. Use the 'Previous Track' and 'Next Track' buttons to adjust hours and minutes. Press 'SET' again to confirm.
- Setting Alarm: Press the 'SET' button once to enter alarm setting mode. Use the 'Previous Track' and 'Next Track' buttons to set the alarm time. Press 'SET' again to confirm and activate the alarm.
6.5 Audio Controls
- Volume Adjustment: Long press the 'Previous Track' button to decrease volume, and long press the 'Next Track' button to increase volume.
- Track Navigation: Short press the 'Previous Track' button for the previous song, and short press the 'Next Track' button for the next song.
- Play/Pause: Press the 'Play/Pause' button to pause or resume playback.
7. Maintenance
- Cleaning: Wipe the speaker's surface with a soft, dry, lint-free cloth. Do not use liquid cleaners or aerosols.
- Storage: When not in use for extended periods, store the speaker in a cool, dry place away from direct sunlight.
- Battery Care: To prolong battery life, avoid fully discharging the speaker frequently. Charge it regularly, even if not in active use.
8. Troubleshooting
| Problem | Possible Cause | Solution |
|---|---|---|
| Speaker does not power on. | Battery is depleted. | Charge the speaker using the provided USB cable. |
| No sound from speaker. | Volume is too low or muted. | Increase the volume on the speaker and your connected device. |
| Bluetooth pairing fails. | Speaker is not in pairing mode or too far from device. | Ensure speaker is in Bluetooth mode. Move devices closer. Restart both devices. |
| USB/TF card not playing. | Incorrect file format or card/drive not properly inserted. | Ensure files are MP3 format. Reinsert the USB drive or TF card. Press 'M' to select correct mode. |
9. Specifications
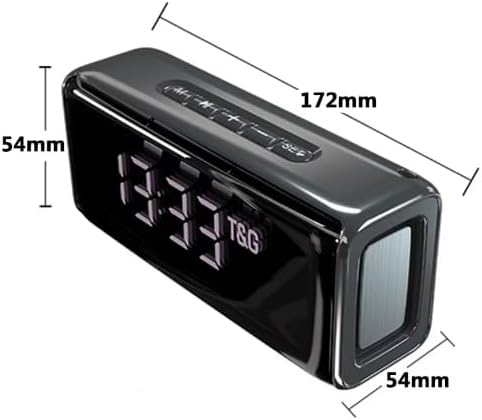
Figure 4: Dimensions of the Merv TG-174 speaker: 172mm length, 54mm width, 54mm height.
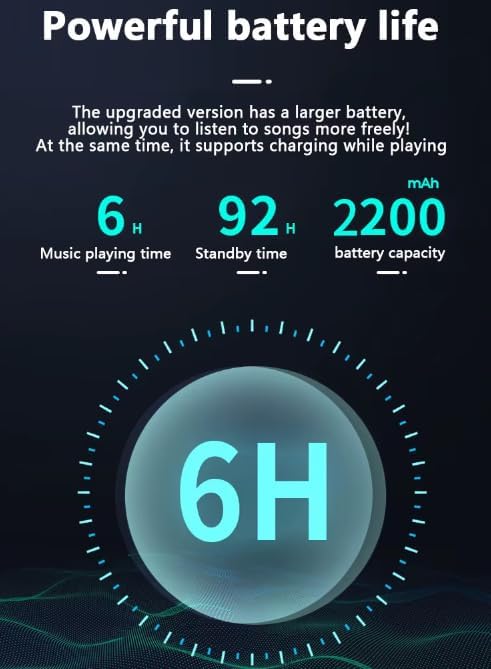
Figure 5: Battery performance details: 6 hours music playback, 92 hours standby, 2200mAh capacity.
| Feature | Detail |
|---|---|
| Model Name | TG-174 (also referred to as LED-805 in some specifications) |
| Brand | MERV |
| Connectivity Technology | Bluetooth, USB, Micro SD (TF Card) |
| Speaker Type | Soundbar |
| Output Power | 2 x 5W (10W total) |
| Battery Capacity | 1200mAh (rechargeable) / 2200mAh (as per image) |
| Working Time | Up to 3 hours (product description) / 6 hours (as per image) |
| Standby Time | Up to 92 hours |
| Product Dimensions | 40 x 7 x 7 cm (172 x 54 x 54 mm) |
| Item Weight | 650 Grams |
| Included Components | Power Cable |
10. Warranty and Support
For warranty information and customer support, please refer to the documentation provided at the time of purchase or contact your retailer. Keep your purchase receipt as proof of purchase.


