1. Introduction
The VEVOR 12V 20A DC to DC Battery Charger (Model: SDC-20A) is an advanced on-board charging solution designed for a wide range of vehicles including RVs, commercial vehicles, boats, and yachts. This charger efficiently charges your auxiliary or house batteries from your vehicle's alternator or starter battery, ensuring your standby batteries are always ready for use. It supports various battery chemistries, including lead-acid (AGM, Gel, Flooded) and lithium (LiFePO4) batteries, and incorporates smart multi-stage charging algorithms to optimize battery life and performance. Built-in multiple protection features ensure safe and reliable operation.

Figure 1.1: VEVOR 12V 20A DC to DC Battery Charger, front view. This image shows the compact design and branding of the charger.
2. Safety Instructions
Please read and understand all safety instructions before installing or operating this device. Failure to follow these instructions may result in electric shock, fire, or serious injury.
- Electrical Safety: Always disconnect power before making or breaking electrical connections. Ensure all wiring is correctly sized for the current draw and properly insulated.
- Battery Safety: Batteries can produce explosive gases. Work in a well-ventilated area. Avoid sparks, flames, and smoking near batteries. Wear eye protection and protective clothing.
- Installation: Install the charger in a dry, well-ventilated area, away from flammable materials. Ensure adequate clearance for cooling.
- Overload Protection: Do not exceed the charger's rated current. Use appropriate fuses as specified.
- Reverse Polarity: Ensure correct polarity when connecting to batteries and power sources to prevent damage to the charger and connected systems.
- Children and Pets: Keep the device out of reach of children and pets.
3. Product Features
The VEVOR DC to DC Battery Charger is equipped with several features designed for optimal performance and safety:
- Versatile Battery Compatibility: Compatible with a wide range of 12V battery types, including Lead-Acid (AGM, Gel, Flooded) and Lithium (LiFePO4) batteries. It adapts charging parameters based on the selected battery type.
- Smart Multi-Stage Charging: Features optimized charging modes for different battery chemistries. LiFePO4 batteries utilize a 2-stage charging process, while lead-acid batteries use a 3-stage process (Bulk, Absorption, Float) to ensure full charge and extended battery lifespan.
- Multiple Protections: Equipped with comprehensive safety features including over-voltage, under-voltage, high temperature, and reverse polarity protection. The isolated input/output design prevents interference with your vehicle's electrical system.
- Compact and Easy to Install: The sleek aluminum alloy design features pre-drilled mounting holes, allowing for flexible installation in various spaces.
- Lithium Battery Activation: Capable of waking up idle or deeply discharged lithium batteries, restoring them to an operational state and extending their lifespan.
- Efficient Cooling: Built-in smart cooling fans automatically activate when the internal temperature of the charger rises, ensuring optimal performance and longevity.

Figure 3.1: Compatibility with various 12V battery types including Lithium (LI), Sealed Lead-Acid (SLA), Absorbed Glass Mat (AGM), Gel, and Flooded (FLD) batteries.
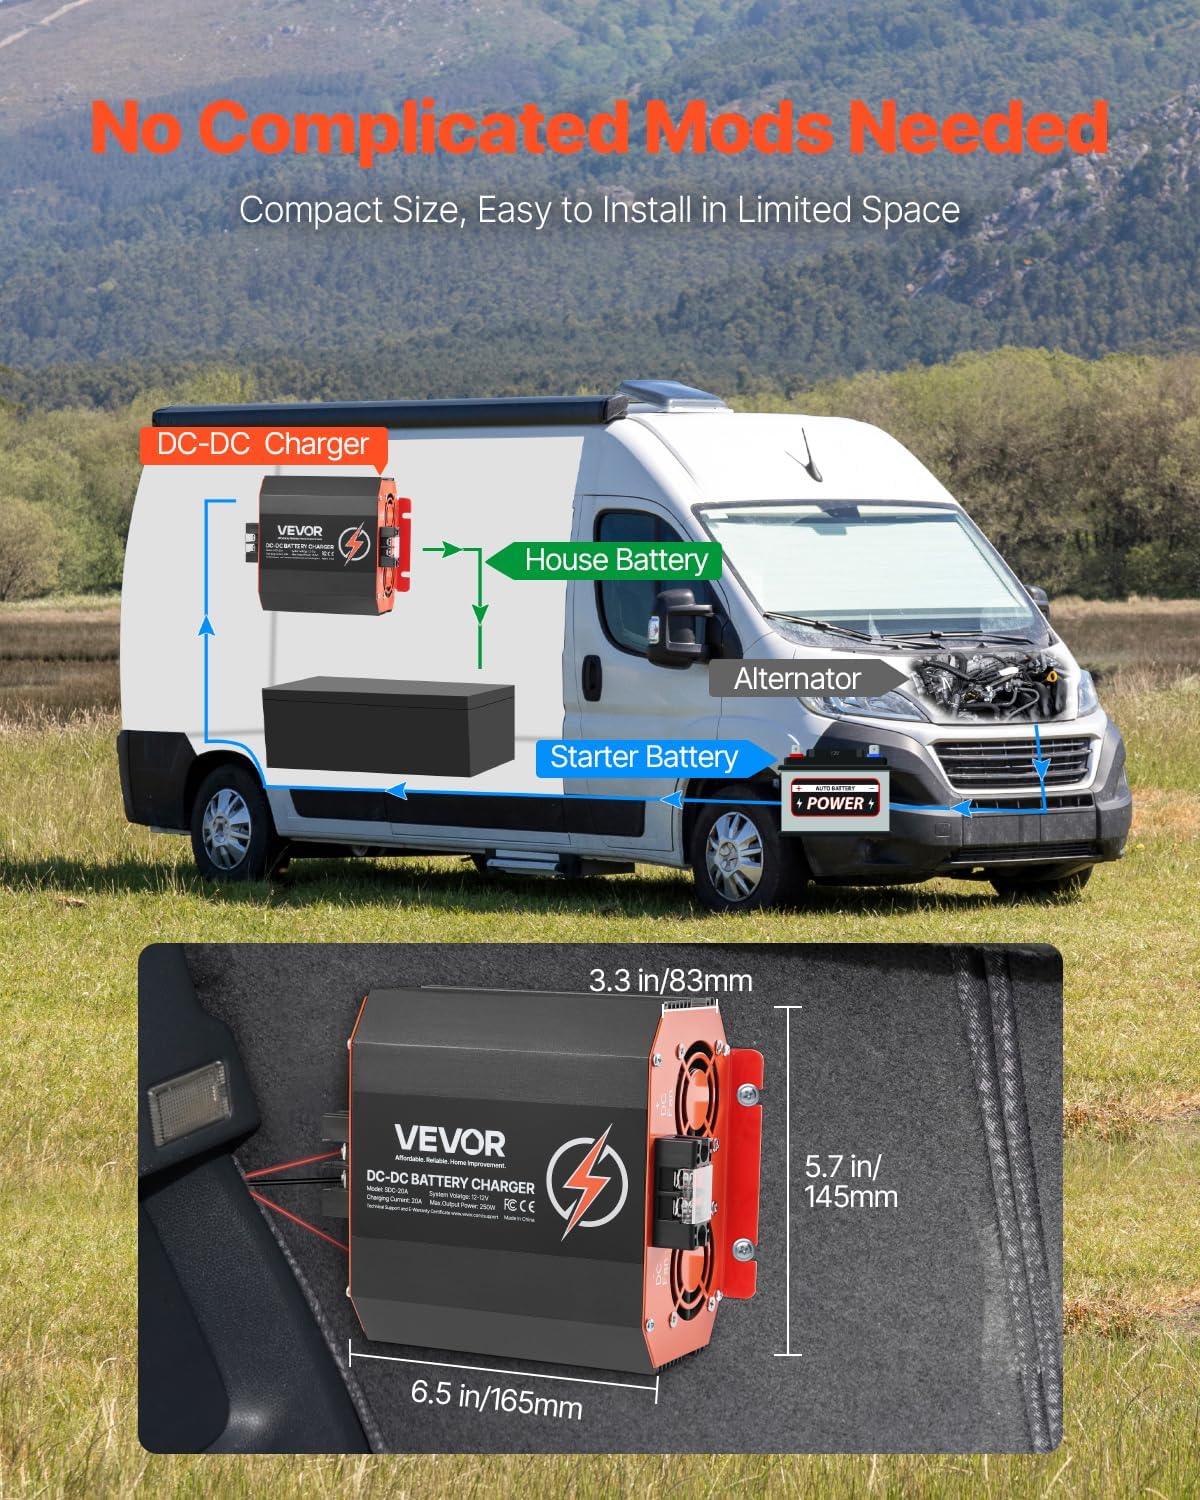
Figure 3.2: Illustration of the intelligent multi-stage charging process, showing Bulk, Absorption, and Float stages for lead-acid batteries.

Figure 3.3: Diagram illustrating the isolated input and output for smart battery protection, showing connections to starter and standby batteries.

Figure 3.4: Image displaying the compact dimensions of the charger (6.5 in / 165mm length, 5.7 in / 145mm width, 3.3 in / 83mm height).
4. Package Contents
Upon opening the package, please verify that all items are present and undamaged:
- 1 x VEVOR 12V 20A DC to DC Battery Charger (Model: SDC-20A)
- 1 x User Manual
- 3 x Fuses
5. Setup & Installation
Proper installation is crucial for the safe and efficient operation of your DC to DC battery charger. Follow these steps carefully:
- Mounting Location: Choose a dry, well-ventilated location, preferably close to the auxiliary battery. Ensure the mounting surface is stable and can support the charger's weight. The charger features pre-drilled mounting holes for easy installation.
- Wiring Connections:
- Input (Starter Battery/Alternator): Connect the positive DC input terminal to your vehicle's starter battery or alternator output. Connect the negative DC input terminal to the vehicle's chassis ground or the negative terminal of the starter battery. Ensure an appropriate fuse is installed on the positive input line.
- Output (House/Auxiliary Battery): Connect the positive DC output terminal to the positive terminal of your house or auxiliary battery. Connect the negative DC output terminal to the negative terminal of the house battery. Ensure an appropriate fuse is installed on the positive output line.
- D+ Ignition Terminal (Optional): For vehicles with smart alternators or where charging should only occur when the engine is running, connect the D+ ignition terminal to a switched ignition source (e.g., D+ terminal of the alternator or an ignition-switched fuse). This ensures the charger only operates when the vehicle is running.
- Temperature Sensor Port (Optional): If your battery has a temperature sensor, connect it to the temperature sensor port for optimized charging based on battery temperature.
- Battery Type Selection: Use the DIP switches on the side of the charger to select the correct battery type (Lead-Acid or Lithium) for your auxiliary battery. Refer to the table below for DIP switch settings.

Figure 5.1: Example installation diagram showing the DC-DC charger connected between a starter battery and a house battery in an RV.

Figure 5.2: Detailed view of the charger's terminals, including Positive DC Input, Negative DC Input, Dip Switch, Temperature Sensor Port, D+ Ignition Terminal, LC Terminal-Current Limiting Terminal, and Negative DC Output.

Figure 5.3: Side view of the VEVOR DC to DC Battery Charger, highlighting the DIP switches for battery type selection.
DIP Switch Settings for Battery Type
| DIP Switch Position | Battery Type |
|---|---|
| [Refer to product specific DIP switch diagram in physical manual for exact settings] | Lead-Acid (AGM, Gel, Flooded) |
| [Refer to product specific DIP switch diagram in physical manual for exact settings] | Lithium (LiFePO4) |
Note: The exact DIP switch configurations are typically detailed in the physical user manual. Please consult your manual for precise settings.
6. Operating Instructions
Once properly installed and configured, the VEVOR DC to DC Battery Charger operates automatically.
- Automatic Charging: The charger will automatically begin charging the auxiliary battery when it detects a sufficient input voltage from the starter battery or alternator (typically when the vehicle engine is running).
- Multi-Stage Charging Process:
- Bulk Stage: Charges the battery at its maximum current until it reaches approximately 80% of its capacity.
- Absorption Stage: Charges the battery at a constant voltage, gradually reducing the current until the battery is fully charged.
- Float Stage (Lead-Acid only): Maintains the battery at a safe, constant voltage to prevent self-discharge and keep it fully charged without overcharging.
- Lithium Activation: If a deeply discharged lithium battery is connected, the charger will attempt to activate it by applying a low current until it reaches a safe voltage for normal charging.
- Cooling Fans: The integrated cooling fans will activate automatically when the internal temperature of the charger rises, ensuring optimal performance and longevity.
7. Maintenance
Regular maintenance helps ensure the longevity and optimal performance of your VEVOR DC to DC Battery Charger.
- Cleaning: Periodically clean the exterior of the charger with a dry, soft cloth. Ensure ventilation openings are free from dust and debris. Do not use harsh chemicals or abrasive cleaners.
- Connections: Regularly inspect all electrical connections to ensure they are tight and free from corrosion. Loose connections can lead to overheating and poor performance.
- Fuses: Check the fuses periodically. If a fuse blows, replace it with a fuse of the same type and rating.
- Environment: Ensure the charger remains in a dry, well-ventilated environment, free from excessive heat, moisture, and direct sunlight.
8. Troubleshooting
If you encounter issues with your VEVOR DC to DC Battery Charger, refer to the following common troubleshooting steps:
| Problem | Possible Cause | Solution |
|---|---|---|
| Charger not operating/no output | No input voltage; Blown fuse; Incorrect wiring; D+ ignition not triggered (if used) | Check input voltage from starter battery/alternator; Inspect and replace fuses; Verify all wiring connections are correct and secure; Ensure D+ ignition signal is present when engine is running. |
| Battery not fully charging | Incorrect battery type setting; Battery degradation; High resistance in wiring | Verify DIP switch settings match battery type; Test battery health; Check for loose or corroded connections and use appropriate wire gauge. |
| Charger overheating/fans constantly running | Poor ventilation; Overload; High ambient temperature | Ensure adequate airflow around the charger; Reduce load if possible; Relocate charger to a cooler area if ambient temperature is consistently high. |
| Unusual noises or smells | Internal fault; Component failure | Immediately disconnect power. Do not attempt to repair. Contact VEVOR customer support. |
If the problem persists after attempting these solutions, please contact VEVOR customer support for further assistance.
9. Specifications
| Parameter | Value |
|---|---|
| Model Number | SDC-20A |
| Input Voltage | 12V DC |
| Input Battery Voltage Range | DC 8V-16V |
| Charging Current | 20A |
| Maximum Output Power | 250W |
| Compatible Battery Types | Lead-Acid (AGM, Gel, Flooded), Lithium (LiFePO4) |
| Casing Material | Aluminum Alloy |
| Operational Temperature | -20 °C to 50 °C (4 °F to 122 °F) |
| Net Weight | 2.69 lbs (1.22 kg) |
| Product Dimensions (L x W x H) | 6.4 x 5.7 x 3.3 inches (16.26 x 14.48 x 8.38 cm) |
| Charging Voltage Range (Lead-Acid) | 13.2V - 14.7V |
| Charging Voltage Range (Lithium) | 12.6V - 14.6V |
10. Warranty & Support
VEVOR products are designed for durability and performance. For information regarding warranty coverage, please refer to the warranty card included with your product or visit the official VEVOR website.
For technical support, troubleshooting assistance, or parts inquiries, please contact VEVOR customer service through their official website or the contact information provided in your product documentation.
VEVOR Official Website: www.vevor.com