1. Introduction
The LDMLAX A-87S Automatic Fiber Optic Fusion Splicer is a high-precision instrument designed for efficient and reliable fiber optic cable splicing. Featuring a 3.5-inch LCD display and advanced core alignment technology, it is suitable for various fiber types including SM (G.652, G.657), MM (G.651), DS (G.653), and NZDS (G.655).
Key features include:
- Multiple Functionality: Supports various fiber types and offers 17 fusion modes and 9 heating modes.
- High Magnification: 400X magnification for precise fiber alignment.
- Fast Splicing: Typical connection time of 9 seconds.
- Adjustable Heating: Typical heating time of 26 seconds, with adjustable settings.
- Versatile Fixture: Multifunctional fixture for bare fiber, pigtail, jumper, and leather cable.
- User-Friendly Interface: 3.5-inch TFT color LCD display with dual-way operation and switchable Chinese/English language.

Figure 1.1: The A-87S Automatic Fiber Optic Fusion Splicer in an operational setting, demonstrating its compact design and user interface.
2. Specifications
| Feature | Specification |
|---|---|
| Item Model Number | 20250422 |
| Magnification | 400X (X axes or Y axes) |
| Return Loss | Better than 60dB |
| Typical Connection Time | 9 seconds |
| Typical Heating Time | 26 seconds (adjustable) |
| Fiber Cladding Diameter | 80-150µm |
| Fiber Coating Diameter | 100-1000µm |
| Cutting Length (Coating < 250µm) | 8-16mm |
| Cutting Length (Coating 250-1000µm) | 16mm |
| Heat Shrink Tubing | 60mm, 40mm, and micro shrink tubing |
| Display | 3.5in TFT color LCD display |
| External Interface | USB interface |
| Splice Modes | 17 groups |
| Heating Modes | 9 groups |
| Connection Loss Storage | 5000 updated connection results |
| Built-in Battery | 11.1V 4800mAh Lithium Battery |
| Charging Time | 3.5 hours |
| Applicable Fibers | SM (G.652, G.657), MM (G.651), DS (G.653), NZDS (G.655), custom fiber types |
| Optical Fiber Fixture | Multifunctional (bare fiber, pigtail, jumper, leather cable), replaceable for SC and other FTTx connectors |
| Product Weight | 12.13 pounds (approx. 5.5 kg) |
| Package Dimensions | 3.94 x 3.94 x 3.94 inches (approx. 10 x 10 x 10 cm) |

Figure 2.1: Detailed dimensions of the A-87S Fusion Splicer and its packaging, including product weight.
3. Package Contents
The standard package for the A-87S Automatic Fiber Optic Fusion Splicer includes the following items:
- 1 x Optical Fiber Fusion Splicer Unit
- 1 x Matching Battery (Built-in)
- 1 x Power Adapter/Charger
- 1 x Fiber Cleaver
- 1 x Fiber Stripper
- 1 x Drop Cable Stripper
- 1 x Alcohol Bottle
- 1 x Dust Blower
- 1 x Set of Hex Wrenches
- 1 x Brush
- 1 x Tweezers
- 1 x Carrying Case
- User Manual (Chinese and English)
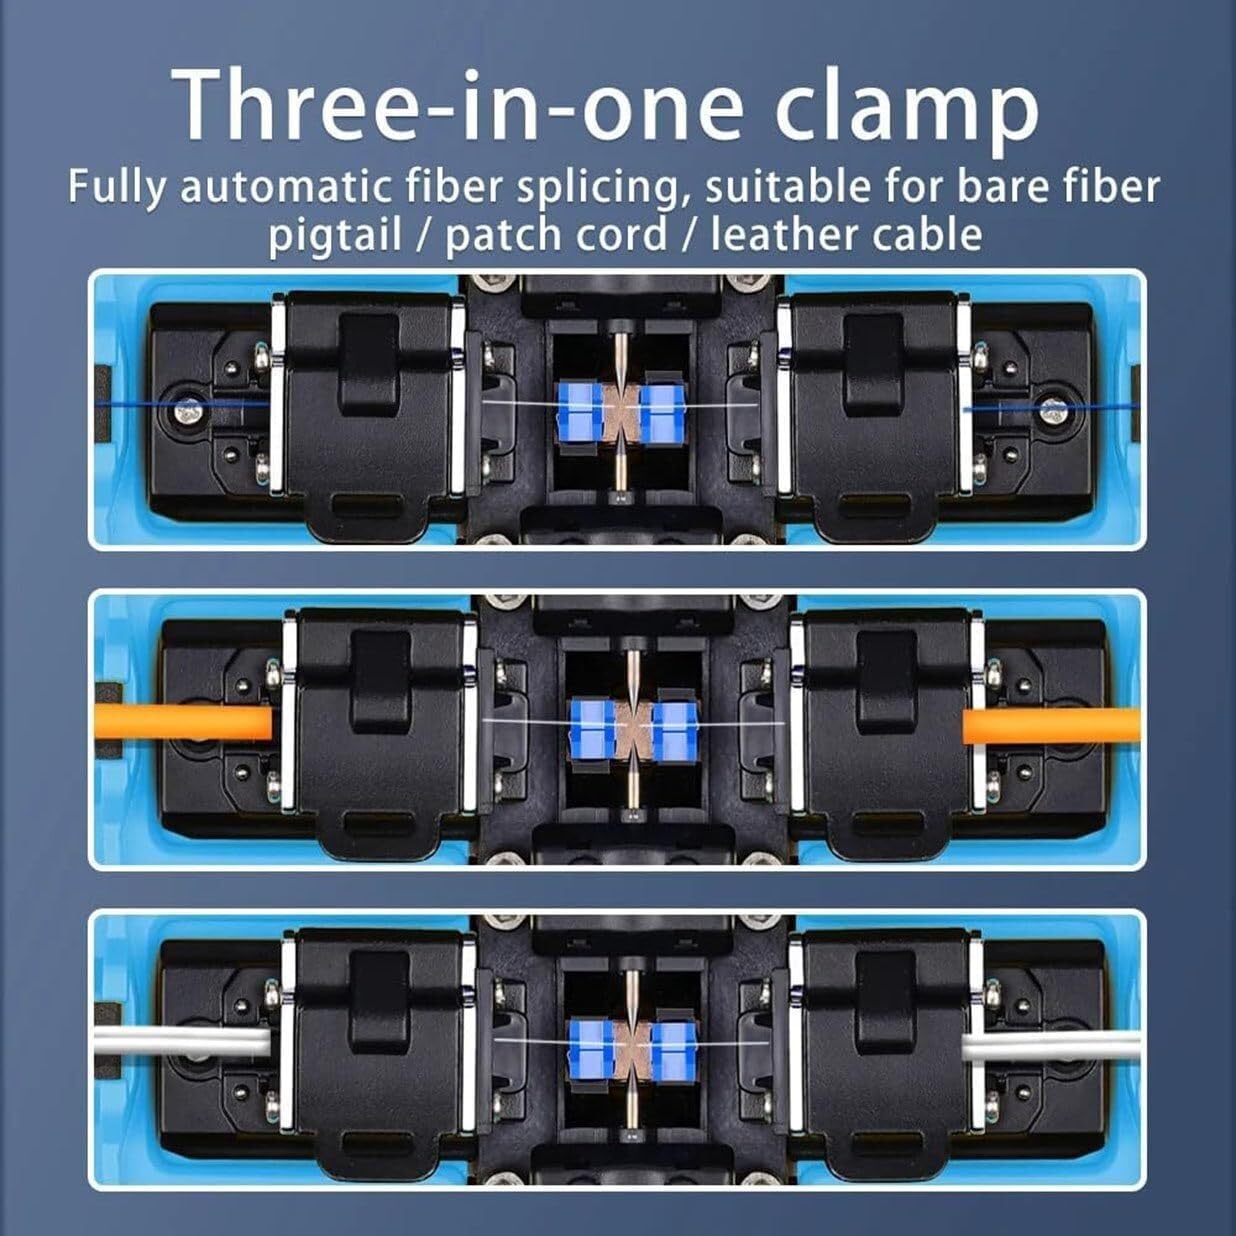
Figure 3.1: Overview of all components included in the A-87S Fusion Splicer standard kit, neatly arranged.
4. Setup
Before operating the A-87S Fusion Splicer, ensure proper setup to guarantee optimal performance and safety.
4.1 Unpacking and Inspection
- Carefully open the carrying case and remove all components.
- Verify that all items listed in the "Package Contents" section are present and undamaged.
- Inspect the splicer unit for any visible damage from shipping. If any damage is found, contact customer support immediately.
4.2 Powering On
- Ensure the built-in battery is sufficiently charged. If not, connect the power adapter to the splicer and a power outlet. The charging time is approximately 3.5 hours.
- Press and hold the power button (usually located on the side or front panel) until the 3.5-inch TFT color LCD display illuminates.
- The system will perform a self-check. Wait for the main interface to appear.
4.3 Language Selection
The splicer supports both Chinese and English languages. To switch languages:
- Navigate to the "Settings" or "Language" menu on the LCD display.
- Select your preferred language (English or Chinese).
- Confirm your selection. The interface will update accordingly.

Figure 4.1: The A-87S Fusion Splicer's menu interface, highlighting the option to switch between Chinese and English languages.
5. Operating Instructions
This section outlines the general procedure for performing a fiber optic fusion splice using the A-87S.
5.1 Fiber Preparation
- Strip the Fiber: Use the fiber stripper to remove the outer jacket and coating from the fiber, exposing the bare fiber. Ensure the stripped length is appropriate for cleaving (e.g., 16mm for 250-1000µm coating).
- Clean the Fiber: Apply isopropyl alcohol to a lint-free wipe and thoroughly clean the bare fiber to remove any residue. Allow it to air dry completely.
- Cleave the Fiber: Place the cleaned, stripped fiber into the fiber cleaver. Ensure the fiber is positioned correctly and perform a precise cleave. A good cleave is crucial for a low-loss splice.
5.2 Fiber Placement and Splicing
- Open the Splicer Lid: Gently open the top lid of the A-87S splicer to expose the V-grooves and electrodes.
- Place Fibers: Carefully place the prepared fibers into the V-grooves of the splicer's multifunctional fixture. Ensure the cleaved ends are positioned correctly in the center, facing each other. The fixture supports bare fiber, pigtail, jumper, and leather cable.
- Close the Lid: Close the splicer lid. The automatic core alignment system will engage.
- Automatic Splicing: The splicer will automatically align the fibers using its four-motor high-precision system and initiate the fusion process. The 3.5-inch LCD display will show the fiber alignment and splice progress with 400x magnification.
- Splice Completion: Once the splice is complete (typically 9 seconds), the splicer will display the estimated splice loss (e.g., 0.02dB for SM, 0.01dB for MM).

Figure 5.1: The A-87S Fusion Splicer with its protective lid open, revealing the fiber alignment and splicing mechanism.
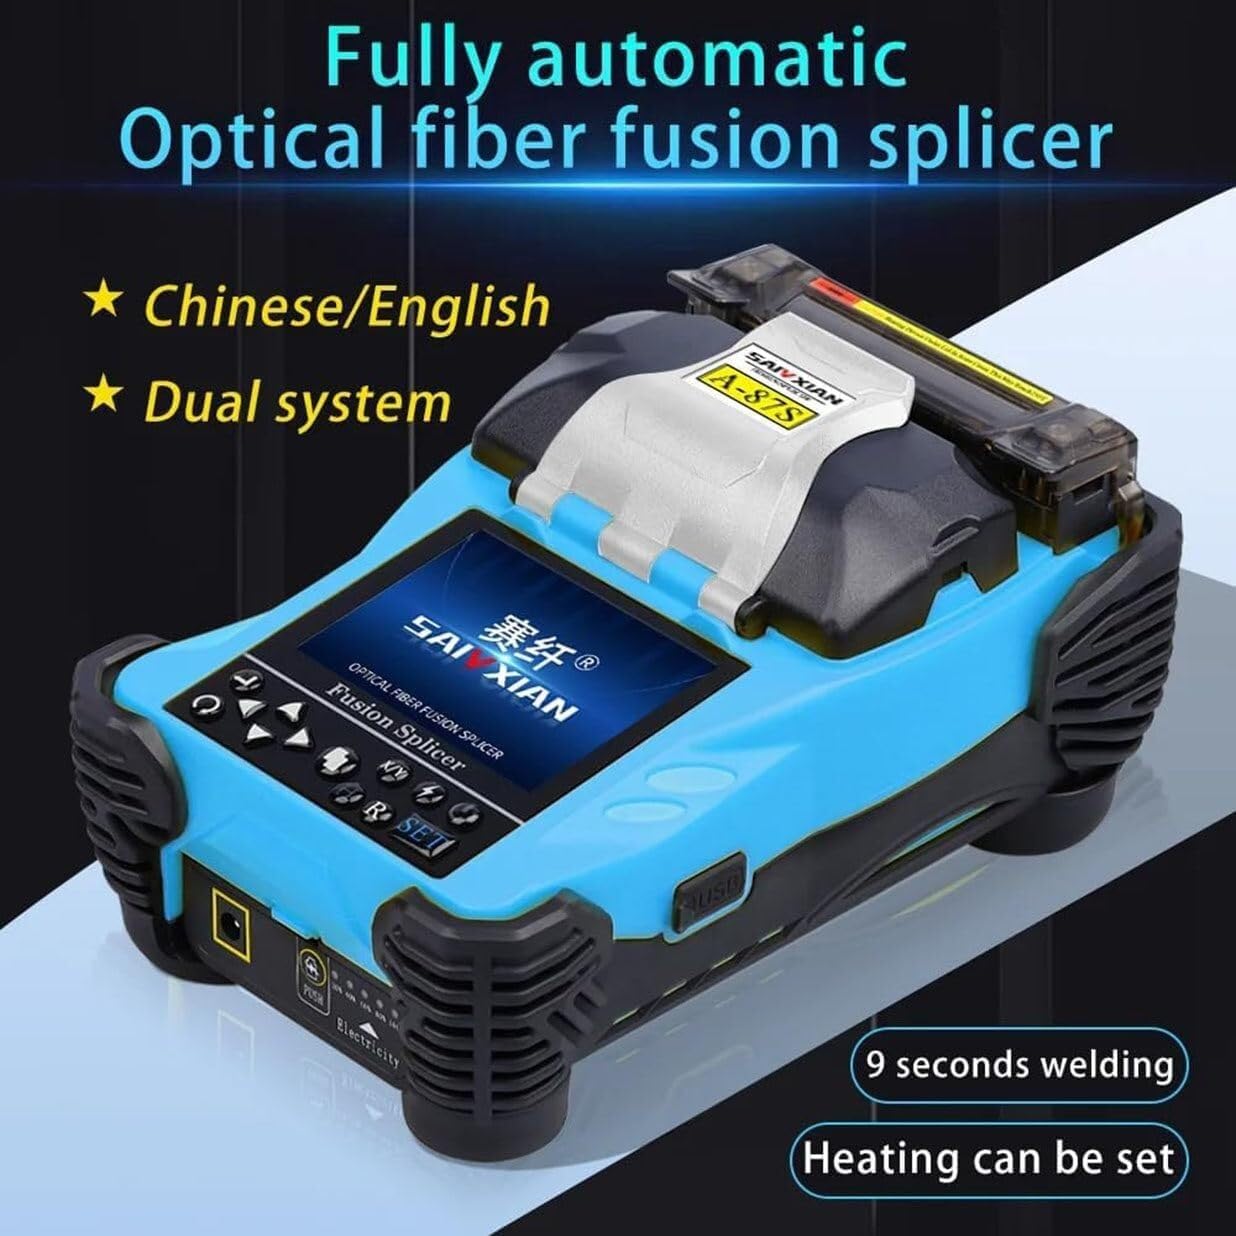
Figure 5.2: The clear 3.5-inch LCD display of the A-87S, showing real-time fiber alignment and splice quality, with content that can be flipped for dual-way operation.
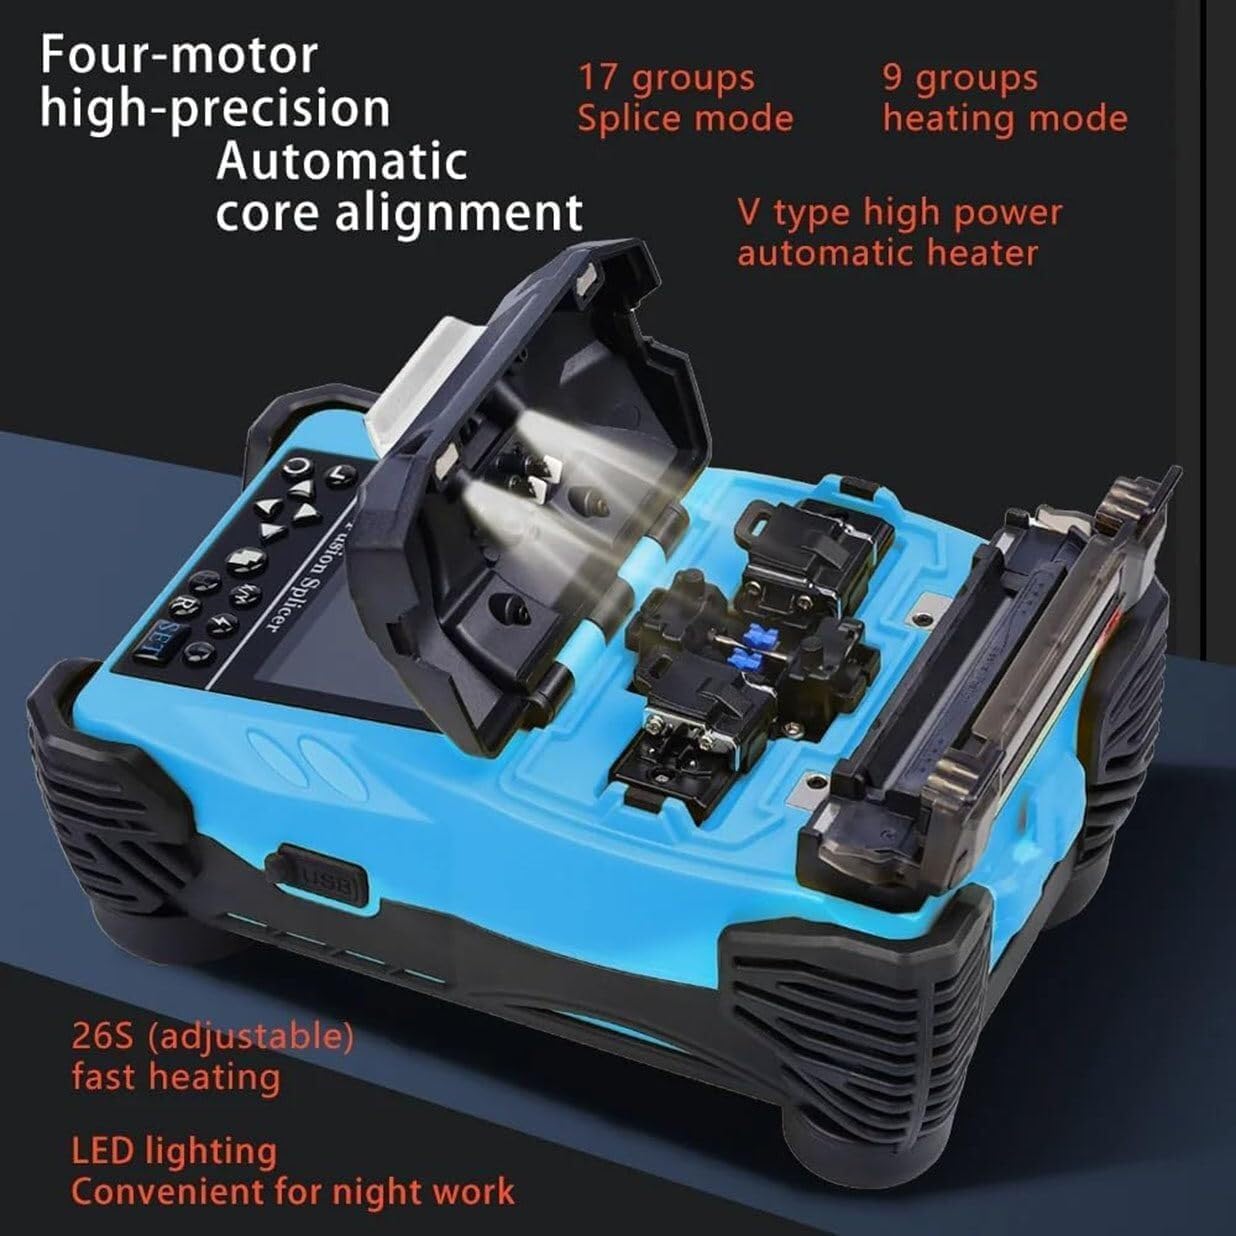
Figure 5.3: Internal view of the A-87S Fusion Splicer, illustrating the four-motor high-precision automatic core alignment system and the V-type high-power automatic heater.
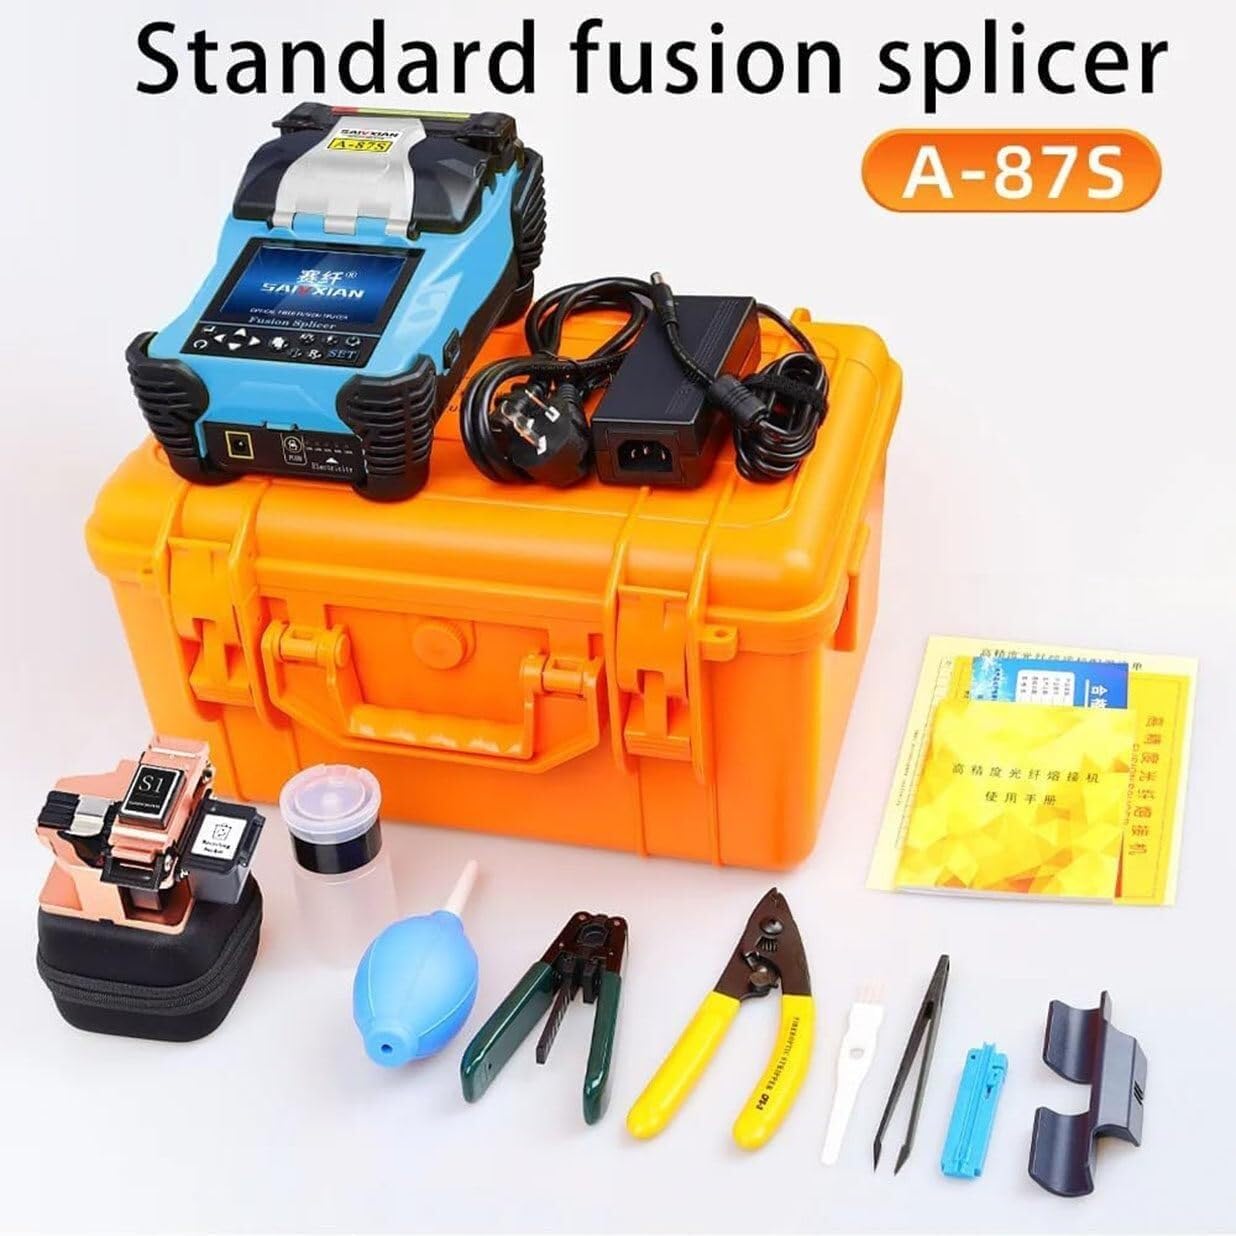
Figure 5.4: Illustration of the versatile three-in-one clamp system, demonstrating its compatibility with bare fiber, pigtail, patch cord, and leather cable.
5.3 Heat Shrinking
- Place Heat Shrink Tube: Slide a heat shrink protection sleeve over the spliced fiber joint.
- Position in Heater: Carefully place the fiber with the heat shrink tube into the splicer's built-in heater.
- Initiate Heating: Close the heater lid. The splicer will automatically initiate the heating process. The typical heating time is 26 seconds, but this can be adjusted in the settings.
- Remove Fiber: Once the heating cycle is complete, carefully remove the fiber. The heat shrink tube should be firmly shrunk around the splice, providing mechanical protection.
5.4 Menu Navigation and Settings
The A-87S features an intuitive menu system accessible via the buttons below the LCD screen. You can adjust various parameters:
- Splice Mode: Select from 17 available splice modes optimized for different fiber types (SM, MM, DS, NZDS, custom).
- Heating Mode: Choose from 9 heating modes, and adjust heating temperature and time as needed.
- Discharging Calibration: Perform calibration for optimal arc discharge.
- Storage Record: Access the internal memory which saves up to 5000 updated connection results.
- Operation Menu: General settings and controls.
- Application Menu: Specific application-related settings.
- Maintenance Menu: Access maintenance functions.
- Language: Switch between Chinese and English.
6. Maintenance
Regular maintenance ensures the longevity and accuracy of your A-87S Fusion Splicer.
6.1 Cleaning
- V-Grooves and Electrodes: Regularly clean the V-grooves and electrodes using a cotton swab dipped in isopropyl alcohol. Dust and fiber debris can affect splicing performance.
- Optical Lenses: Use a lens cleaning solution and a soft, lint-free cloth to gently clean the optical lenses. Avoid touching the lenses directly.
- Display Screen: Wipe the LCD screen with a soft, dry cloth. Do not use abrasive cleaners.
- General Casing: Keep the exterior of the splicer clean and free of dust and dirt.
6.2 Battery Care
- Charge the battery fully before first use.
- Avoid completely discharging the battery frequently to prolong its lifespan.
- If storing the splicer for an extended period, ensure the battery is charged to about 50-70%.
6.3 Electrode Replacement
Electrodes have a limited lifespan and will need replacement when they become worn or contaminated. Refer to the maintenance menu for electrode status and replacement instructions. Always use genuine replacement electrodes.
7. Troubleshooting
This section provides solutions to common issues you might encounter with your A-87S Fusion Splicer.
| Problem | Possible Cause | Solution |
|---|---|---|
| Splicer does not power on. | Low battery or power adapter issue. | Charge the battery. Ensure power adapter is correctly connected and functional. |
| High splice loss. |
|
|
| Fiber not aligning correctly. |
|
|
| Heating element not working. |
|
|
If you encounter issues not listed here or if the suggested solutions do not resolve the problem, please contact LDMLAX customer support for further assistance.
8. Warranty and Support
For warranty information and technical support, please refer to the documentation provided with your purchase or contact LDMLAX directly. Keep your purchase receipt as proof of purchase for warranty claims.
If you have any other questions, you can send us an email and we will be happy to solve the problem for you.