
1. Introduction
This manual provides essential information for the proper setup, operation, and maintenance of your new Generic remote control. This remote is specifically designed to work with OKIN Superiorsleep Glideaway Comforbase adjustable bed bases that utilize the Okin JLDK.37.06.06 control box. Please read these instructions carefully before use.
2. Compatibility and Verification
This remote control is not universal. It is crucial to verify compatibility with your existing adjustable bed system. This remote is only compatible with control boxes bearing the model number Okin JLDK.37.06.06.
Before attempting to pair or use, ensure your control box matches the specified model. If your control box model differs, this remote will not function correctly.
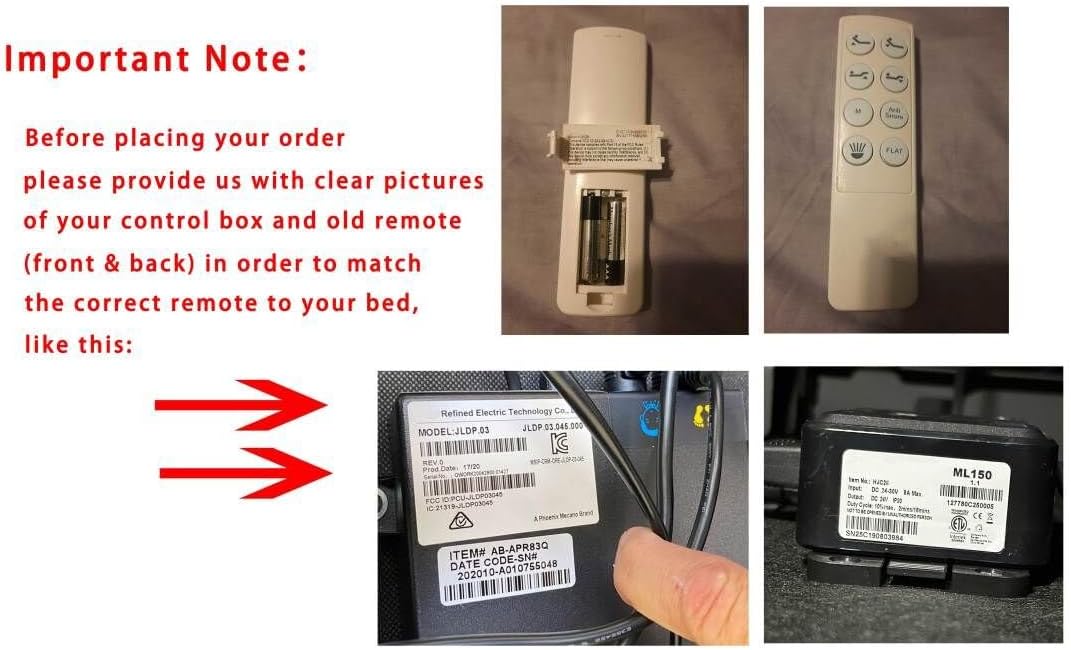
Figure 1: Important compatibility note. This image illustrates the necessity of verifying your control box model. It shows an example of a control box label with a model number (JLDP.03.046.000). Please note that while this image shows an example label, your control box must specifically be model Okin JLDK.37.06.06 for this remote to be compatible.
3. Setup and Pairing Instructions
Follow these steps carefully to pair your new remote control with your adjustable bed base. Ensure the bed is connected to a power source.
3.1. Initial Preparation
- Disconnect Power: Unplug the adjustable bed from the electrical outlet.
- Wait: Wait for at least 5 seconds.
- Reconnect Power: Plug the adjustable bed back into the electrical outlet.
- Locate Control Box: Find the control box, typically located under the bed. This box may also contain a battery backup.
3.2. Pairing Procedure
The pairing process must be completed within 15 seconds once initiated. If 15 seconds pass, you will need to restart the process from step 3.1.
- Activate Control Box: Double-click the "reset" button on the control box twice. This button is often labeled "Learn" or "Reset Coding". Press and release the button quickly; do not press and hold.
- Remote Activation: Immediately after activating the control box (while its indicator light is on), press and hold the "head up" button and the "foot up" button on the remote control simultaneously for 10 seconds.
- Confirmation: You will hear a series of beeps, indicating that the remote control has successfully synced with the bed base.
Note: Ensure the indicator light on the control box is active during the remote activation step. If the light goes out before pairing is complete, restart the process.
4. Operating Instructions
Your remote control features intuitive buttons for adjusting your bed's position. The specific layout may vary slightly, but the functions are standard.

Figure 2: Front view of the remote control. This image displays the button layout, including controls for adjusting the head and foot sections of the bed, as well as a "Flat" button to return the bed to a level position.
- Head Up/Down: Use these buttons to raise or lower the head section of the bed.
- Foot Up/Down: Use these buttons to raise or lower the foot section of the bed.
- Flat: Press this button to return the bed to a completely flat position.
- (Other buttons may be present depending on your specific remote model, such as massage or memory presets. Refer to your original bed base manual for details on these functions.)
5. Maintenance
5.1. Battery Replacement
The remote control requires 2 AAA batteries (not included). Replace batteries when the remote's performance diminishes or it stops responding.

Figure 3: Remote control with battery compartment open. This image shows where to insert the two AAA batteries, ensuring correct polarity.
- Remove Battery Cover: Slide the battery cover off the back of the remote control.
- Insert Batteries: Insert two new AAA batteries, ensuring correct polarity (+/-) as indicated inside the compartment.
- Replace Cover: Slide the battery cover back into place until it clicks securely.
Note: Dispose of old batteries responsibly according to local regulations.
6. Troubleshooting
If you encounter issues with your remote control, try the following solutions:
- Remote Not Responding:
- Check if the batteries are correctly inserted and not depleted. Replace if necessary (refer to Section 5.1).
- Ensure there are no obstructions between the remote and the bed base's receiver.
- Verify that the bed base is properly plugged into a working electrical outlet.
- Pairing Failure:
- Re-attempt the pairing procedure carefully, ensuring all steps are followed within the 15-second timeframe (refer to Section 3.2).
- Confirm that the control box indicator light is active when you press buttons on the remote during pairing.
- Double-check that your control box model is indeed Okin JLDK.37.06.06.
- Intermittent Operation:
- Weak batteries can cause intermittent operation. Replace them.
- Ensure the remote is within the maximum operating range (8 meters).
If problems persist after following these steps, contact customer support for further assistance.
7. Specifications
| Feature | Detail |
|---|---|
| Brand | Generic |
| Model Name | noe (Mfr Part Number: szh002) |
| Special Feature | Ergonomic |
| Color | Grey |
| Max Number of Supported Devices | 1 |
| Compatible Devices | Adjustable Bed |
| Connectivity Technology | Infrared |
| Controller Type | Button Control |
| Maximum Range | 8 Meters |
| Batteries Required | 2 AAA batteries (not included) |
| Item Weight | Approximately 2 Pounds |
| Manufacturer | SZHKHXD |
8. Warranty Information
This product comes with a 90-day warranty from the date of purchase. This warranty covers manufacturing defects under normal use. It does not cover damage resulting from misuse, accidents, unauthorized modifications, or improper installation.
For warranty claims, please retain your proof of purchase and contact customer support.
9. Customer Support
If you have any questions, require assistance with setup, or encounter issues not covered in this manual, please contact your retailer or the manufacturer for support.
When contacting support, please have your product model number (szh002) and a description of the issue ready.