1. Introduction
This instruction manual provides essential information for the proper installation, operation, and maintenance of your SEINECA Engine Oil Pressure Sensor, model 5149062AA. This sensor is a critical component designed to accurately measure your vehicle's engine oil pressure, ensuring optimal engine performance and preventing potential damage from low oil pressure conditions. Please read this manual thoroughly before installation and use.
2. Safety Information
Always observe the following safety precautions when handling or installing the oil pressure sensor:
- Ensure the vehicle's engine is off and cool before beginning any work.
- Disconnect the vehicle's battery to prevent accidental electrical shorts.
- Wear appropriate personal protective equipment, including safety glasses and gloves.
- Refer to your vehicle's specific service manual for detailed instructions and torque specifications.
- Dispose of old parts and fluids responsibly according to local regulations.
3. Product Overview
The SEINECA Engine Oil Pressure Sensor (Model: 5149062AA) is a precision-engineered component designed to replace the original equipment sensor in compatible vehicles. It features a durable brass body and a robust electrical connector, ensuring reliable performance and accurate oil pressure readings.

Figure 3.1: Top view of the SEINECA Engine Oil Pressure Sensor, showing the threaded brass fitting and electrical connector.

Figure 3.2: Side view of the SEINECA Engine Oil Pressure Sensor, highlighting its compact design.
4. Compatibility
This oil pressure sensor is compatible with a wide range of Jeep, Dodge, and Chrysler vehicles. Please verify your vehicle's make, model, and year against the list below to ensure proper fitment. This sensor replaces OEM part numbers including 5149062AA, 5149062AB, 56028807AA, and others.
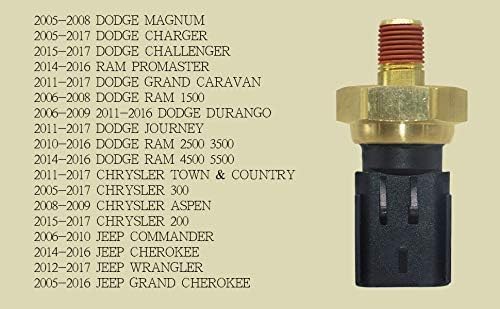
Figure 4.1: Visual representation of compatible vehicle models and years.
Compatible Vehicle Models:
- Chrysler: 200 (2011-2016), 300 (2005-2016), Aspen (2007-2009), Town & Country (2011-2016), C/V (2012-2015)
- Jeep: Cherokee (1999-2016), Commander (2006-2010), Grand Cherokee (1999-2016), Liberty (2002-2006), Wrangler (1999-2016)
- Dodge: Avenger (2011-2014), Challenger (2008-2016), Charger (2006-2016), Durango (2002-2016), Grand Caravan (2011-2016), Journey (2011-2016), Magnum (2005-2008), Viper (2003-2017)
- Ram: 1500 Pickup (2005-2010), 2500 Pickup (2009-2010), 3500 Pickup (2009), 1500/2500/3500 (2011-2016), 4500/5500 (2015-2016), Promaster 1500/2500/3500 (2014-2016)
- SRT: Viper (2013-2014)
- Volkswagen: Routan (2012-2014)
Replaces OEM Part Numbers:
- 1S10853, 1S7937, 5080472AA, 5093908AA, 5149062AA, 5149062AB, 5149064AA, 514906AA, 56028807AA, 56028807AB, 56044777AA, 68060337AA, 7B0919081B, 7B0919081C, PS401, PS598, PS701, 1S6755, PS317, OPS186
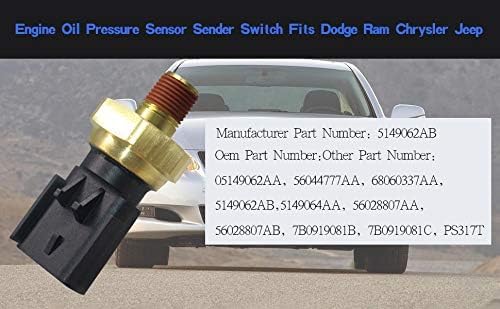
Figure 4.2: Visual reference for compatible OEM and other part numbers.
5. Setup and Installation
Replacing an engine oil pressure sensor typically involves a few key steps. While specific procedures may vary by vehicle model, the general process is as follows:
- Preparation: Park the vehicle on a level surface, engage the parking brake, and allow the engine to cool completely. Disconnect the negative terminal of the battery.
- Locate the Sensor: Consult your vehicle's service manual to identify the exact location of the oil pressure sensor. It is typically located near the oil filter housing or on the engine block.
- Disconnect Wiring: Carefully disconnect the electrical connector from the old sensor.
- Remove Old Sensor: Use an appropriate wrench or socket to unscrew and remove the old oil pressure sensor. Be prepared for a small amount of oil to leak out.
- Install New Sensor: Apply a small amount of thread sealant (if recommended by your vehicle's manual) to the threads of the new SEINECA sensor. Carefully thread the new sensor into place by hand to avoid cross-threading.
- Tighten Sensor: Use the wrench or socket to tighten the new sensor to the vehicle manufacturer's specified torque. Do not overtighten.
- Reconnect Wiring: Reconnect the electrical connector to the new sensor, ensuring it clicks securely into place.
- Final Steps: Reconnect the vehicle's battery. Check the engine oil level and top off if necessary. Start the engine and check for any oil leaks around the new sensor. Observe the oil pressure gauge or warning light to ensure proper operation.
If you are unsure about any step, it is recommended to seek assistance from a qualified automotive technician.

Figure 5.1: Bottom view of the sensor, showing the electrical connection pins.
6. Operating Principles
The engine oil pressure sensor is a transducer that converts oil pressure into an electrical signal. This signal is then sent to the vehicle's engine control unit (ECU) or directly to the oil pressure gauge on the dashboard. The ECU uses this information to monitor the engine's lubrication system and can trigger a warning light if the pressure falls below a safe threshold. A properly functioning sensor ensures that the driver is alerted to critical oil pressure issues, helping to prevent severe engine damage.
7. Maintenance
The SEINECA Engine Oil Pressure Sensor is designed for long-term reliability and typically requires no routine maintenance. However, it is good practice to:
- Regularly check your engine oil level and ensure it is within the recommended range.
- Perform oil and filter changes according to your vehicle manufacturer's schedule.
- Inspect the sensor's electrical connector during routine vehicle maintenance for any signs of corrosion or damage.
If the sensor or its wiring appears damaged, it should be replaced.
8. Troubleshooting
If you experience issues related to oil pressure after installing or while using the sensor, consider the following:
- Oil Pressure Warning Light On:
- Check Oil Level: Ensure the engine oil level is correct.
- Sensor Connection: Verify the electrical connector is securely attached to the sensor.
- Wiring: Inspect the wiring harness for any cuts, fraying, or corrosion.
- Sensor Failure: If oil level is good and connections are secure, the sensor itself may be faulty or there could be an actual low oil pressure issue.
- Inaccurate Oil Pressure Gauge Reading:
- Sensor Malfunction: The sensor may be sending an incorrect signal.
- Gauge/Cluster Issue: The problem might be with the vehicle's instrument cluster or gauge itself.
- Wiring: Intermittent connection issues in the wiring can cause erratic readings.
- Oil Leak Around Sensor:
- Improper Torque: The sensor may not be tightened to the correct specification.
- Damaged Threads: Inspect the threads on both the sensor and the engine block for damage.
- Sealant: Ensure appropriate thread sealant was used if required.
For persistent issues, it is recommended to consult a professional mechanic for diagnostic testing.
9. Specifications
| Attribute | Detail |
|---|---|
| Product Name | Engine Oil Pressure Sensor |
| Brand | SEINECA |
| Model Number | 5149062AA |
| Manufacturer Part Number | 5149062AA |
| ASIN | B0F5VSTL38 |
| Material | High-quality brass and durable plastic |
| Function | Measures engine oil pressure |
| Replaces OEM Numbers | 1S10853, 1S7937, 5080472AA, 5093908AA, 5149062AA, 5149062AB, 5149064AA, 514906AA, 56028807AA, 56028807AB, 56044777AA, 68060337AA, 7B0919081B, 7B0919081C, PS401, PS598, PS701, 1S6755, PS317, OPS186 |
10. Warranty and Support
SEINECA products are manufactured to high quality standards. For specific warranty information or technical support, please refer to the product listing on Amazon or visit the official SEINECA brand store. You can find the brand store at: SEINECA Amazon Store.
When contacting support, please have your product model number (5149062AA) and purchase details ready.