JHMFDDSB TAT-002
JHMFDDSB Twister Arm Trainer User Manual
Model: TAT-002
Introduction
This manual provides essential information for the safe and effective use of your JHMFDDSB Twister Arm Trainer. Designed for strength building, this adjustable resistance device helps target chest, arm, and shoulder muscles. Please read this manual thoroughly before initial use and retain it for future reference.
Safety Information
WARNING: Improper use can lead to serious injury.
- Consult a physician before starting any new exercise program.
- Always inspect the device for any damage or wear before each use. Do not use if any components are damaged.
- Ensure all springs are securely attached and properly aligned before exercising.
- Start with a lower resistance level and gradually increase as your strength improves.
- Perform exercises in a controlled manner. Avoid sudden, jerky movements.
- Keep hands and fingers clear of moving parts, especially during spring installation and removal.
- Children should not use this device without adult supervision.
- Store the trainer in a safe place, away from children and pets.
Package Contents
Your JHMFDDSB Twister Arm Trainer package includes:
- 2 x Handles
- 4 x Spring Fitness Bars (providing 6 different resistance levels)
- 1 x Instruction Manual (this document)
- 1 x Training Poster

Image: Overview of the JHMFDDSB Twister Arm Trainer, showing the main unit, detachable springs, and the included training poster. A man and woman are depicted using the device.
Setup and Assembly
The Twister Arm Trainer features a modular design allowing for adjustable resistance. Follow these steps to assemble and set your desired resistance level:
- Identify Components: You have two handles and four spring bars. The spring bars are designed to provide different resistance levels when combined.
- Select Resistance: The trainer offers 6 progressive resistance levels from 30 lbs to 120 lbs. Each spring bar is marked with its resistance value. You will always use two spring bars for assembly.
- Low Resistance (Leather-Wrapped Springs): 30 lbs, 45 lbs, 60 lbs
- High Resistance (Leather-Wrapped Springs): 90 lbs, 105 lbs, 120 lbs

Image: Illustration of the six progressive resistance levels (30, 45, 60, 90, 105, 120 lbs) achieved by selecting specific spring bars. The image shows two types of leather-wrapped springs for low and high resistance.
- Assembly Steps:

Image: A four-step visual guide demonstrating the assembly process of the Twister Arm Trainer. It shows aligning holes, pressing down the spring bar, aligning the other side, and the final assembled product.
- Step 1 (Hole Alignment): Take one handle and one selected spring bar. Align the pin on the spring bar with the corresponding hole on the handle.
- Step 2 (Press Down): Press the spring bar firmly into the handle until the pin is fully engaged.
- Step 3 (Align Other Side): Take the second handle. Align the other end of the spring bar with the hole on the second handle and press down to secure it.
- Step 4 (Repeat for Second Bar): Repeat Steps 1-3 with the second selected spring bar to complete the assembly. Ensure both spring bars are of the same resistance level for balanced training.
- Verify Connection: Gently pull on the handles to ensure both spring bars are securely locked into place before beginning your workout.
The spring bars feature a resilience leather cover wrapping, which enhances durability and user safety by preventing pinch injuries and extending the spring's lifespan.
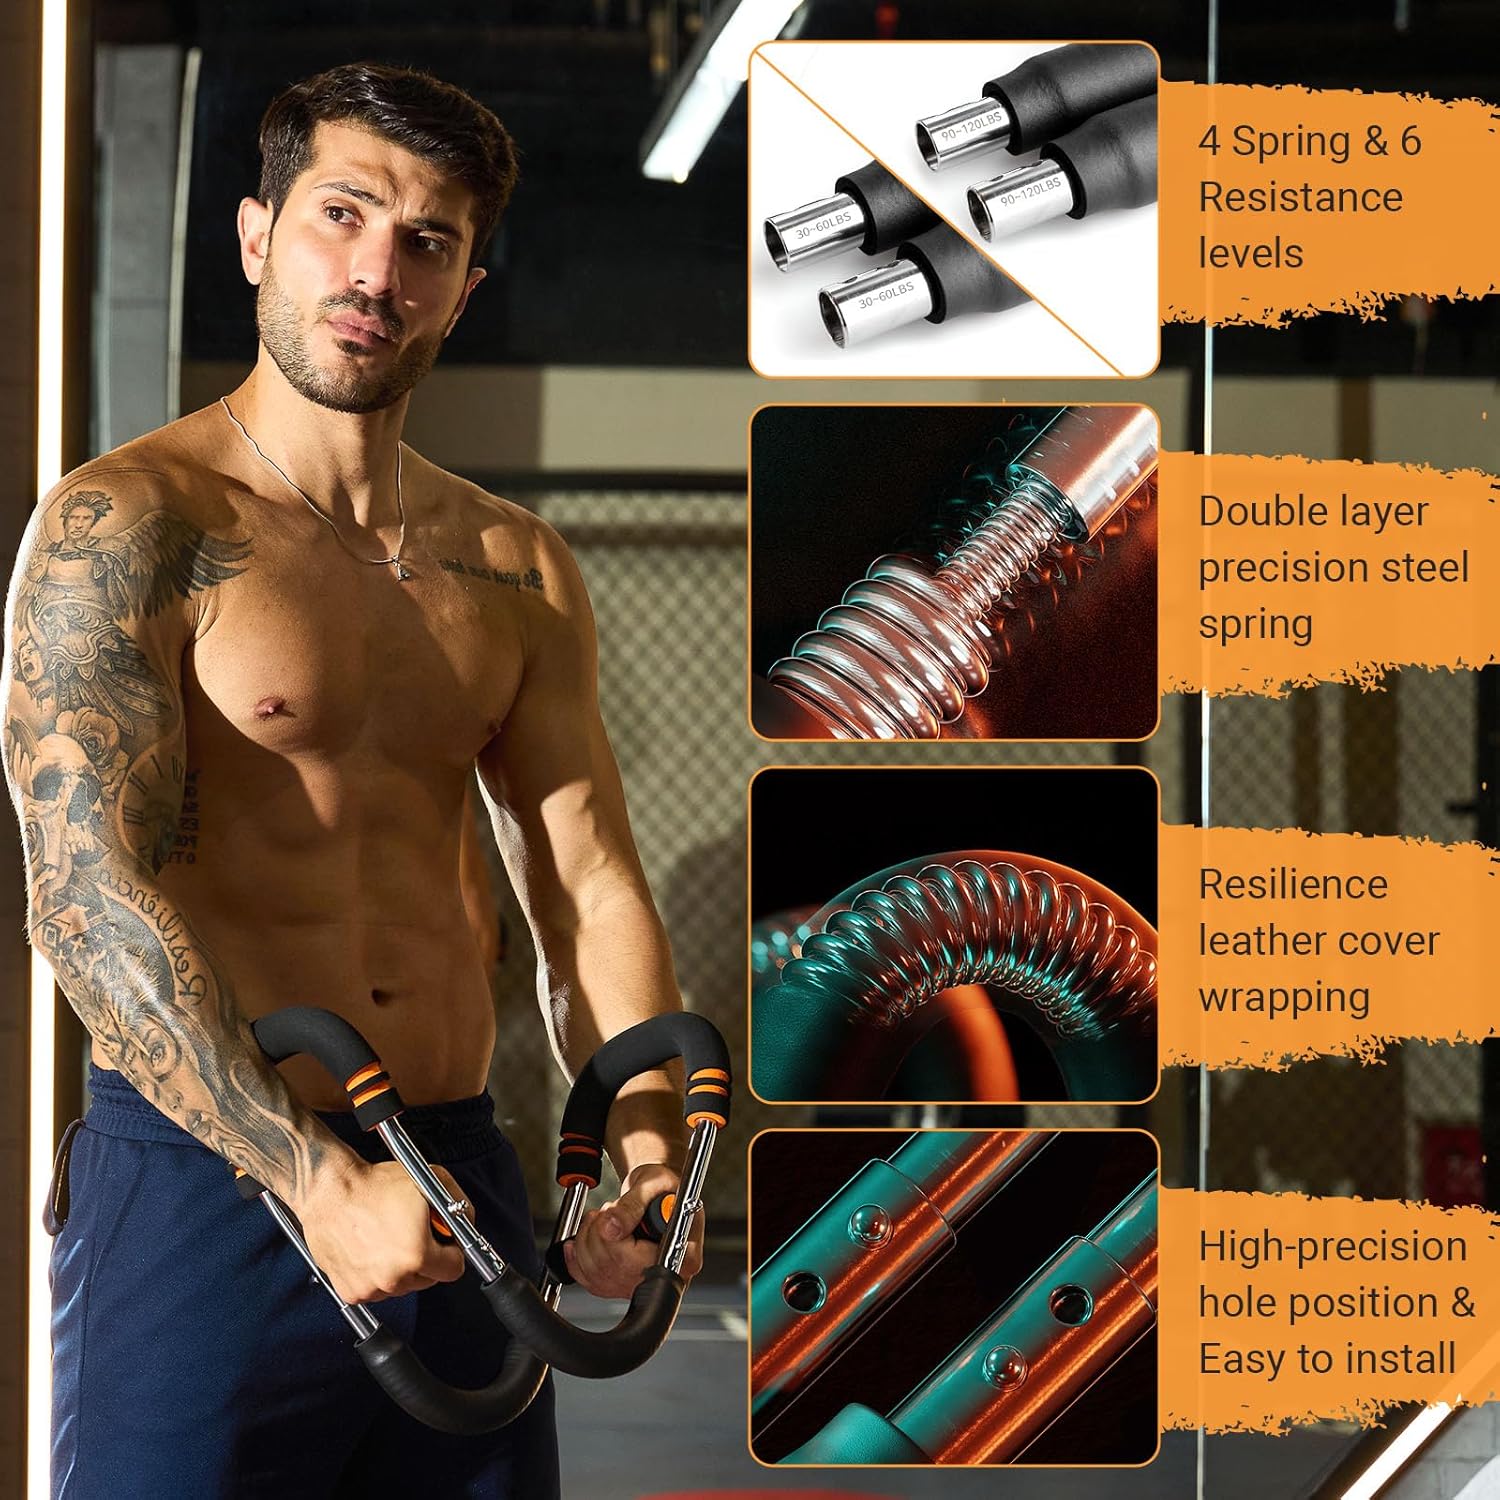
Image: Detailed view of the Twister Arm Trainer's construction, showing the double-layer precision steel spring, the protective resilience leather cover, and the high-precision holes for secure and easy assembly.
Operating Instructions
The Twister Arm Trainer is versatile and can be used for various exercises targeting different muscle groups. Refer to the included Training Poster for a comprehensive guide to 10 different exercises.

Image: A man using the Twister Arm Trainer, with the included training poster visible in the background, illustrating various exercises for different muscle groups.
General Usage Tips:
- Warm-up: Always perform a light warm-up before starting your workout to prepare your muscles.
- Proper Form: Maintain proper posture and form during exercises to maximize effectiveness and prevent injury.
- Controlled Movements: Execute movements slowly and with control, focusing on the muscle contraction. Avoid using momentum.
- Breathing: Breathe deeply and consistently throughout your exercises. Exhale during the exertion phase and inhale during the release phase.
- Rest: Allow adequate rest between sets and workouts for muscle recovery.
Example Exercises:
The trainer can be used to target various muscle groups, including:
- Chest Exercise: Hold the trainer with both hands in front of your chest, handles facing each other. Press the handles together, engaging your pectoral muscles.
- Biceps Exercise: Hold one handle with one hand, and the other handle with the other hand, palms facing up. Curl the trainer upwards, engaging your biceps.
- Back Exercise: Hold the trainer behind your head, handles facing outwards. Pull the handles apart, squeezing your shoulder blades together.
- Thigh Exercise: Place the trainer between your thighs while seated. Squeeze your thighs together to engage inner thigh muscles.

Image: Visual examples of how to use the Twister Arm Trainer for Chest, Thigh, Back, and Biceps exercises, highlighting the targeted muscle groups.
The compact and detachable design allows for use in various locations, including home, office, gym, or while traveling.
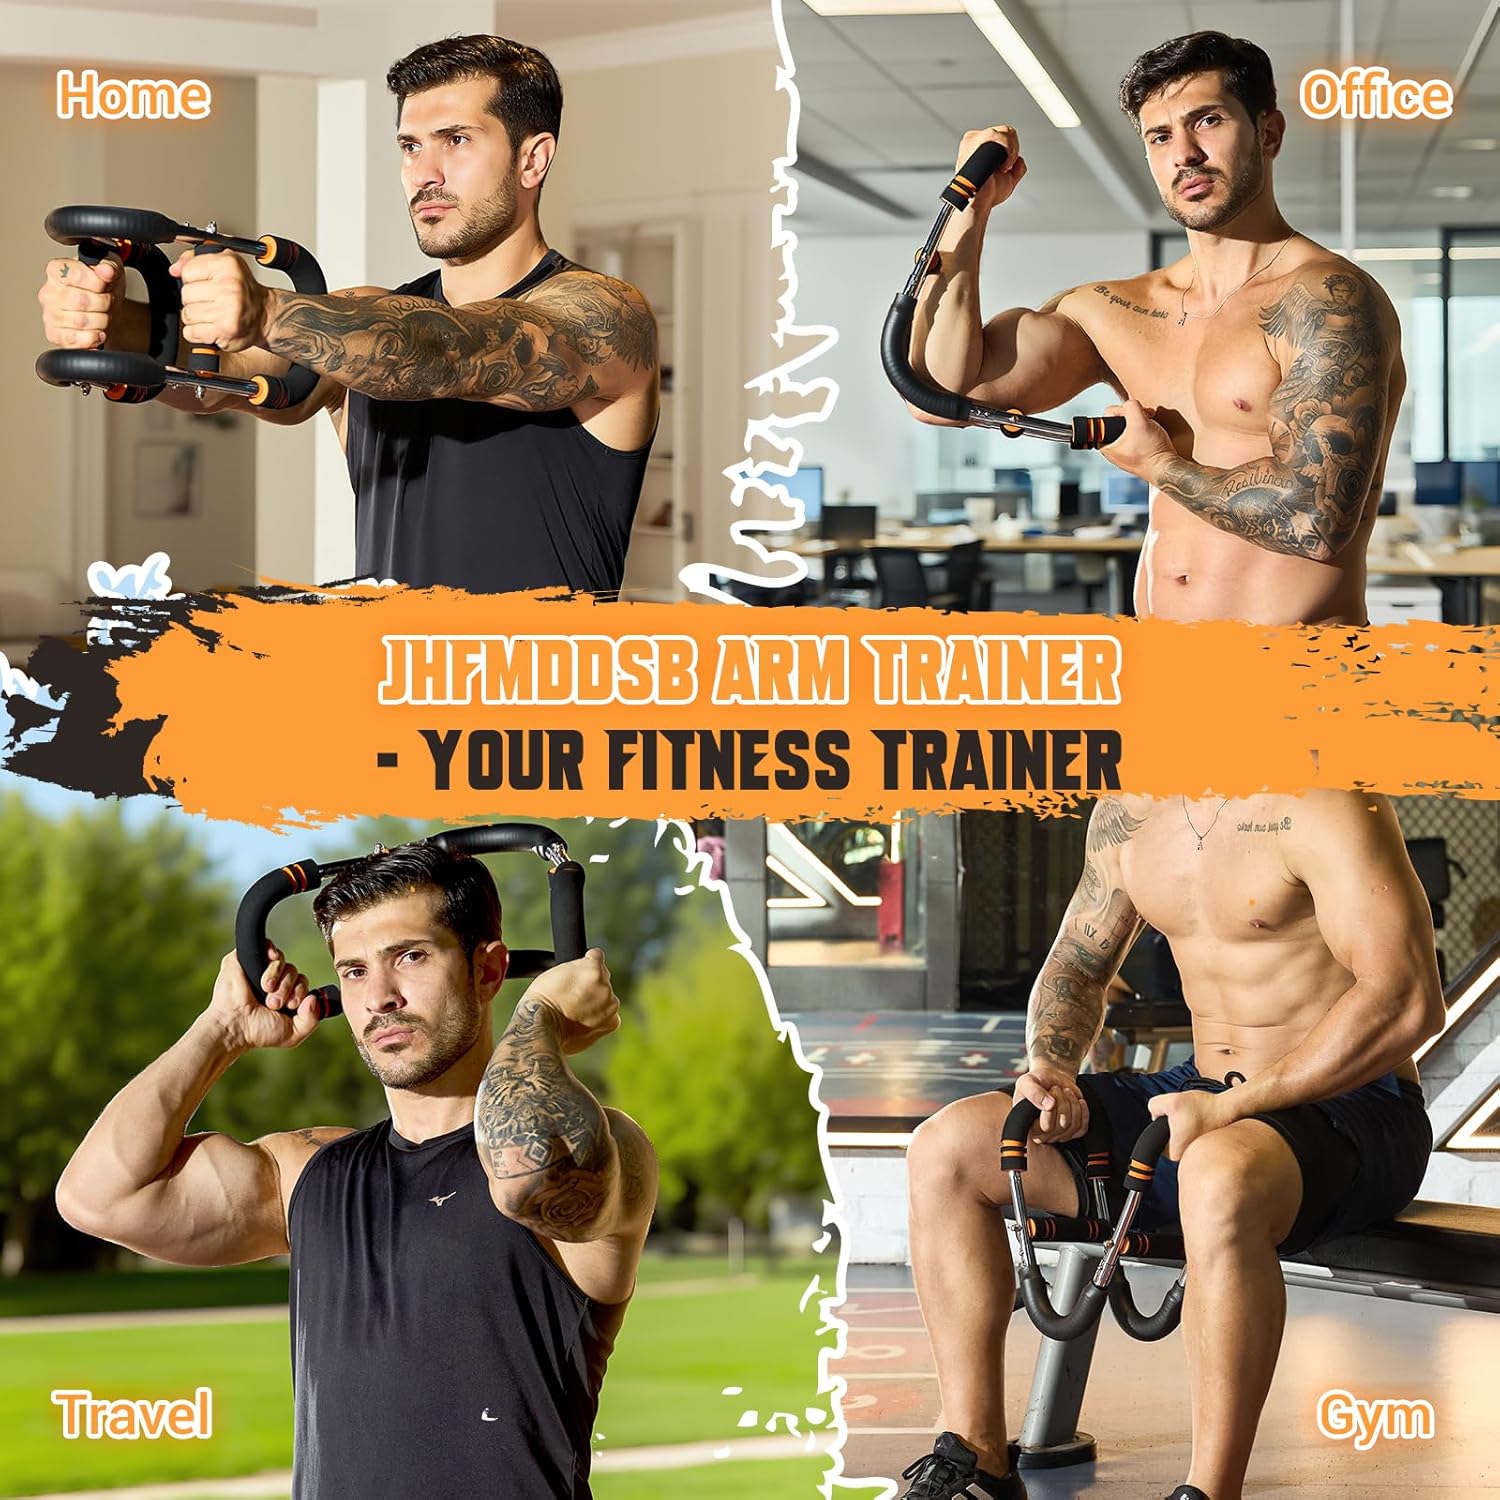
Image: A man demonstrating the versatility of the JHMFDDSB Arm Trainer, using it in various settings such as home, office, gym, and during travel.
Maintenance
- Cleaning: Wipe down the handles and spring bars with a damp cloth after each use to remove sweat and dirt. Do not use abrasive cleaners.
- Storage: Store the trainer in a cool, dry place away from direct sunlight and extreme temperatures. The detachable design allows for compact storage.
- Inspection: Regularly inspect the spring bars and handle connections for any signs of wear, cracks, or damage. Ensure the leather wrapping on the springs is intact.
- Lubrication: No lubrication is required for the springs or connection points.
Troubleshooting
| Problem | Possible Cause | Solution |
|---|---|---|
| Trainer feels unstable or loose. | Spring bars not fully engaged in handles. | Disassemble and re-assemble, ensuring pins on spring bars click securely into handle holes. |
| Resistance feels uneven. | Mismatched spring bars used. | Ensure both installed spring bars have the same resistance rating. |
| Difficulty changing resistance levels. | Pins are stuck or misaligned. | Apply firm, even pressure. Wiggle gently if needed. Ensure no debris is obstructing the mechanism. |
| Visible damage to springs or handles. | Wear and tear, or accidental damage. | Discontinue use immediately. Contact customer support for replacement parts or warranty claim. |
Specifications
| Brand | JHMFDDSB |
| Model Name | TAT-002 |
| Material | Metal |
| Color | Orange |
| Item Weight | 5.4 Pounds |
| Product Dimensions | 26.18"L x 7.09"W |
| Tension Level | 30-120 LBS |
| Number of Resistance Levels | 6 |
| Included Components | 2 Handles, 4 Spring Fitness Bars, Instruction Manual, Training Poster |
| Special Features | Adjustable, Anti-Snap, Non-Slip |
| Recommended Uses | Workout, Body Building, Exercise and Fitness, Strength Training |
| UPC | 747923922704 |
Warranty and Support
Warranty: The JHMFDDSB Twister Arm Trainer comes with a 1-Year Warranty from the date of purchase. This warranty covers manufacturing defects and material flaws under normal use. It does not cover damage caused by misuse, accidents, unauthorized modifications, or normal wear and tear.
Customer Support: For any questions, concerns, or warranty claims, please contact our customer support team. Refer to the contact information provided with your purchase or on the official JHMFDDSB website. We are committed to providing professional and caring product consultation services to ensure your satisfaction.
Related Documents - TAT-002
 |
Exergen TemporalScanner Disposable Caps Instructions for Use Instructions for use of Exergen TemporalScanner disposable thermometer caps (TAT-5000S, TAT-2000 series) for preventing contamination and ensuring hygienic temperature measurements. |
 |
Exergen TAT-5000 TemporalScanner Infrared Thermometer Operator's Manual Operator's manual for the Exergen TAT-5000 TemporalScanner, a handheld infrared thermometer for accurate and gentle forehead temperature measurement. Includes safety instructions, operating procedures, care and maintenance, troubleshooting, specifications, and electromagnetic compatibility declarations. |
 |
Exergen TemporalScanner TAT-2000C/Original Home Model: Instructions for Use Comprehensive instructions for the Exergen TemporalScanner TAT-2000C/Original Home Model, covering setup, usage, safety precautions, FAQs, and specifications for accurate temporal artery temperature measurement. |
 |
Exergen TemporalScanner TAT-5000S Operation Manual: Accurate Non-Invasive Temperature Measurement Comprehensive operation manual for the Exergen TemporalScanner TAT-5000S, an infrared temporal artery thermometer designed for accurate, non-invasive temperature measurement in clinical settings. Learn about its features, usage, safety, and maintenance. |
 |
Exergen TemporalScanner TAT-2000 with Bluetooth: User Manual and Specifications Comprehensive user manual and technical specifications for the Exergen TemporalScanner TAT-2000 with Bluetooth infrared thermometer, detailing its use, features, safety information, and clinical accuracy. |
 |
Biomatik Rat TAT (Thrombin/Antithrombin Complex) ELISA Kit User Manual User manual for the Biomatik Rat TAT (Thrombin/Antithrombin Complex) ELISA Kit (Catalog No: EKE62285). Includes instructions for use, storage, sample collection, and assay procedures. |
Ask a question about this manual
Ask about setup, troubleshooting, compatibility, parts, safety, or missing instructions. Manuals+ will review the question and use this page’s manual context to help answer it.