Introduction
Thank you for choosing the Wildeway FW11 Folding Electric Bike. This manual provides essential information for the safe assembly, operation, and maintenance of your e-bike. Please read it thoroughly before your first ride and keep it for future reference. Proper understanding and adherence to these instructions will ensure optimal performance and longevity of your electric bicycle.
Safety Information
General Safety Guidelines
- Always wear a helmet and appropriate safety gear when riding.
- Familiarize yourself with local traffic laws and regulations for electric bicycles.
- Perform a pre-ride inspection before each use, checking brakes, tires, battery, and all fasteners.
- Do not ride under the influence of alcohol or drugs.
- Avoid riding in adverse weather conditions, such as heavy rain, snow, or ice.
- Ensure all lights are functional, especially when riding in low-light conditions.
Braking System
The Wildeway FW11 is equipped with front and rear disc brakes. These provide powerful and consistent stopping power in various weather conditions. Regularly check brake pads for wear and ensure proper adjustment for optimal safety.
Lighting
The e-bike features a super bright LED headlight, brake rear light, and warning spoke reflectors. Always use the headlight when riding in low visibility and ensure the brake light is functioning correctly to alert others.
Setup and Assembly
The Wildeway FW11 electric bike comes partially assembled. Follow these steps carefully for complete assembly. For a visual guide, please refer to the installation video below.
Video: Comprehensive Installation Guide for Wildeway Electric Bike. This video covers unboxing, accessory identification, and step-by-step assembly of the kickstand, front wheel, handlebars, headlight, mudguards, seat, taillight, pedals, and battery, followed by a functional test.
1. Unboxing and Accessory Identification
Carefully remove all components from the packaging. Identify the main bike body, front wheel, seat, pedals, kickstand, power adapter, protective bracket, screws, tool bag, and instruction manual. Refer to the beginning of the installation video for a detailed overview of included accessories.
2. Install Kickstand
Locate the kickstand and its mounting screws. Align the kickstand with the designated holes on the bike frame and secure it by tightening the screws. (Refer to 0:13 in the installation video).
3. Install Front Wheel
Remove the fork protector bar and brake pads from the front fork. Thread the front wheel onto the fork, ensuring the brake disc is correctly engaged with the brake caliper. Reinstall the remaining parts and tighten the screws. (Refer to 0:23 in the installation video).
4. Install Handlebars
Adjust the handlebar retainer. Remove the retaining hardware from the handlebar slots, place the handlebars, and reinstall the hardware, tightening the screws in a criss-cross pattern after adjusting the handlebars to the appropriate angle. (Refer to 1:00 in the installation video).
5. Install Headlight and Mudguards
Remove the screws on both sides of the headlight. Mount the headlight onto its bracket, noting the correct order of screws and washers. Connect the headlight to the dashboard, ensuring the arrows on the connectors align. Remove the screws for the mudguards, align the mudguards with the holes, and tighten the screws. (Refer to 2:23 in the installation video).
6. Install Seat and Taillight
Select and assemble the appropriate screws and accessories for the seat and taillight. Place the seat in position, aligning it with the holes, and tighten the short screws. Connect the rear light, ensuring the arrows align. Place the rear frame in position, align with the holes, and secure with the corresponding screws and accessories. Finally, tighten all fasteners using a wrench and an Allen wrench. (Refer to 3:18 in the installation video).
7. Install Pedals
Note the difference between the left (L) and right (R) pedals. Install each pedal into its corresponding crank arm and tighten securely. (Refer to 5:12 in the installation video).
8. Install Battery
Insert the battery into its compartment on the bike frame and secure it with the key. Turn on the power and check the battery level. (Refer to 5:51 in the installation video).
Operating Instructions
Functional Test
After assembly, perform a functional test to ensure all components are working correctly. (Refer to 6:10 in the installation video).
- Test the instrument panel.
- Test the headlights.
- Test the brake lights.
- Test the turn signals.
- Test gear shifting.
- Test the accelerator pedal.
- Test the brakes.
LCD Display and Controls

Image: Detailed view of the Wildeway FW11 LCD screen and handlebar controls.
The full-color LCD display provides essential riding information, including battery indicator, speed, trip mileage, ODO mileage, average speed, and riding power. It also features cruise control and a USB charging port for your devices.
Power Modes
- Electric Mode: Provides power directly from the motor, offering up to 60 miles of range.
- Pedal Assist Mode: The motor assists your pedaling, extending the range up to 90 miles.
- Manual Mode: Ride the bike like a traditional bicycle without motor assistance.
Gear Shifting
The 7-speed shifting system allows you to adjust your pedaling effort to match terrain and speed. Use the shifter on the handlebars to change gears smoothly.
Folding the Bike
The FW11 is designed for portability with a quick folding mechanism. This allows for easy storage and transport in a car trunk or on public transport.

Image: The Wildeway FW11 folded for compact storage.
Video: Demonstration of the Wildeway Folding Electric Bike's long range and folding capabilities.
Maintenance
Battery Care
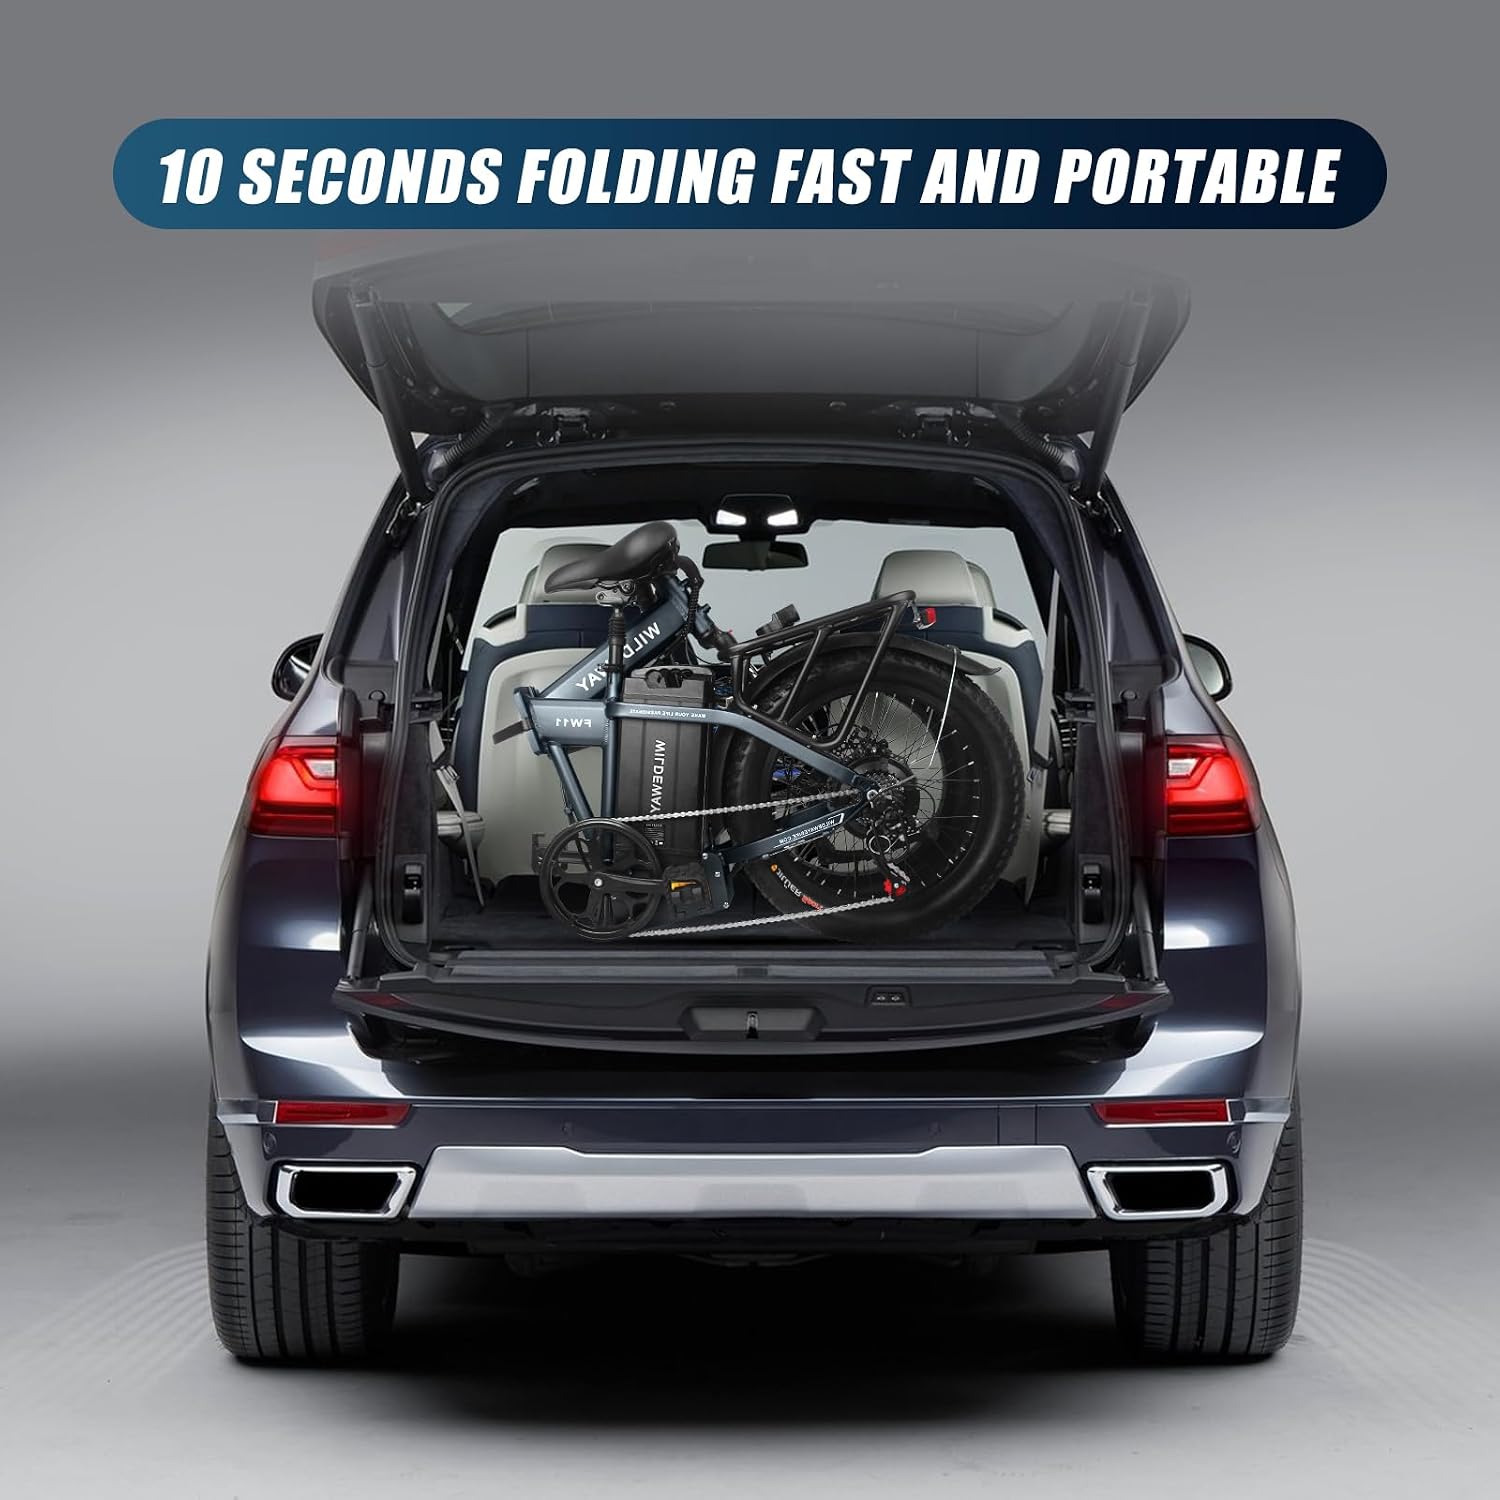
Image: The Wildeway FW11's 48V 32Ah removable battery.
- Charge the 32Ah high-capacity battery using the provided 3A fast charger.
- Avoid completely draining the battery before recharging.
- Store the battery in a cool, dry place when not in use, and charge it periodically if stored for long periods.
Tire Maintenance

Image: Close-up of the 20" x 3.0" fat tire, designed for various terrains.
- Regularly check the tire pressure of the 20" x 3.0" fat tires. Maintain pressure within the recommended range indicated on the tire sidewall.
- Inspect tires for any punctures, cuts, or excessive wear.
Brake System Check
- Periodically check the front and rear disc brakes for proper function and responsiveness.
- Ensure brake levers are firm and engage smoothly.
- Inspect brake pads for wear and replace them if necessary.
General Cleaning
Clean your e-bike regularly with a damp cloth. Avoid using high-pressure water jets directly on electrical components.
Troubleshooting
If you encounter any issues with your Wildeway FW11, please refer to the following common problems and solutions:
- Bike not powering on: Check if the battery is properly installed and charged. Ensure the power switch on the battery is turned on.
- Motor not assisting: Verify that the pedal assist level is set above zero on the LCD display. Check all cable connections for looseness.
- Brakes feel spongy: This may indicate air in the hydraulic lines or worn brake pads. Consult a professional bike mechanic for inspection and service.
- Abnormal noise from front wheel: Ensure the front wheel screws are tightened correctly. (Refer to 0:31 in the front wheel installation video for proper tightening to avoid noise).
For more complex issues or if the problem persists, please contact customer support.
Specifications
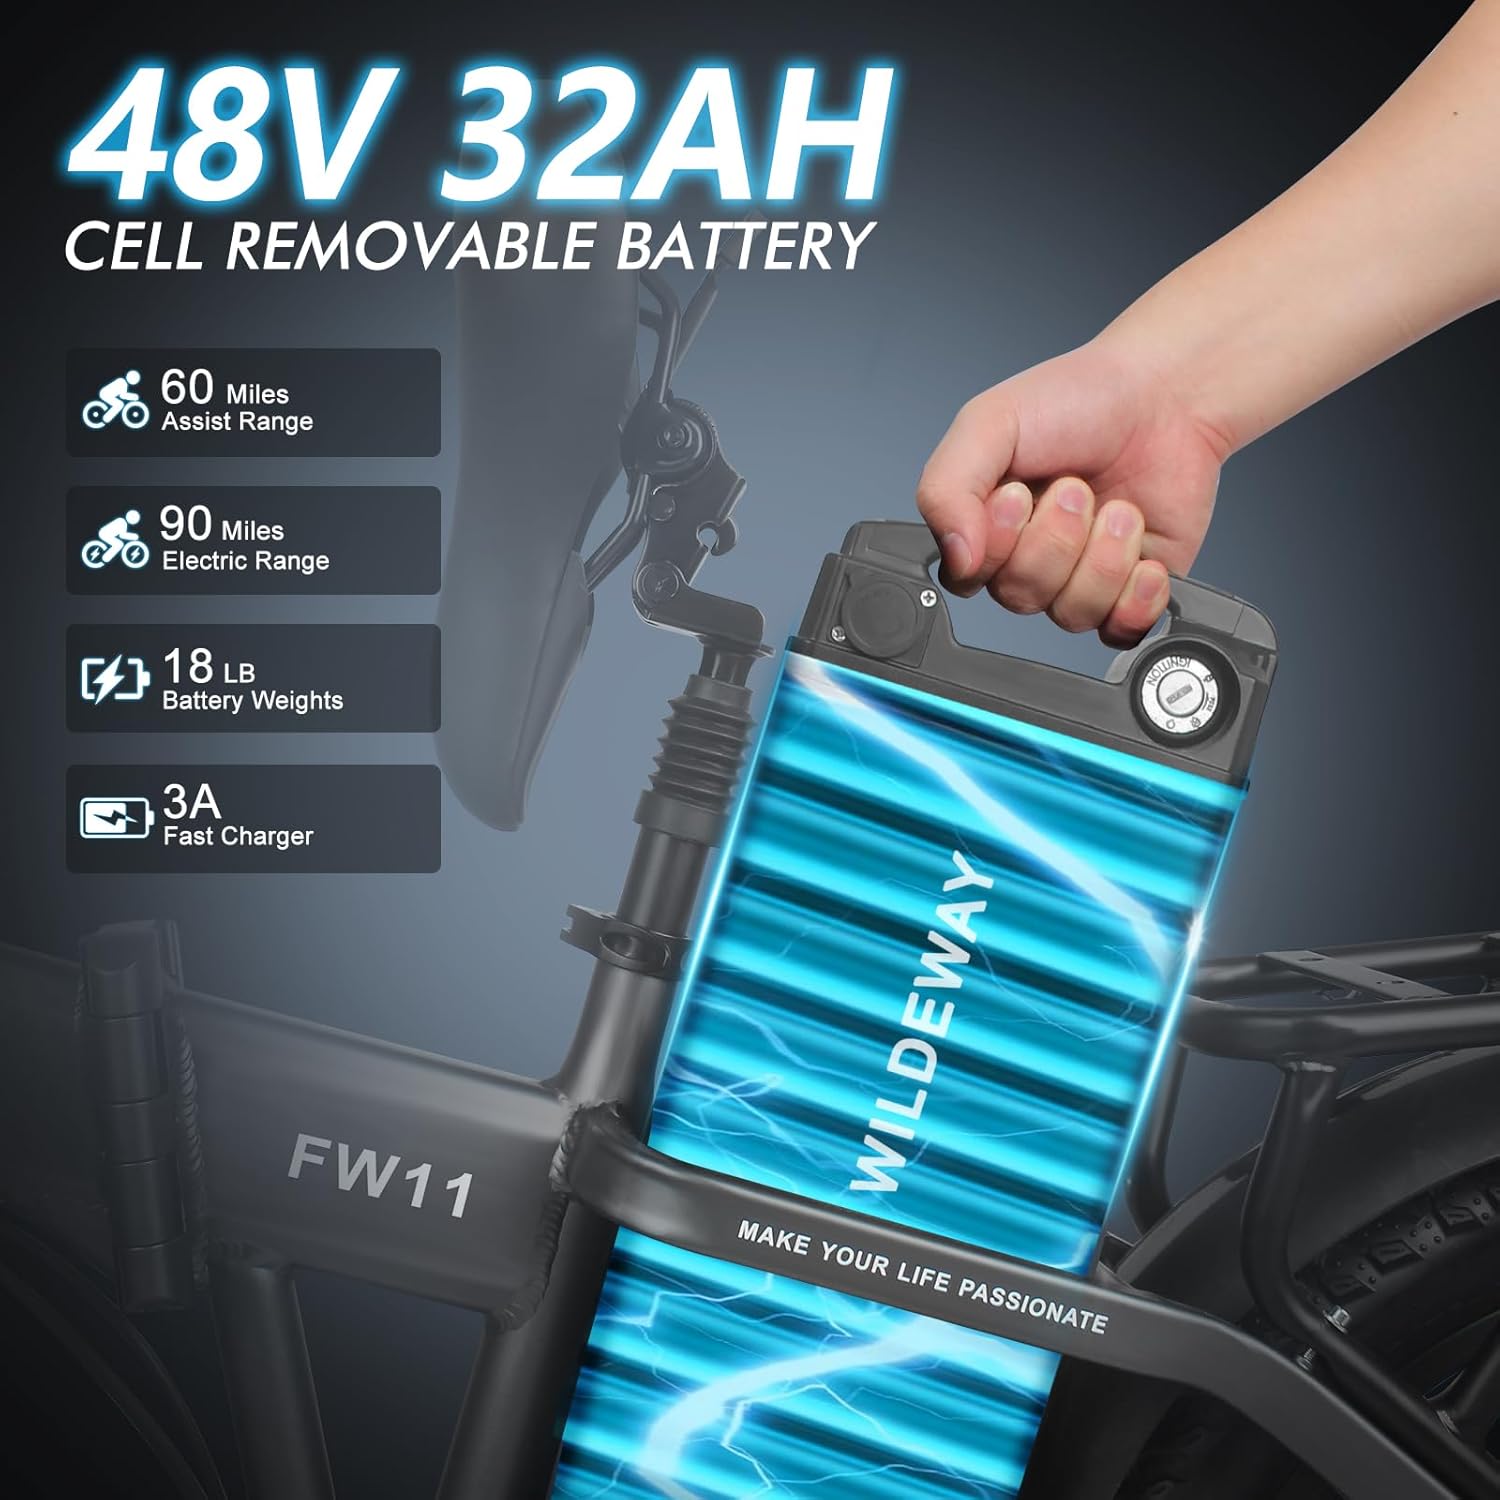
Image: Detailed product dimensions and weight for the Wildeway FW11.
| Feature | Detail |
|---|---|
| Bike Type | Electric Bike |
| Age Range | Adult |
| Brand | Wildeway |
| Model Number | FW11 |
| Motor | 750W 48V Brushless Motor |
| Battery | 32Ah High-Capacity (1536 Watt Hours) |
| Max Speed | 28 MPH |
| Electric Mode Range | 60 Miles |
| Assist Mode Range | 90 Miles |
| Wheel Size | 20 Inches (3.0" Fat Tires) |
| Suspension Type | Front Suspension Fork & Saddle Shock Suspension |
| Brake Style | Disc Brakes (Front and Rear) |
| Number of Speeds | 7-speed |
| Folded Size | 29.5 x 19.3 x 37 inches |
| Bicycle Weight | 73.2 lbs |
| Maximum Weight Recommendation | 330 Pounds |
| Assembly Required | No (85% pre-assembled) |
Warranty Information
The Wildeway FW11 Electric Bike comes with a Limited Warranty. Please refer to the warranty card included in your packaging for specific terms and conditions. Keep your proof of purchase for any warranty claims.
Customer Support
For any product support needs, including assembly questions or troubleshooting, please follow these steps:
- Click on your order or the seller name on the purchase platform.
- Send us videos or photos to clearly illustrate your problem.
- Our support team aims to resolve issues within 24 hours.
Our warehouse is located in California. Orders are processed and shipped within 1-2 business days, with a typical shipping time of 3-7 days.