1. Introduction
The VAMHFLDR MST-90+14V 120A Automotive Voltage Regulator Stabilizer is an intelligent power processor designed for automotive coding and programming applications. It provides a stable and regulated voltage supply to prevent damage to vehicle electronic systems during diagnostic and programming procedures. This manual provides essential information for the safe and effective operation of your device.
2. Product Features
- Stable and Reliable Operation: Ensures consistent power delivery for sensitive automotive electronics.
- High Conversion Efficiency: Utilizes synchronization rectification technology for optimal performance.
- Multiple Intelligent Protection Functions: Safeguards against various electrical anomalies.
- Durable Construction: Features excellent heat dissipation and a long service life.
- Environmental Resistance: Adopted potting technology for waterproof, dust-proof, moisture-proof, and shock-proof characteristics, suitable for outdoor use.
- Integrated Protections: Includes over-current protection and over-temperature protection.
3. Safety Information
Please read and understand all safety warnings before operating the device. Failure to follow these instructions may result in injury or damage to the equipment or vehicle.
- Power Socket Requirement: Always use a power socket rated for over 10A.
- Connection Verification: Before turning on the power, confirm that all connections are secure and correct.
- Operation State: Do not operate or adjust the charger when the power is ON, unless specifically instructed.
- Engine Start Prohibition: It is strictly prohibited to start the vehicle engine while the device is connected and charging.
4. Setup and Connections
Follow these steps to properly set up and connect the voltage regulator stabilizer:
- Connect Power Input: Connect the device's power input line to a suitable 220V AC power outlet (European plug variant).
- Connect Battery Charging Wires: Connect the red positive (+) charging wire to the positive terminal of the vehicle battery and the black negative (-) charging wire to the negative terminal of the vehicle battery.
- Secure Connections: After connecting the charging wires, ensure they are screwed tight and secure to prevent loose connections.
- Final Check: Before proceeding, double-check all connections to ensure they are correct and firmly attached.

Image 4.1: The MST-90+ unit connected to a vehicle battery using the provided red (positive) and black (negative) cables.

Image 4.2: The MST-90+ unit showing the European power plug and the red and black battery connection cables.
5. Operating Instructions
Once the device is properly connected, follow these steps for operation:
- Power On: Open the power switch. LED1 will illuminate, and the display window will show the normal charging voltage and current. LED2 will also light up.
- Battery Condition Check: The device will indicate "Battery bad" if an over-discharged battery (voltage below 8V) is connected. Do not attempt to charge such batteries.
- Charging Completion: When the battery is fully charged, the charger will automatically cut off the input power and display "charge end".
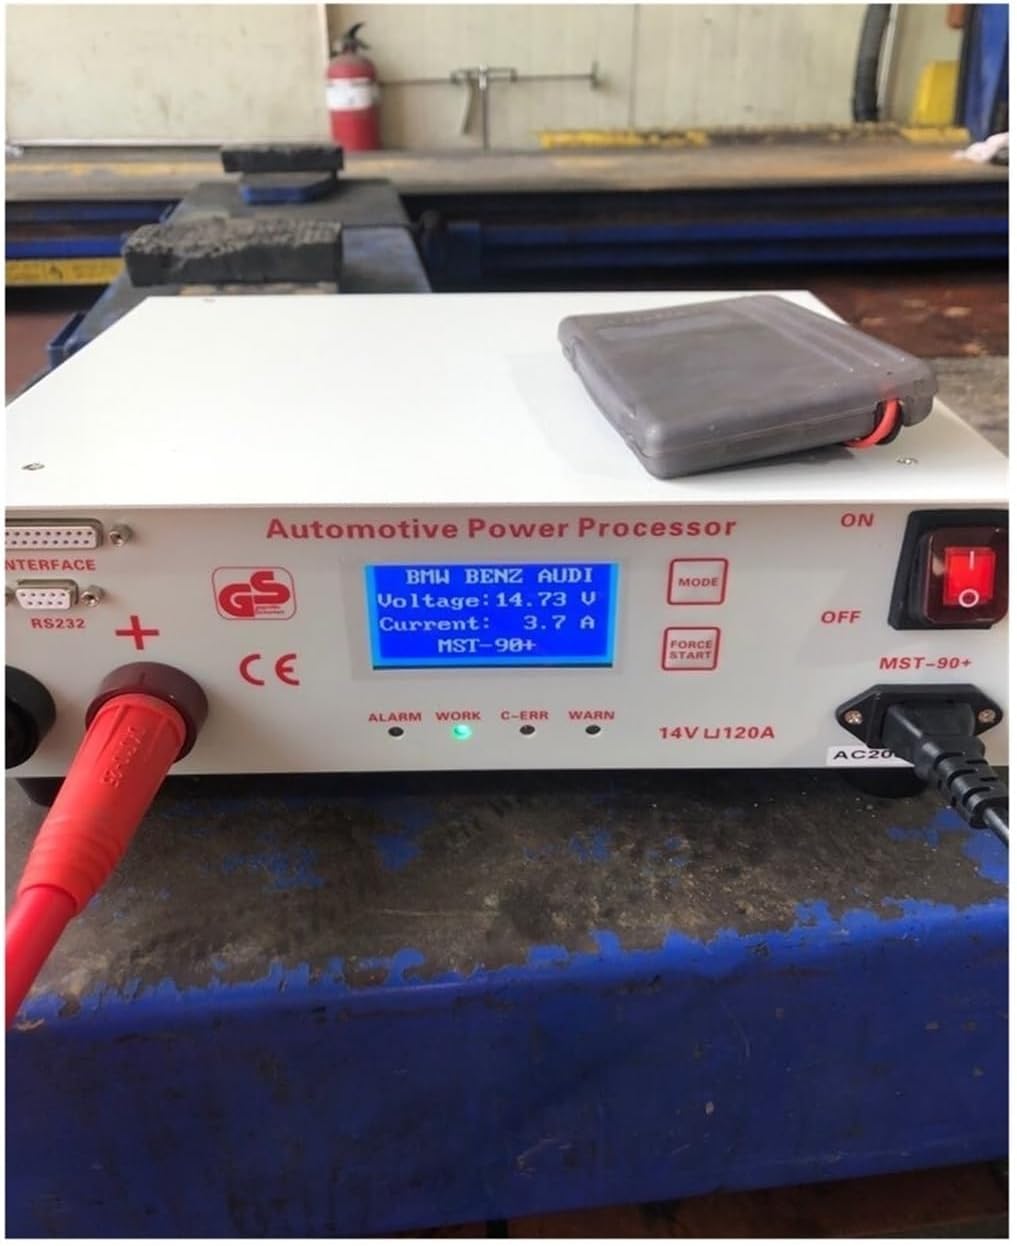
Image 5.1: The display screen of the MST-90+ showing typical operating parameters during a programming session.
6. Troubleshooting
This section addresses common issues and their resolutions:
- Overcurrent/Overvoltage: If the charging current exceeds 100A or the output voltage exceeds 15V, the charger will cut off the output, LED3 will light, and the display will show "large charging" or "high voltage". Check the battery condition and vehicle electrical system for faults.
- Over-temperature: If the charger's internal temperature exceeds 60°C, LED4 (Yellow light) will illuminate, and the cooling fan will activate. Ensure adequate ventilation around the unit.
- Input Circuit Breaker Trip: In case of input overcurrent, overvoltage, or high temperature, the internal breaker will automatically pop up. Press the breaker back in and thoroughly check the input circuit for any problems before resuming operation.
- "Battery bad" Indication: If the display shows "Battery bad" (Image 6.1), the connected battery voltage is below 8V, indicating a severely discharged or faulty battery. This device is not designed to recover such batteries.

Image 6.1: The display screen indicating a problematic battery condition.
7. Specifications
| Category | Parameter | Value |
|---|---|---|
| Protection Features | P-FG | 1.5KVAC |
| Over-voltage Protection | 15V | |
| Working Temperature | -40 to +85 ℃ | |
| Safety Standards | UL60950, TUV EN60950-1 | |
| EMC Compliance | EN55022, EN61000 | |
| Withstand Voltage (I/P-O/P) | 3KVAC | |
| Overload Protection | 90-110% of rated output power | |
| Insulation Resistance | I/P-O/P, I/P-FG: 100M Ohms, 500VDC/25 ℃/70% RH | |
| Input | Efficiency | 85% |
| Power Factor | 0.95 | |
| Frequency Range | 40-60Hz | |
| Rated Input Voltage | 220V (+/-20%) | |
| Output | DC Voltage | 14.5V |
| Rated Current | 0-100A | |
| Rated Maximum Power | 1500W | |
| Ripple and Noise | 100mVp-p | |
| Physical | Item Weight | 1.76 ounces (approx. 50g) |
| Package Dimensions | 0.39 x 0.39 x 0.39 inches (approx. 1cm x 1cm x 1cm) |
Note: Package dimensions and item weight may vary slightly based on packaging and accessories.
8. Maintenance
To ensure the longevity and optimal performance of your VAMHFLDR MST-90+:
- Cleaning: Regularly wipe the exterior of the unit with a soft, dry cloth. Do not use abrasive cleaners or solvents.
- Ventilation: Ensure that the ventilation openings are clear of dust and debris to allow for proper heat dissipation.
- Storage: Store the device in a cool, dry place away from direct sunlight and extreme temperatures when not in use.
- Cable Inspection: Periodically inspect all cables for signs of wear, damage, or fraying. Replace damaged cables immediately.
9. Warranty and Support
Warranty information for the VAMHFLDR MST-90+ is typically provided at the time of purchase or included with the product packaging. Please refer to your purchase documentation for specific warranty terms and conditions.
For technical support, service, or inquiries regarding your device, please contact your retailer or the manufacturer's customer service department using the contact information provided with your purchase.