Introduction
This manual provides detailed instructions for the installation, operation, and maintenance of your JOYING Single Din Touchscreen Car Stereo, model JY-UTS08N8-R. Please read this manual thoroughly before using the product to ensure proper functionality and to prevent damage.

Figure 1: JOYING Single Din Touchscreen Car Stereo (JY-UTS08N8-R)
Setup
1. Unpacking and Component Check
Carefully unpack the unit and verify that all components are present. The package should include:
- 10.1" radio unit
- Single Din Cage
- Mounting Sleeve
- Left & Right Brackets
- Plastic Trim Out
- Extraction Keys
- Installation Manual
- WiFi Antenna (x1)
- GPS Antenna (x1)
- 4G Antenna (x2)
- External Microphone (x1)
- USB Cables (x2)
- AR Cable (x1)
- Screen Ribbon Cable (x1)
- ISO Cable (x1)
- User Manual (this document)

Figure 2: Included Components
2. Physical Installation
Installation may require an installation frame kit, special ISO harness, amplifier adapter, or CANbus decoder depending on your vehicle's specific requirements. Refer to the included Installation Manual for detailed steps. The unit features an upgraded installation structure allowing adjustment of left and right bracket positions for optimal fit in various car center consoles.

Figure 3: Installation Structure Adjustment
3. Wiring and Connections
Connect the provided cables to the corresponding ports on the rear of the head unit and to your vehicle's wiring harness. Ensure all connections are secure. The unit features various input/output ports including USB, HDMI, Optical, Coaxial, and RCA for audio and video.
- ISO Cable: Connects to the vehicle's main power and speaker harness.
- GPS Antenna: Connect for satellite navigation functionality.
- WiFi Antenna: Connect for stable wireless internet access.
- 4G Antennas: Connect for mobile data access via SIM card.
- External Microphone: Connect for improved call quality and voice commands.
- USB Cables: For connecting external devices or media.
- HDMI Output: For connecting external displays (e.g., headrest monitors).
- Optical Fiber and Coaxial Digital Output: For direct connection to external amplifiers with digital inputs for enhanced sound quality.

Figure 4: Rear Port Layout
4. 4G Module Setup
Insert a compatible SIM card into the designated slot for internet access. The unit supports FDD-LTE: B2/B4/B5/B7/B12/B13/B14/B17/B25/B26/B38/B66/B71 and TDD-LTE: B41. Note that the 4G module is for internet access only and does not support phone calls or SMS directly from the unit.
Operating Instructions
1. Initial Boot and Fast Boot
The first boot-up may take approximately 30-40 seconds. Subsequent power-ons will utilize the fast boot feature, allowing the unit to start and enter the user interface within 2 seconds after the car key is turned.
2. Navigation (GPS)
The unit includes precise GPS engines and an antenna for accurate positioning and real-time navigation. You can download offline maps for use in areas without internet connectivity. Mobile phone map data can also be synchronized to the head unit via Apple CarPlay or Android Auto.
3. Apple CarPlay & Android Auto
Connect your mobile phone via USB cable or Bluetooth to access Apple CarPlay or Android Auto. This allows you to use phone applications for navigation, make calls, and stream music directly on the car stereo's display.

Figure 5: Apple CarPlay and Android Auto Interface
4. Split-Screen Multitasking
The unit supports split-screen functionality, allowing you to run two applications simultaneously. For example, you can view navigation on one side and media playback on the other. To activate, tap the recent apps icon, find the app you want to split, click its icon, and select the split-screen option. Then choose a second app from recent apps.

Figure 6: Split-Screen Multitasking
5. Audio Features
The unit features a TDA7851 DSP chip and a 48-band graphic equalizer for high-quality sound. It provides 4 audio outputs and 1 subwoofer output. Support for aftermarket amplifiers is available via Fiber Optical or SPDIF Coaxial outputs.

Figure 7: High-Quality Sound Features
6. HDMI Output
The HDMI output allows for a full digital image and sound signal to external displays. This supports projection screen displays for passengers or on-screen displays with 1080P clarity without stuttering. Note that the HDMI cable is not included.

Figure 8: HDMI Output Functionality
7. Steering Wheel Control (SWC)
The unit supports steering wheel controls for easy switching of songs, radio channels, and volume adjustment. If your car has a CAN system, an extra CANbus cable may be required to retain this feature.

Figure 9: Steering Wheel Control
8. Other Features
The unit includes AM/FM radio, hands-free calling, Picture-in-Picture (PiP) mode, 3 USB ports, a Micro SD card slot, and a 4G SIM card slot.

Figure 10: Additional Features Overview
9. Personalized Settings
Customize your user experience with options for changing the car boot logo, setting custom wallpapers, adjusting button light colors, and controlling screen brightness.
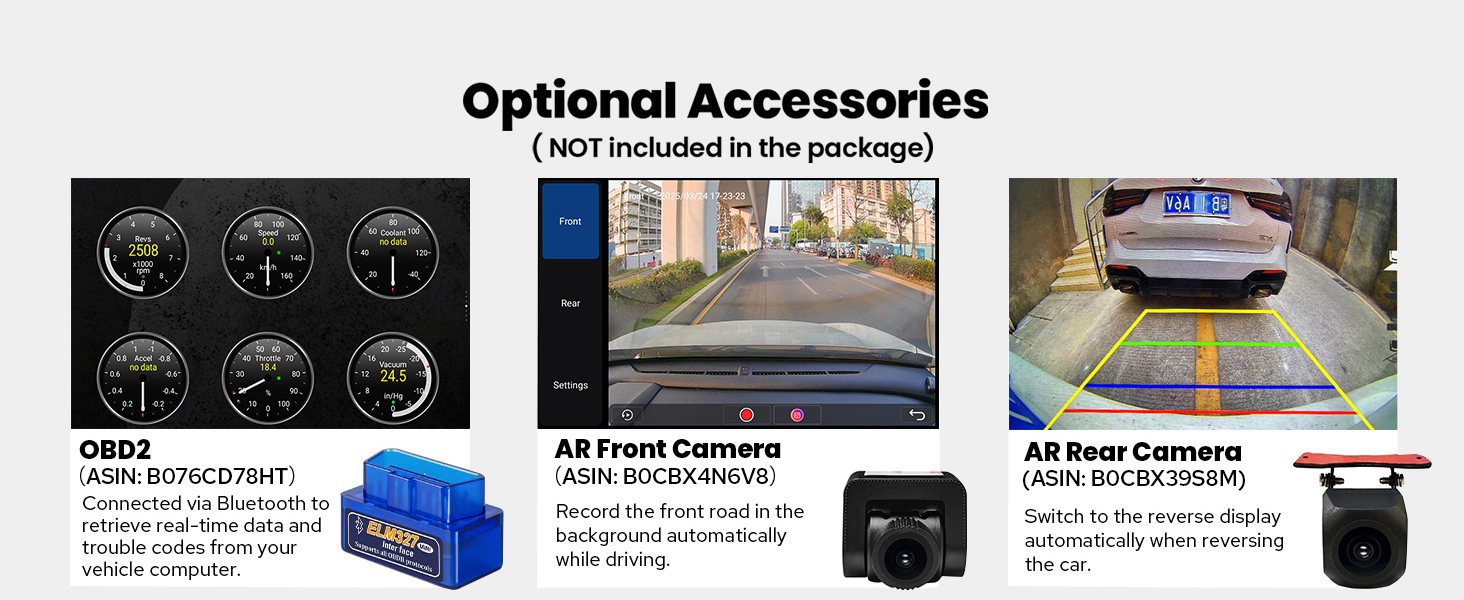
Figure 11: Personalized Settings
Maintenance
To ensure the longevity and optimal performance of your JOYING car stereo, follow these maintenance guidelines:
- Cleaning the Screen: Use a soft, lint-free cloth slightly dampened with water or a screen cleaner specifically designed for electronics. Avoid harsh chemicals or abrasive materials.
- Cleaning the Unit: Wipe the exterior of the unit with a dry, soft cloth. Ensure no liquids enter the unit.
- Software Updates: Periodically check the manufacturer's website for available software updates to improve performance and add new features. Follow the provided instructions carefully when performing updates.
- Temperature Control: The unit features a dual heat sink design and a cooling fan. Ensure proper ventilation around the unit to prevent overheating. The system can be configured to automatically activate the fan if the CPU temperature or radio volume exceeds a set warning value.

Figure 12: Upgraded Cooling System

Figure 13: Independent WiFi Antenna
Troubleshooting
If you encounter issues with your JOYING car stereo, refer to the following common problems and solutions:
- No Power: Ensure all power cables are correctly connected and the vehicle's fuse is intact.
- No Sound: Check speaker connections, amplifier connections (if applicable), and volume settings. Verify that the audio output mode is correctly configured.
- GPS Signal Loss: Ensure the GPS antenna is properly installed and has a clear view of the sky. Avoid placing it under metal objects.
- Bluetooth/Wi-Fi Connectivity Issues: Ensure Bluetooth/Wi-Fi is enabled on both the head unit and the connected device. Try restarting both devices.
- Touchscreen Unresponsive: Perform a soft reset of the unit (refer to the Installation Manual for specific instructions). If the issue persists, contact support.
- CarPlay/Android Auto Not Connecting: Ensure your phone's operating system is up to date and try a different USB cable. Verify that the feature is enabled on the head unit.
For persistent issues, consult the detailed troubleshooting section in the Installation Manual or contact JOYING customer support.
Specifications
| Feature | Specification |
|---|---|
| Brand | JOYING |
| Model Name | UTS08N8 |
| Model Number | JY-UTS08N8-R |
| Screen Size | 10.1 Inches |
| Operating System | Android |
| Memory Storage Capacity | 128 GB |
| Touch Screen Type | Capacitive |
| Display Type | LED |
| Connectivity Technology | Bluetooth, Ethernet, HDMI, USB, Wi-Fi |
| Connectivity Protocol | Bluetooth, Wi-Fi |
| Special Features | Android Auto, Apple CarPlay, DSP, RCA, RDS |
| Audio Output Mode | Stereo |
| Supported Satellite Navigation System | BeiDou, GLONASS, GPS |
| Map Type | North America |
| Compatible Devices | Amplifier, Camera, Speaker |
| Control Method | App, Touch, Voice |
| Item Weight | 1200 Grams |
Optional Accessories
The following accessories are not included in the standard package but can be ordered separately to enhance your car stereo experience:
- OBD2 Scanner: Connects via Bluetooth to retrieve real-time data and trouble codes from your vehicle computer.
- AR Front Camera: Records the front road automatically while driving.
- AR Rear Camera: Switches to reverse display automatically when reversing the car.
- DAB+ Digital Radio Adapter
- DVR (Digital Video Recorder)
- TPMS (Tire Pressure Monitoring System)
Figure 14: Optional Accessories
Warranty and Support
Your JOYING Single Din Touchscreen Radio (JY-UTS08N8-R) comes with a 2-year warranty from the date of purchase. This warranty covers manufacturing defects and malfunctions under normal use.
For warranty claims, technical assistance, or any questions regarding your product, please contact JOYING customer support through the retailer where the product was purchased or visit the official JOYING website for support contact information.
Please retain your proof of purchase for warranty validation.