1. Introduction
This manual provides detailed instructions for the assembly, operation, and maintenance of your MEDEHOO Wooden Rabbit Hutch, Model AIR24-1. Please read this manual thoroughly before assembly and use to ensure proper function and safety for your pets. This hutch is designed for small animals such as rabbits, guinea pigs, hedgehogs, hamsters, and squirrels, suitable for both indoor and outdoor environments.

Image: The MEDEHOO Wooden Rabbit Hutch, Model AIR24-1, showcasing its design with a rabbit inside the wire enclosure.
2. Safety Information
- Ensure all parts are securely fastened during assembly to prevent collapse or injury.
- Regularly inspect the hutch for any damage, loose parts, or sharp edges that could harm your pet.
- Place the hutch on a stable, level surface. When using outdoors, ensure it is in a sheltered area to protect from extreme weather.
- Do not overload the hutch with too many animals; it is designed for 1-2 rabbits or similarly sized small animals.
- Keep children and other pets supervised around the hutch to prevent accidental injury or escape.
- Always engage the locking mechanisms on the wheels when the hutch is in a stationary position.
3. Package Contents
Before beginning assembly, verify that all components listed below are present and undamaged. If any parts are missing or damaged, please contact customer support.
- Wooden panels for hutch structure
- 1 x Bottom Floor Wire Grid
- 1 x Metal Feeder
- 4 x Caster Wheels (with locking mechanism)
- 1 x Leak-Proof Pull-Out Tray
- Hardware pack (screws, latches, hinges)
- Assembly instructions (this manual)

Image: A diagram illustrating the included components: one bottom floor wire grid, one metal feeder, and four caster wheels.
4. Assembly Instructions
Follow these steps carefully to assemble your rabbit hutch. It is recommended to have a second person assist with assembly.
- Unpack and Identify Parts: Lay out all wooden panels, wire mesh sections, and hardware. Refer to the parts diagram to identify each component.
- Assemble Base Frame: Connect the side and front/back wooden panels to form the base of the hutch. Ensure all connections are secure with the provided screws.
- Attach Caster Wheels: Securely attach the four caster wheels to the bottom of the assembled base frame. Ensure the locking mechanisms are facing outwards for easy access.
- Install Wire Enclosure: Attach the wire mesh panels to form the enclosed run area. Ensure the top wire panels are hinged correctly for easy opening.
- Construct Sleeping Area: Assemble the wooden panels for the enclosed sleeping area, including the roof section. Ensure the roof is hinged to allow access and is weatherproof.
- Insert Pull-Out Tray: Slide the leak-proof plastic tray into its designated slot beneath the wire enclosure.
- Install Access Doors and Ramps: Attach all access doors with their respective latches and hinges. Install the ramp connecting the wire enclosure to the sleeping area.
- Final Checks: Verify all screws are tightened, all doors latch securely, and the hutch is stable.
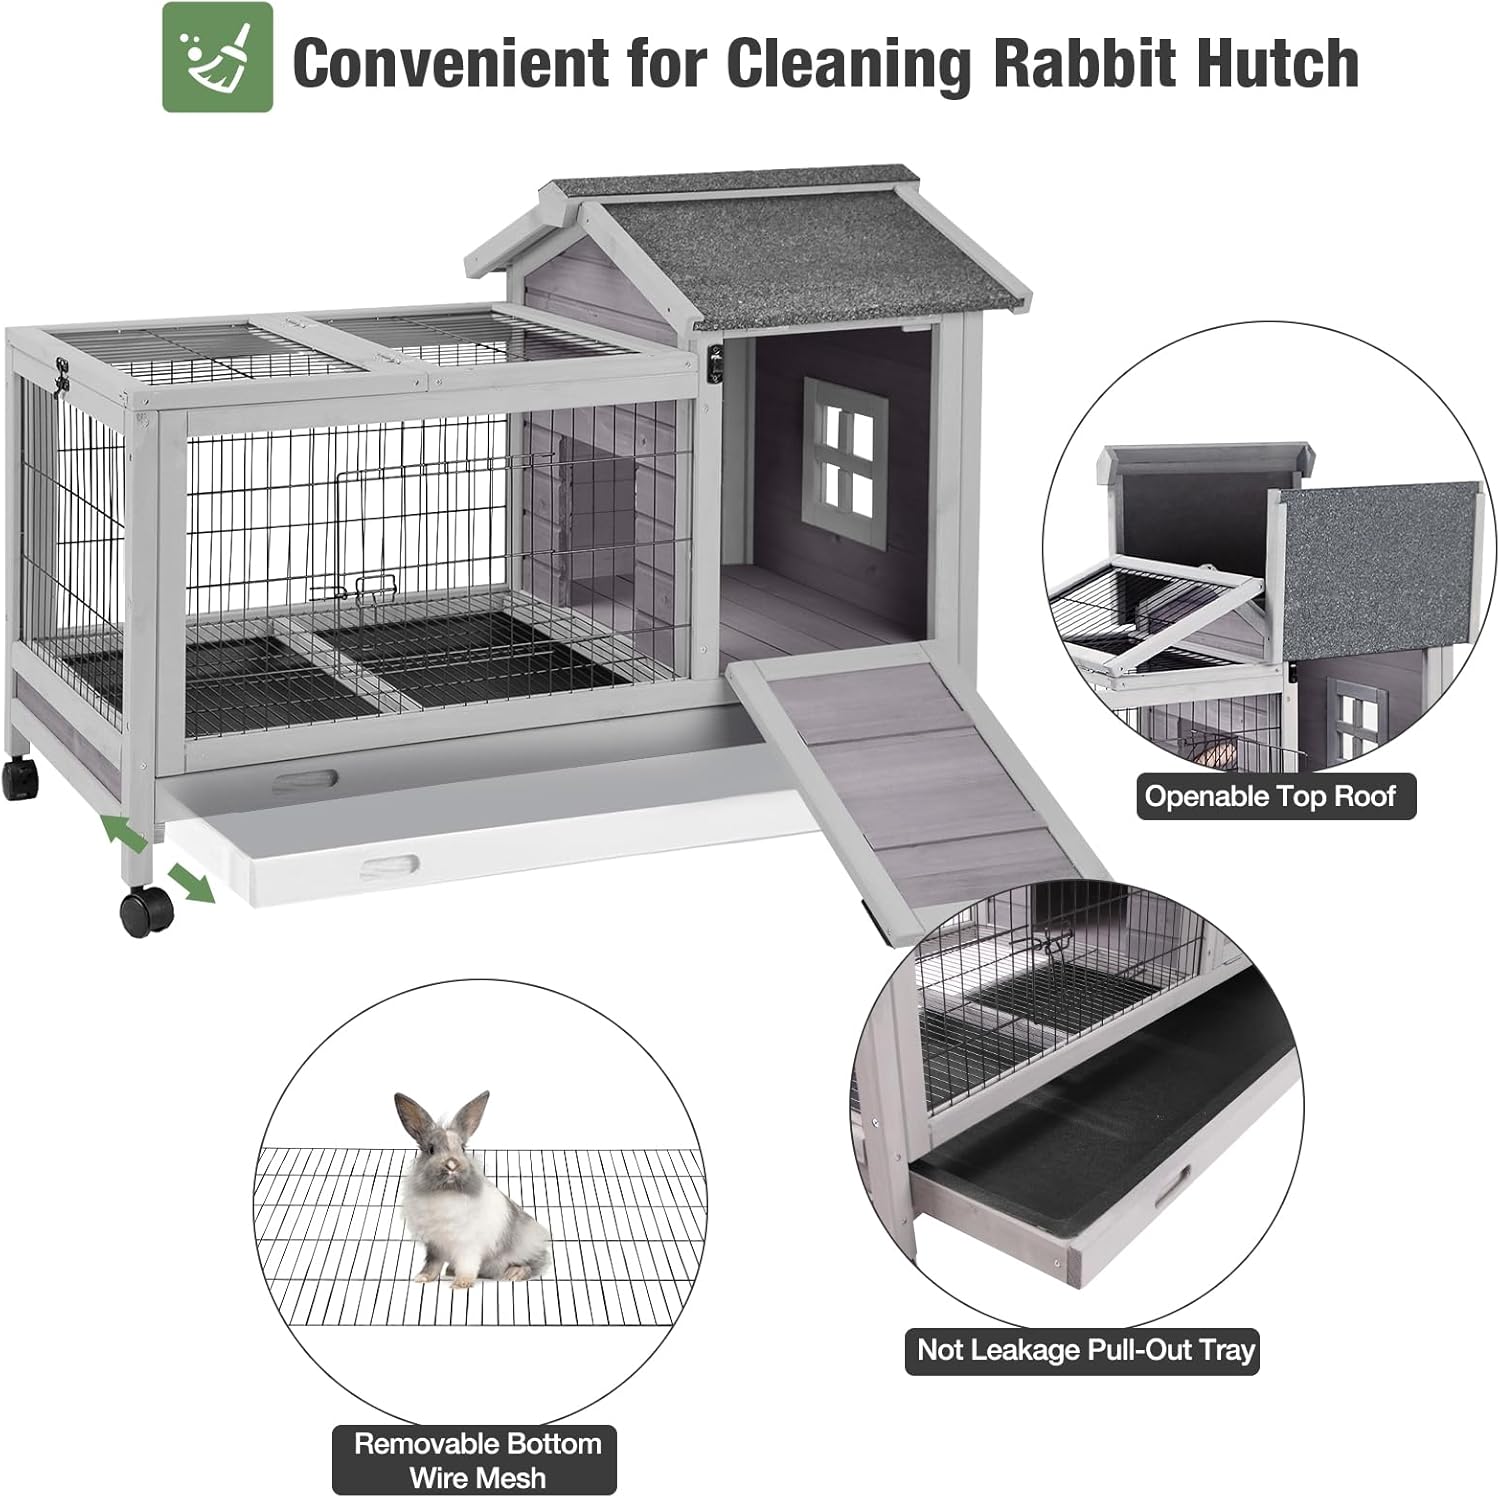
Image: A visual guide showing the various components and their assembly points for the rabbit hutch.
5. Operation and Placement
5.1 Placement
The MEDEHOO Rabbit Hutch is suitable for both indoor and outdoor use. When placing the hutch:
- Indoors: Choose a quiet, draft-free area away from direct heat sources or air conditioning vents.
- Outdoors: Position the hutch in a shaded area to protect from direct sunlight and provide shelter from rain and wind. The asphalt roof offers weather protection.
- Ensure the hutch is on a level surface. Use the locking casters to secure its position.

Image: Examples of the rabbit hutch being used in both an outdoor garden setting and an indoor room setting.
5.2 Mobility
The hutch is equipped with four 360-degree rotating caster wheels for easy movement. To move the hutch, unlock all four wheels. To secure the hutch in place, engage the locking mechanism on each wheel.
5.3 Access and Feeding
The hutch features multiple access points for convenient interaction with your pets and for feeding:
- Two front doors on the wire enclosure.
- Two side doors on the enclosed sleeping area.
- Hinged top roof sections for full access to both the wire enclosure and the sleeping area.

Image: An exploded view diagram showing the five access points of the hutch, including front doors, side doors, and hinged roof sections.
5.4 Suitable Animals
This hutch is designed to provide a comfortable and secure living space for various small animals, including:
- Rabbits
- Guinea Pigs
- Hedgehogs
- Hamsters
- Squirrels

Image: A graphic indicating the suitability of the hutch for rabbits, guinea pigs, hedgehogs, hamsters, and squirrels.
6. Maintenance and Cleaning
Regular cleaning is essential for maintaining a hygienic environment for your pets.
- Removable Wire Netting: The metal wire netting on the bottom of the enclosure can be easily removed for thorough cleaning.
- Leak-Proof Tray: The plastic pull-out tray is designed to be leak-proof, simplifying waste removal. Slide out the tray, empty its contents, and clean with pet-safe disinfectant.
- General Cleaning: Wipe down all wooden surfaces with a damp cloth and mild, pet-safe cleaner. Ensure all surfaces are dry before returning pets to the hutch.
- Roof Maintenance: Periodically check the asphalt roof for any damage or leaks, especially if used outdoors.

Image: A comparison highlighting the leak-proof design and ease of cleaning of the hutch's pull-out tray.
7. Troubleshooting
- Hutch is unstable: Ensure all screws are fully tightened and the hutch is placed on a flat, level surface.
- Doors not closing properly: Check hinges and latches for obstructions or misalignment. Adjust as necessary.
- Wheels not locking: Verify that the locking mechanisms on each wheel are fully engaged. Clean any debris from the wheel mechanisms.
- Tray difficult to slide: Ensure the tray is free of debris and is inserted correctly into its runners.
8. Specifications
| Feature | Detail |
|---|---|
| Brand | MEDEHOO |
| Model Number | AIR24-1 |
| Product Dimensions (L x W x H) | 40.7" x 22.8" x 28.6" |
| Item Weight | 32 pounds |
| Material | Fir Wood |
| Color | Grey |
| Special Features | Easy Assembly, Leakproof Tray, Removable Wire Netting, Lockable Caster Wheels |
| Specific Uses | Indoor, Outdoor for small animals |
Image: Detailed dimensions of the rabbit hutch, including overall length, width, and height.
9. Warranty and Support
For warranty information or customer support, please refer to the retailer's policy or contact the manufacturer directly. Keep your purchase receipt as proof of purchase.


