1. Introduction
Thank you for purchasing the intelamp YL005-18P20FT-JP Solar Sensor Floodlight. This manual provides detailed instructions for the safe and efficient use, installation, and maintenance of your new solar light. Please read this manual thoroughly before installation and retain it for future reference.
2. Product Overview
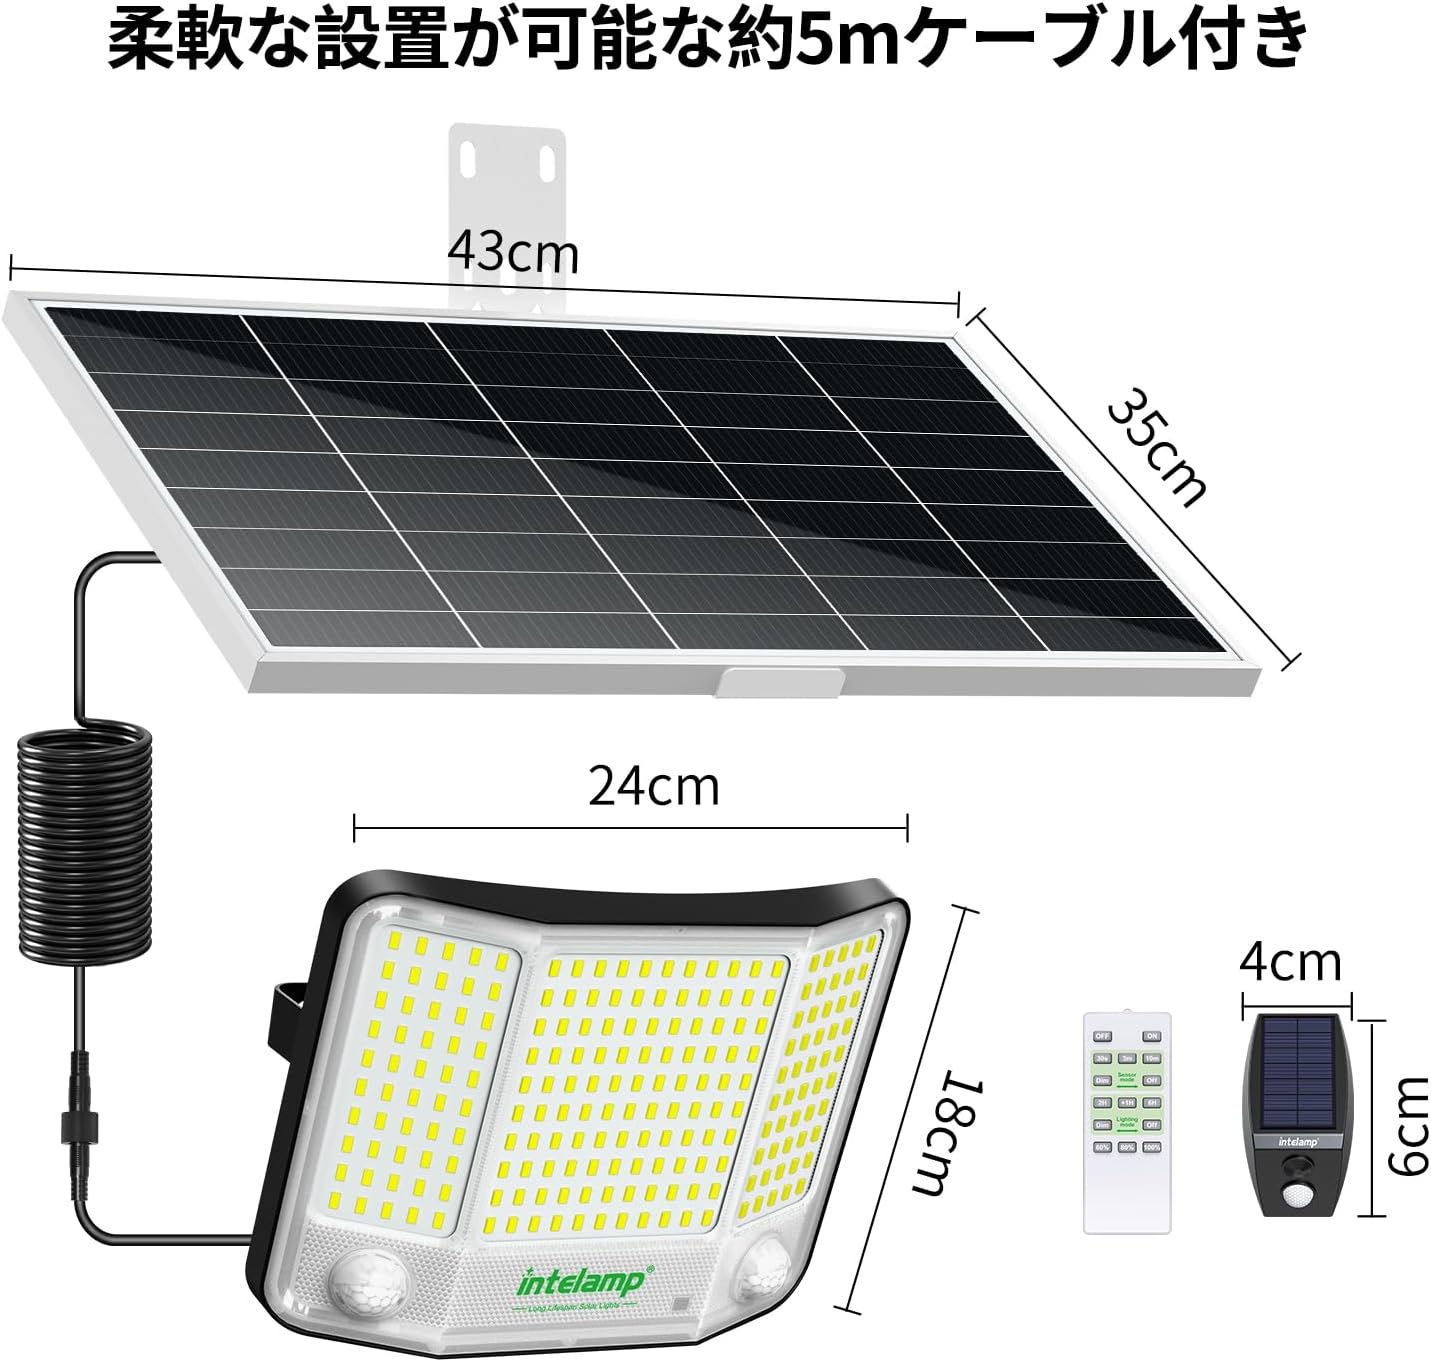
The intelamp YL005-18P20FT-JP is a high-performance, split-design solar floodlight engineered for outdoor use. It features a powerful 20000mAh battery, 4000 lumens of brightness, and a 6500K color temperature for clear, bright illumination. With its IP65 waterproof rating and dual motion sensors, it offers reliable and flexible lighting solutions for various outdoor environments.
- Ultra-High Brightness: Equipped with 251 high-quality LED chips and a high-transmittance PC lampshade, providing exceptionally bright illumination. The 20000mAh large-capacity battery allows for over 12 hours of continuous lighting at maximum brightness after just 5 hours of direct sunlight charging.
- Wide-Area Illumination: A three-sided light emission design delivers a wide 180° illumination range. The lighting unit's angle can be adjusted 120° vertically to cover desired areas effectively.
- Convenient Remote Control Operation: Includes a remote control, operable within a 5-meter range, for easy adjustment of lighting duration (2-12 hours) and 3 brightness levels. Features a power-saving mode and automatic shut-off after the timer.
- Automatic Dusk-to-Dawn Function: The light automatically turns on at dusk and off at dawn, providing a comfortable and flexible lighting experience without manual intervention.
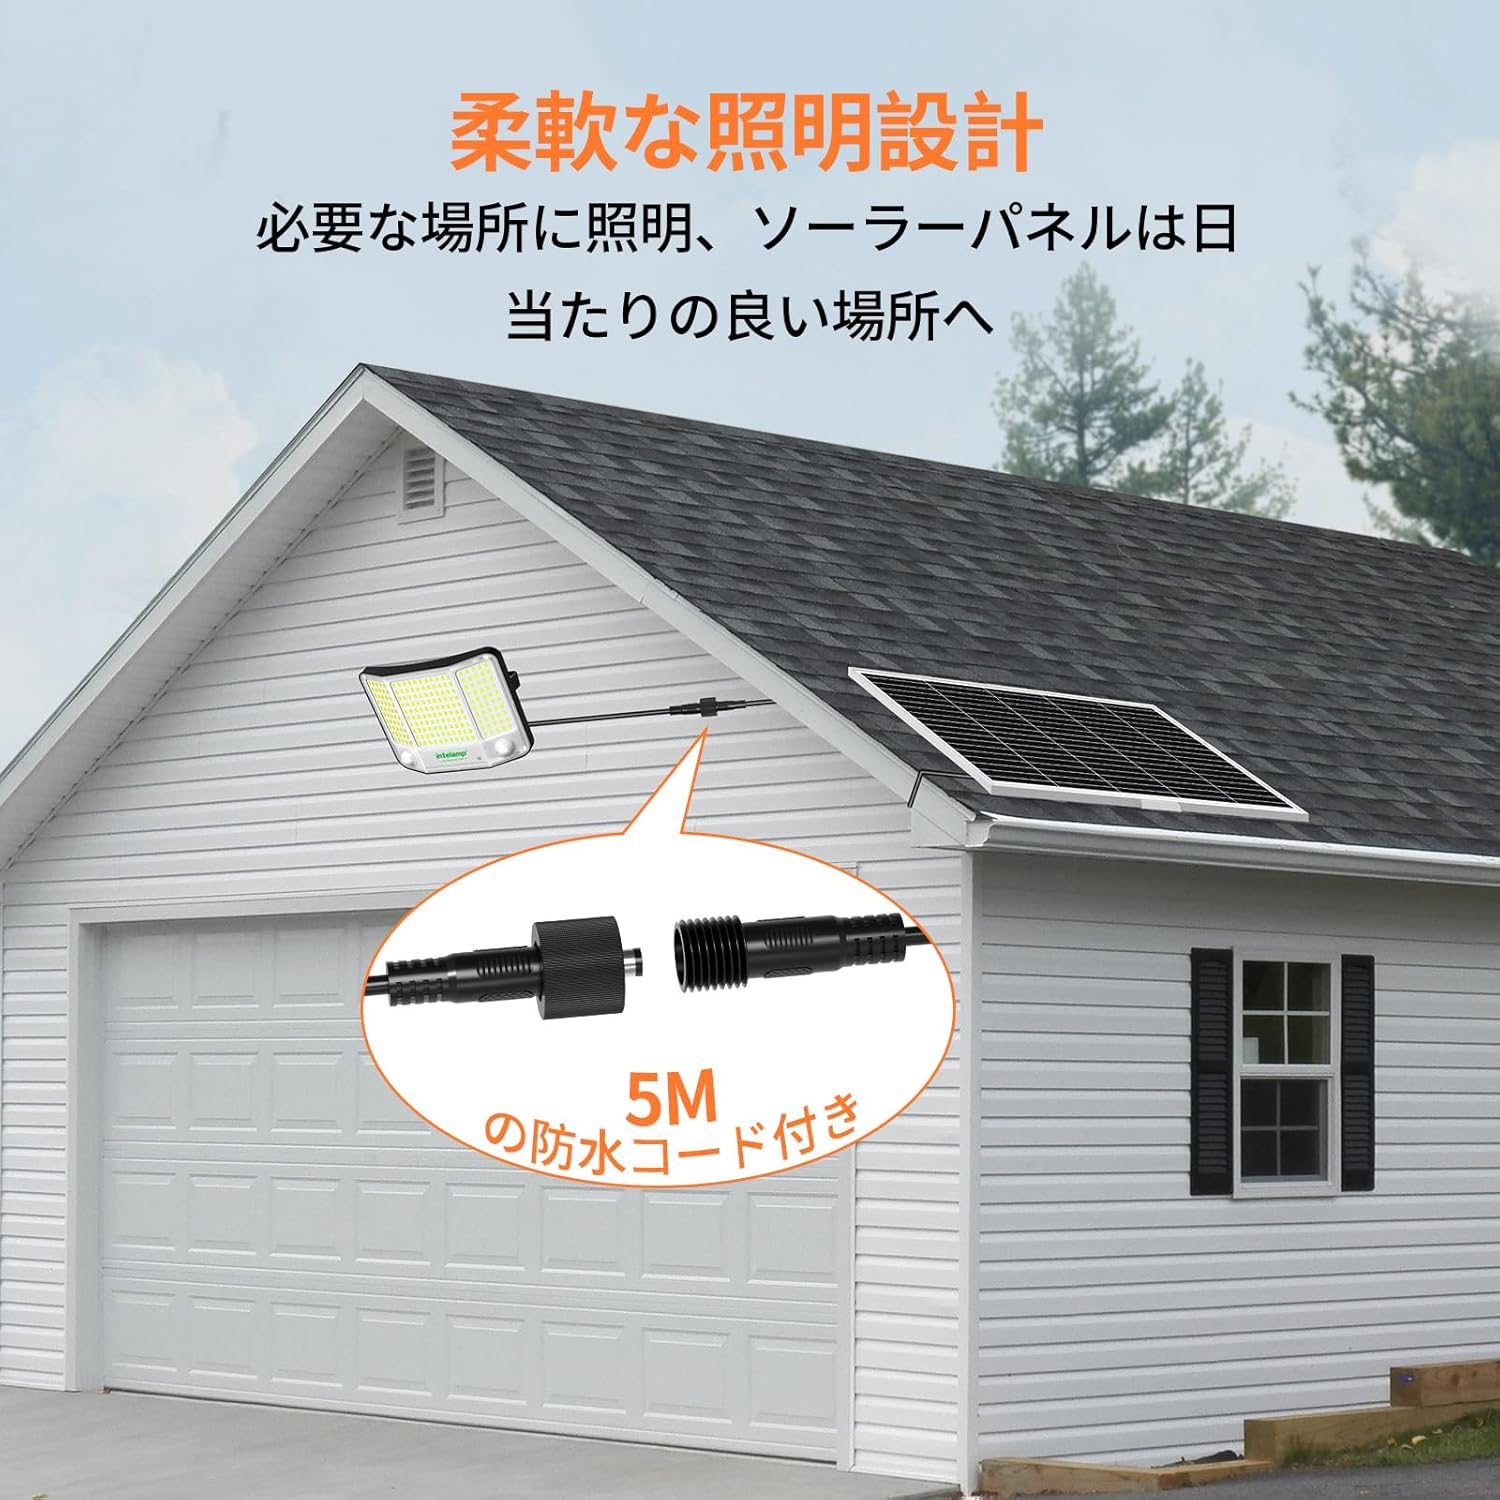
- Easy Installation: Comes with a 5-meter extension cable, allowing flexible placement of the solar panel in an optimal sunny location and the light unit either indoors or outdoors. All necessary accessories for wall, wood, or pole mounting are included for secure installation.
- Excellent Waterproof Performance: With an IP65 waterproof rating, the light is designed to withstand environments exposed to wind and rain, making it suitable for various outdoor settings.

3. Specifications
| Feature | Description |
|---|---|
| Brand | intelamp |
| Model Number | YL005-18P20FT-JP (18GP20) |
| Color | White |
| Material | ABS |
| Style | With Human Motion Sensor |
| Fixture Shape | Wall-mounted Lamp Stand |
| Usage | Outdoor |
| Included Components | Remote Control |
| Country of Origin | China |
| Item Dimensions (L x W x H) | 24 x 7 x 18 cm |
| Number of Items | 1 |
| Battery Capacity | 20000mAh |
| Brightness | 4000 Lumens |
| Color Temperature | 6500K |
| Waterproof Rating | IP65 |
| Cable Length | 5 meters |
4. Package Contents
Please check the package contents upon receipt to ensure all items are present and undamaged:
- intelamp Solar Sensor Floodlight Unit (with integrated motion sensors)
- Solar Panel (with 5-meter extension cable)
- Remote Control
- Mounting Bracket for Solar Panel
- Mounting Bracket for Light Unit
- Set of Screws and Wall Plugs for Installation
- User Manual
5. Setup & Installation
The intelamp solar floodlight features a split design, allowing optimal placement of both the solar panel and the light unit. Ensure the installation location is stable and can support the weight of the units.
5.1 Choosing Installation Location
- Solar Panel: Must be installed in a location that receives direct sunlight for at least 5-6 hours daily to ensure optimal charging. Avoid shaded areas.
- Light Unit: Can be installed indoors or outdoors, on a wall, wood surface, or pole. Position it to cover the desired illumination area. The 5-meter cable provides flexibility.
5.2 Mounting the Solar Panel
- Attach the solar panel mounting bracket to the back of the solar panel using the provided screws.
- Mark the desired drill points on the wall or pole using the bracket as a template.
- Drill holes at the marked positions. Insert wall plugs if installing on masonry.
- Secure the solar panel bracket to the wall/pole using the provided screws.
- Adjust the angle of the solar panel to maximize sun exposure.
5.3 Mounting the Light Unit
- Attach the light unit mounting bracket to the back of the light unit.
- Mark the desired drill points on the wall or pole.
- Drill holes and insert wall plugs if necessary.
- Secure the light unit bracket to the wall/pole.
- Adjust the light unit's angle (up to 120° vertically) to illuminate the target area.
5.4 Connecting the Cable
Connect the 5-meter extension cable from the solar panel to the light unit. Ensure the connection is secure and waterproof.

6. Operating Instructions
6.1 Initial Charge
Before first use, allow the solar panel to charge in direct sunlight for at least 8-10 hours to ensure the battery is fully charged. The light will automatically turn on at dusk once charged.
6.2 Remote Control Functions
The included remote control allows you to customize the light's operation:
- ON/OFF: Manually turn the light on or off.
- Brightness Levels: Adjust between 3 brightness settings.
- Timer Function: Set the lighting duration for 2, 4, 6, 8, 10, or 12 hours. After the set time, the light will automatically turn off.
- Sensor Modes: Select between different motion sensor modes (detailed below).
- Dusk-to-Dawn Mode: Activates automatic operation where the light turns on at dusk and off at dawn.
6.3 Motion Sensor Modes
The light features dual motion sensors for enhanced detection. Use the remote control to select your preferred mode:
- Sensor Mode 1 (Dim-to-Bright): The light stays at a low brightness (e.g., 400 lumens). When motion is detected, it brightens to full (4000 lumens) for a set duration (30 seconds, 3 minutes, or 10 minutes), then returns to dim.

- Sensor Mode 2 (Off-to-Bright): The light remains off. When motion is detected, it brightens to full (4000 lumens) for a set duration (30 seconds, 3 minutes, or 10 minutes), then turns off completely.

6.4 Continuous Lighting Modes
These modes provide continuous illumination without relying on motion detection:
- Lighting Mode 3 (Dusk-to-Dawn with Dimming): The light automatically turns on at a set brightness (e.g., 2000 lumens) at dusk, then dims to a lower brightness (e.g., 400 lumens) and stays on until dawn.

- Lighting Mode 4 (Dusk-to-Dawn with Auto-Off): The light automatically turns on at a set brightness (e.g., 2000 lumens) at dusk, then turns off completely after a set period, remaining off until dawn.


7. Maintenance
Regular maintenance ensures optimal performance and longevity of your solar light.
- Cleaning the Solar Panel: Periodically wipe the solar panel surface with a soft, damp cloth to remove dust, dirt, leaves, or snow. A clean panel ensures maximum sunlight absorption and charging efficiency.
- Cleaning the Light Unit: Keep the LED surface and motion sensors clean from obstructions to ensure proper light output and sensor functionality.
- Battery Care: The integrated 20000mAh battery is designed for long-term use. Avoid prolonged storage in a completely discharged state. If storing for an extended period, ensure the battery is partially charged.
- Environmental Protection: Despite its IP65 rating, avoid submerging the unit in water or exposing it to extreme physical impact.

8. Troubleshooting
If you encounter issues with your intelamp solar light, please refer to the following common problems and solutions:
| Problem | Possible Cause | Solution |
|---|---|---|
| Light does not turn on at night. | Insufficient solar panel charging. | Ensure the solar panel is in direct sunlight for 5-6 hours daily. Clean any debris from the panel. |
| Light duration is shorter than expected. | Partial charge, low ambient temperature, or high brightness setting. | Ensure full charge. In colder weather, battery efficiency may decrease. Reduce brightness setting or use power-saving mode. |
| Motion sensor not detecting. | Sensor obstructed or incorrect mode selected. | Clear any obstructions from the sensor lens. Verify the correct motion sensor mode is selected via remote control. |
| Remote control not working. | Battery depleted or out of range. | Replace the remote control battery. Ensure you are within the 5-meter operating range. |
| Light flickers or is dim. | Low battery charge. | Allow the solar panel to charge for a full day in direct sunlight. |
If the problem persists after trying these solutions, please contact customer support.
9. Warranty & Support
intelamp products are designed and manufactured to the highest quality standards. This product comes with a standard manufacturer's warranty. For specific warranty details, duration, and terms, please refer to the warranty card included in your package or contact intelamp customer service.
Customer Support:
For technical assistance, troubleshooting, or warranty claims, please contact intelamp customer support through the retailer where you purchased the product or visit the official intelamp website for contact information.