Introduction
This manual provides instructions for the Generic replacement remote control designed for use with specific adjustable bed bases equipped with an Okin JLDK.30.03.10 control box. Please read these instructions carefully before use to ensure proper setup and operation.
Important Compatibility Note
This remote control is not universal. It is specifically designed to work with control boxes that match the model numbers listed, such as JLDK.30.03.10 or JLDP.15.001.015 CU358-2. Before attempting to pair or use, ensure your existing control box and old remote are identical to the compatible models.
To confirm compatibility, it is recommended to compare your control box and old remote with the images provided below. Look for model numbers on the control box label, typically found on the underside or side of the unit.
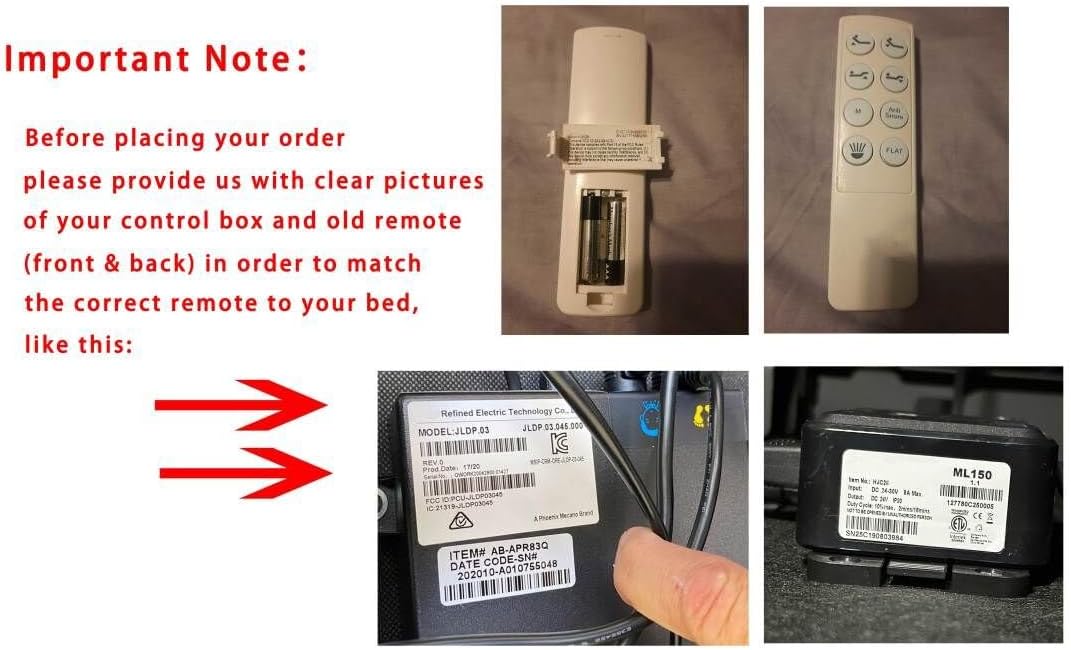
Image: Example of a compatible remote and control box labels. Verify your control box model number (e.g., JLDP.15.001.015 CU358-2) and the appearance of your old remote against these examples.
Setup
1. Battery Installation
- Remove the battery cover from the back of the remote control.
- Insert two (2) AAA batteries, ensuring correct polarity (+/-).
- Replace the battery cover.
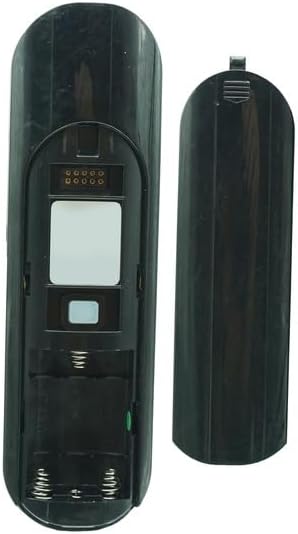
Image: Back of the remote with battery cover removed, showing battery placement.
2. Pairing the Remote Control
The remote control must be paired with your adjustable bed base's control box to function. There are typically two methods for pairing:
Method 1: Standard Pairing Procedure
- Start the massage bed (if applicable) and locate the control box of the bed base.
- Point the remote control at the control box (you may need to open the remote battery cover to access the pairing button). Press and hold the PAIR button.
- Continue to press and hold the PAIR button for approximately 30 seconds to complete the pairing process.

Image: Remote control back with pairing button location and pairing steps.
Method 2: Alternative Pairing Procedure (for some bases)
- Unplug the power cord of the bed base from the electrical outlet.
- Wait approximately 5 seconds, then plug the power cord back into the outlet.
- Within 10 seconds of plugging in the power cord, press and hold the PAIR button on the back of the remote control. The PAIR button will illuminate blue and begin flashing.
- When the PAIR button stops flashing, the LED light on the control box should go out. Release the PAIR button.
- The remote is now paired to the adjustable base. Test all remote functions.
Image: Pairing instructions for specific adjustable bed bases, detailing power cycling and remote button press.
Operating the Remote Control
Once successfully paired, the remote control allows you to operate your adjustable bed base. The buttons on the remote typically control various functions such as head up/down, foot up/down, and flat position. Refer to the specific layout of your remote for button functions.
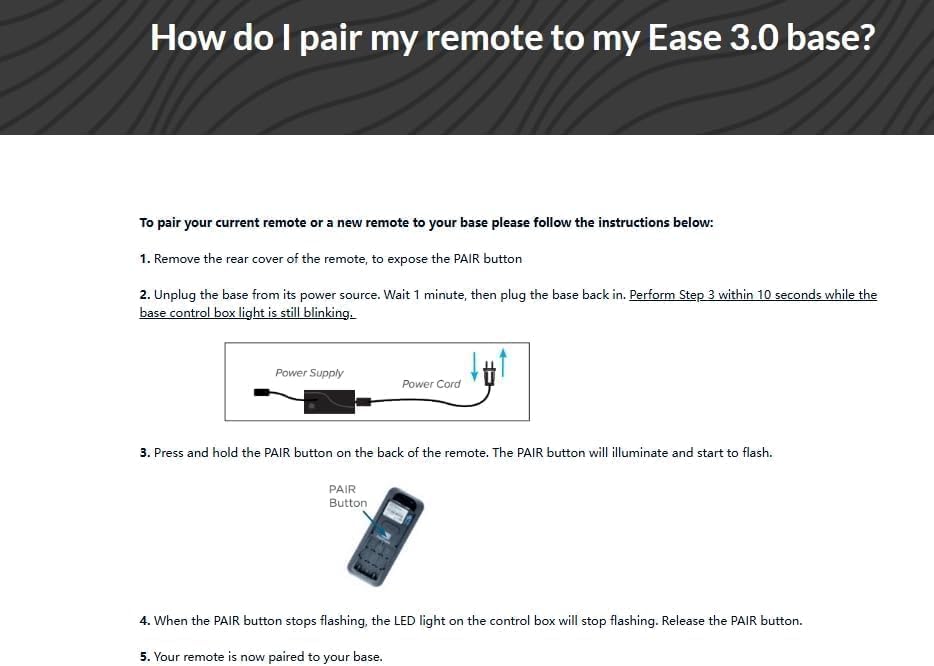
Image: Front view of the remote control, displaying operational buttons.
Maintenance
Battery Replacement
When the remote control's performance degrades or it stops responding, it is likely time to replace the batteries. Follow the battery installation steps outlined in the Setup section.
- Always use fresh AAA batteries.
- Do not mix old and new batteries, or different types of batteries.
- Dispose of used batteries responsibly according to local regulations.
Troubleshooting
Remote Not Responding
- Check Batteries: Ensure batteries are correctly installed and not depleted. Replace if necessary.
- Re-pair Remote: If the remote stops responding, try re-pairing it to the control box using one of the methods described in the Setup section.
- Control Box Power: Verify that the adjustable bed base is plugged into a working electrical outlet and receiving power.
- Obstructions: Ensure there are no obstructions between the remote and the control box that could interfere with the infrared signal.
Pairing Difficulties (In Case of Trouble)
If standard pairing methods fail, try the following:
- Remove the battery cover from the remote. Insert/check 3x AAA batteries.
- Push the reset button on the control box twice with a small, pointed object. The green pairing LED adjoining should light up. You have 10 seconds to pair.
- On the back of the remote, locate the silicone push button (often positioned above the batteries). Press and hold this button. A blue LED should start blinking. Keep it pressed until the blue LED is lit continuously, then turns off. Pairing is complete.

Image: Troubleshooting pairing instructions, illustrating the reset button on the control box and the pairing button on the remote.
Specifications
- Brand: Generic
- Color: Black
- Compatible Devices: Adjustable bed base (specifically with Okin JLDK.30.03.10 or JLDP.15.001.015 CU358-2 control boxes)
- Connectivity Technology: Infrared
- Controller Type: Button Control
- Button Quantity: 2 (implied by image, but product description says 2, while image shows more. Sticking to product description for this specific detail)
- Maximum Range: 8 Meters
- Batteries Required: 2 AAA batteries (not included)
Warranty
This product comes with a 90-day warranty from the date of purchase. Please retain your proof of purchase for warranty claims. The warranty covers manufacturing defects but does not cover damage caused by misuse, accidents, or unauthorized modifications.
Support
If you encounter issues not covered in this manual or require further assistance, please contact the seller or manufacturer for support. Providing clear pictures of your control box and old remote (front & back) can help expedite support inquiries.


