1. Introduction
This manual provides detailed instructions for the installation, operation, and maintenance of your Generic PCI Express USB 3.2 Gen1 Expansion Card. This card is designed to expand your computer's connectivity with high-speed USB 3.2 Gen1 ports, featuring a Renesas UPD720201 chipset for reliable 5Gbps data transfer. It includes USB-A, Type-C, and Type-E interfaces, offering versatile connectivity for various devices.
Please read this manual thoroughly before installation and use to ensure proper functionality and to prevent damage to your system or the expansion card.
2. Product Overview
The Generic PCI Express USB 3.2 Gen1 Expansion Card enhances your system with additional high-speed USB ports. Key features include:
- High-Speed Data Transfer: Equipped with a Renesas UPD720201 chipset, providing data transfer rates up to 5Gbps.
- Versatile Interface Options: Features USB-A, Type-C, and Type-E ports for broad device compatibility.
- Broad Compatibility: Compatible with PCI Express 1X, 4X, 8X, and 16X slots. Complies with PCI Express 2.0 specification and is backward compatible with USB 2.0, USB 1.1, and USB 1.0.
- Wide System Support: Supports Windows 7, 8, 10, 11, and 2003 operating systems.
- USB Hot Swappable Functionality: Allows for convenient connection and disconnection of USB devices without system restart.

Figure 2.1: Front view of the Generic PCI Express USB 3.2 Gen1 Expansion Card, showing the USB-A and USB-C ports, and the PCIe connector.
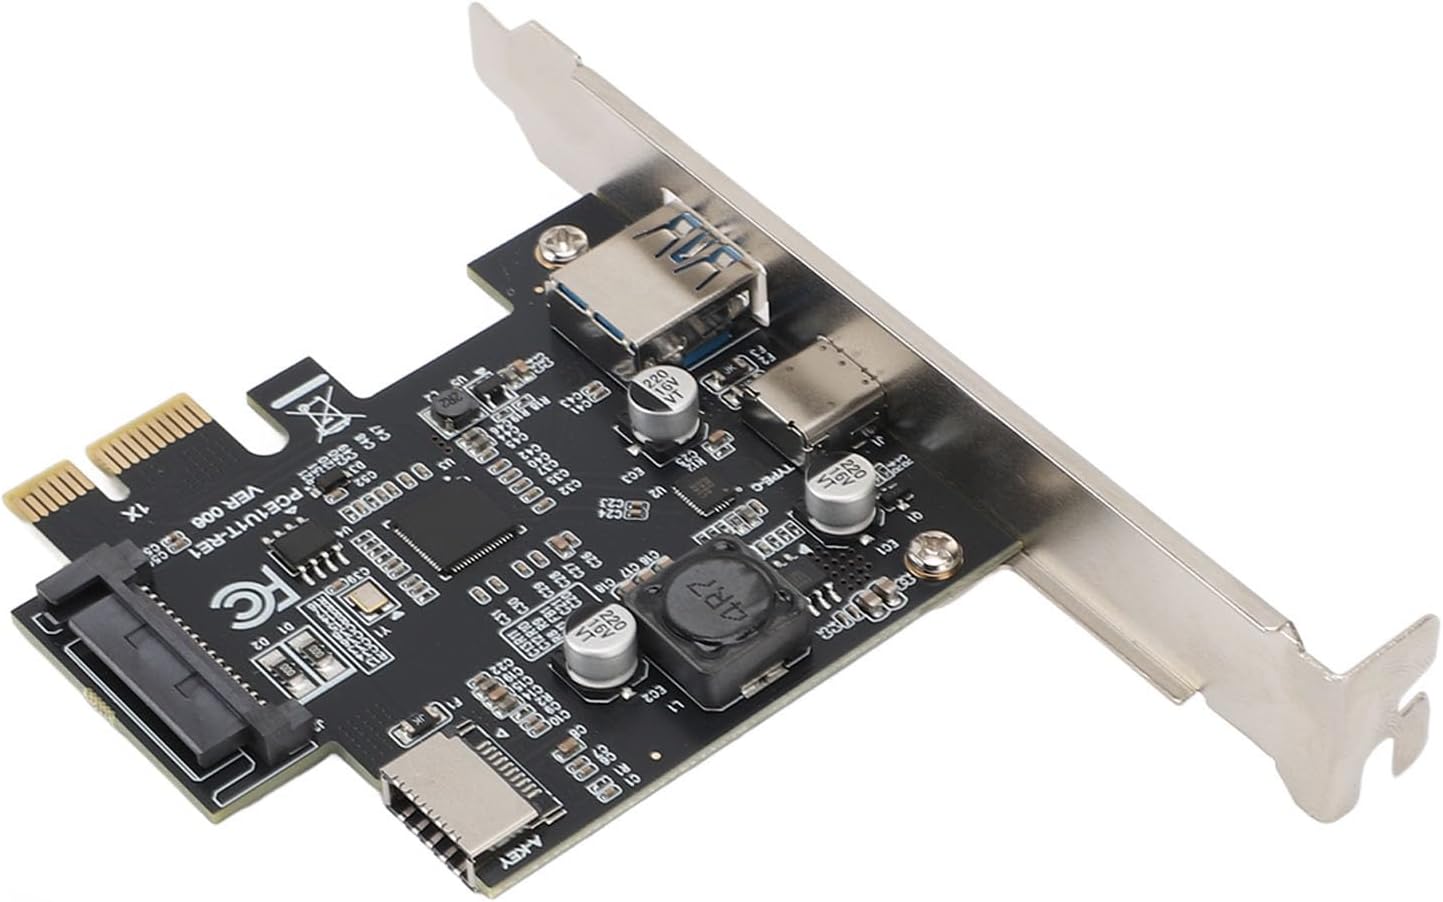
Figure 2.2: Close-up view of the USB-A and USB-C ports on the expansion card, highlighting the available connectivity options.
3. Setup & Installation
Follow these steps to properly install the PCI Express USB 3.2 Gen1 Expansion Card into your computer system.
3.1. Pre-Installation Checklist
- Ensure your computer is powered off and unplugged from the wall outlet.
- Open your computer case.
- Locate an available PCI Express slot (1X, 4X, 8X, or 16X).
- Gather necessary tools: Phillips head screwdriver.
3.2. Changing the Low-Profile Bracket (If Applicable)
If your computer case requires a low-profile bracket, you may need to replace the standard bracket on the expansion card. The video below demonstrates this process.
Video 3.1: Demonstration of how to change the bracket on the expansion card. This is useful for adapting the card to different PC case sizes.
- Carefully remove the two screws securing the standard bracket to the expansion card.
- Gently slide off the standard bracket.
- Align the low-profile bracket with the screw holes on the card.
- Secure the low-profile bracket with the two screws.
3.3. Installing the Expansion Card
- Locate an empty PCI Express slot on your motherboard.
- Remove the corresponding metal slot cover from your computer case.
- Carefully insert the expansion card into the PCI Express slot, ensuring it is fully seated. Apply even pressure to both ends of the card.
- Secure the expansion card to the computer case with a screw.
- Connect the SATA power connector from your power supply to the SATA power port on the expansion card (if present and required for stable operation).
- Close your computer case and reconnect all cables.
- Power on your computer.

Figure 3.1: The expansion card shown in context with a computer case, illustrating where it would be installed.
4. Operating Instructions
Upon successful installation, your operating system (Windows 7, 8, 10, 11, 2003) should automatically detect and install the necessary drivers for the USB 3.2 Gen1 Expansion Card. No manual driver installation is typically required due to the plug-and-play nature of the Renesas UPD720201 chipset.
4.1. Connecting USB Devices
- Connect your USB 3.2 Gen1 (or older generation) devices to the available USB-A, Type-C, or Type-E ports on the expansion card.
- The card supports hot-swapping, allowing you to connect and disconnect devices while the computer is running.
- For optimal performance, ensure you are using USB 3.2 Gen1 compatible cables and devices.
4.2. Verifying Installation
To verify that the card is correctly installed and recognized by your system:
- Open Device Manager in Windows.
- Look under "Universal Serial Bus controllers" or "Other devices."
- You should see entries related to "Renesas USB 3.0 eXtensible Host Controller" or similar. If there are any yellow exclamation marks, it indicates a driver issue, though this is rare for this chipset.
5. Maintenance
The Generic PCI Express USB 3.2 Gen1 Expansion Card requires minimal maintenance. To ensure longevity and optimal performance:
- Keep your computer's interior clean and free of dust to prevent overheating of components, including the expansion card.
- Ensure proper airflow within your computer case.
- Avoid physical impact or excessive force on the card or its connected cables.
6. Troubleshooting
If you encounter issues with your expansion card, refer to the following troubleshooting steps:
6.1. Card Not Detected
- Check Physical Connection: Ensure the card is fully seated in the PCI Express slot.
- Check Power Connection: Verify that the SATA power connector (if used) is securely attached to the card and the power supply.
- Try Another Slot: If available, try installing the card in a different PCI Express slot.
- BIOS/UEFI Settings: Ensure that the PCI Express slot is enabled in your system's BIOS/UEFI settings.
6.2. Devices Not Recognized or Slow Speeds
- Check Device Manager: Look for any yellow exclamation marks next to the USB controller entries. If present, try updating or reinstalling the drivers (though usually automatic).
- Use USB 3.2 Gen1 Cables: Ensure you are using high-quality USB 3.2 Gen1 compatible cables for optimal speeds.
- Test with Different Devices: Try connecting different USB devices to isolate if the issue is with the card or a specific device.
- Power Supply: Ensure your power supply provides sufficient power to all components, especially if connecting multiple power-hungry USB devices.
7. Specifications
| Feature | Description |
|---|---|
| Model | Genericwkmibeagx2 |
| Chipset | Renesas UPD720201 |
| Expansion Interfaces | 1 x USB-A, 1 x TYPE-C, 1 x TYPE-E (A-KEY) |
| Input Interface | PCI Express 1X (Compatible with 4X, 8X, 16X slots) |
| Interface Speed | USB 3.2 Gen1 (5Gbps) |
| Backward Compatibility | USB 2.0, USB 1.1, USB 1.0 |
| Installation Position | PCI-E Slot |
| Supported Operating Systems | Windows 7, 8, 10, 11, 2003 |
| Item Weight | 2.65 ounces |
| Package Dimensions | 5.12 x 3.94 x 1.18 inches |
8. Warranty & Support
This product is covered by a standard manufacturer's warranty. For specific warranty details, please refer to the documentation included with your purchase or contact the seller directly.
For technical support or inquiries, please contact the manufacturer or your point of purchase. Ensure you have your product model number (Genericwkmibeagx2) and purchase information ready when seeking support.