Introduction
This manual provides essential information for the safe and efficient operation of your Generic 5000W Pure Sine Wave Inverter. Please read this manual thoroughly before installation and use, and retain it for future reference.
Safety Information
Adhering to these safety guidelines is crucial for preventing injury and damage to the inverter and connected devices.
- Power Off Before Connection: Always ensure the inverter switch is in the OFF position before making any electrical connections.
- No Household Outlet Connection: Never connect the inverter directly to a household AC power outlet. This inverter is designed for DC input from batteries.
- Battery Polarity: Carefully identify and connect the positive (+) and negative (-) terminals of the battery to the corresponding terminals on the inverter. Incorrect polarity can cause severe damage.
- Secure Connections: Ensure all wiring connections, especially the positive (+) and negative (-) battery cables, are tightened securely. Loose connections can lead to overheating and potential fire hazards.
- Avoid Overload: Do not exceed the continuous output power rating of 5000W. For inductive loads (e.g., motors, refrigerators, pumps), select an inverter with a continuous output power 3 to 7 times higher than the device's rated power to account for surge requirements.
- Ventilation: Ensure adequate ventilation around the inverter to prevent overheating.
- Dry Environment: Operate the inverter in a dry environment, away from water, moisture, and flammable materials.
Product Overview
The Generic 5000W Pure Sine Wave Inverter converts DC power from batteries into clean, stable AC power suitable for a wide range of electronic devices and appliances.
Key Features:
- Power Conversion: Transforms DC input (24V, 48V, 60V, 72V, 96V) to AC output (110V/240V).
- Pure Sine Wave Output: Provides true 5000W continuous power and 10000W peak power, ensuring compatibility with sensitive electronics.
- LCD Display: Real-time monitoring of input voltage, output voltage, output frequency, and power.
- Multiple Protection Functions: Built-in smart chip and fuse for protection against overheating, overload, overvoltage, undervoltage, and short circuits. Includes Automatic Voltage Regulation (AVR), Intelligent Power Management (IPM), and Intelligent Fan Control (IFC).
- Wide Application: Ideal for off-grid solar systems, vehicles (cars, trucks, RVs), travel, camping, and outdoor emergency power needs.
Component Identification:

Figure 1: Front view of the inverter, showing the LCD display, power switch, and four AC output ports.

Figure 2: Rear view of the inverter, highlighting the cooling fans and DC input terminals (red for positive, black for negative).

Figure 3: Waveform comparison illustrating the superior quality of pure sine wave output for sensitive electronics.
Setup
Follow these steps for proper installation of your inverter.
- Choose a Location: Select a dry, well-ventilated area for the inverter, away from direct sunlight, heat sources, and flammable materials. Ensure sufficient space around the unit for airflow.
- Prepare Battery: Ensure your DC power source (battery bank) matches the inverter's input voltage (24V, 48V, 60V, 72V, or 96V). Verify the battery is fully charged or adequately powered.
- Connect DC Cables:
- With the inverter switch OFF, connect the positive (+) cable (typically red) from your battery to the positive (+) terminal on the inverter.
- Connect the negative (-) cable (typically black) from your battery to the negative (-) terminal on the inverter.
- Important: Double-check polarity before tightening connections. Loose connections can cause sparks and overheating.
- Grounding (Optional but Recommended): If available, connect a grounding wire from the inverter chassis to a suitable earth ground.
- Initial Power On: Once all connections are secure, switch the inverter ON. The LCD display should illuminate, showing input voltage and other parameters.
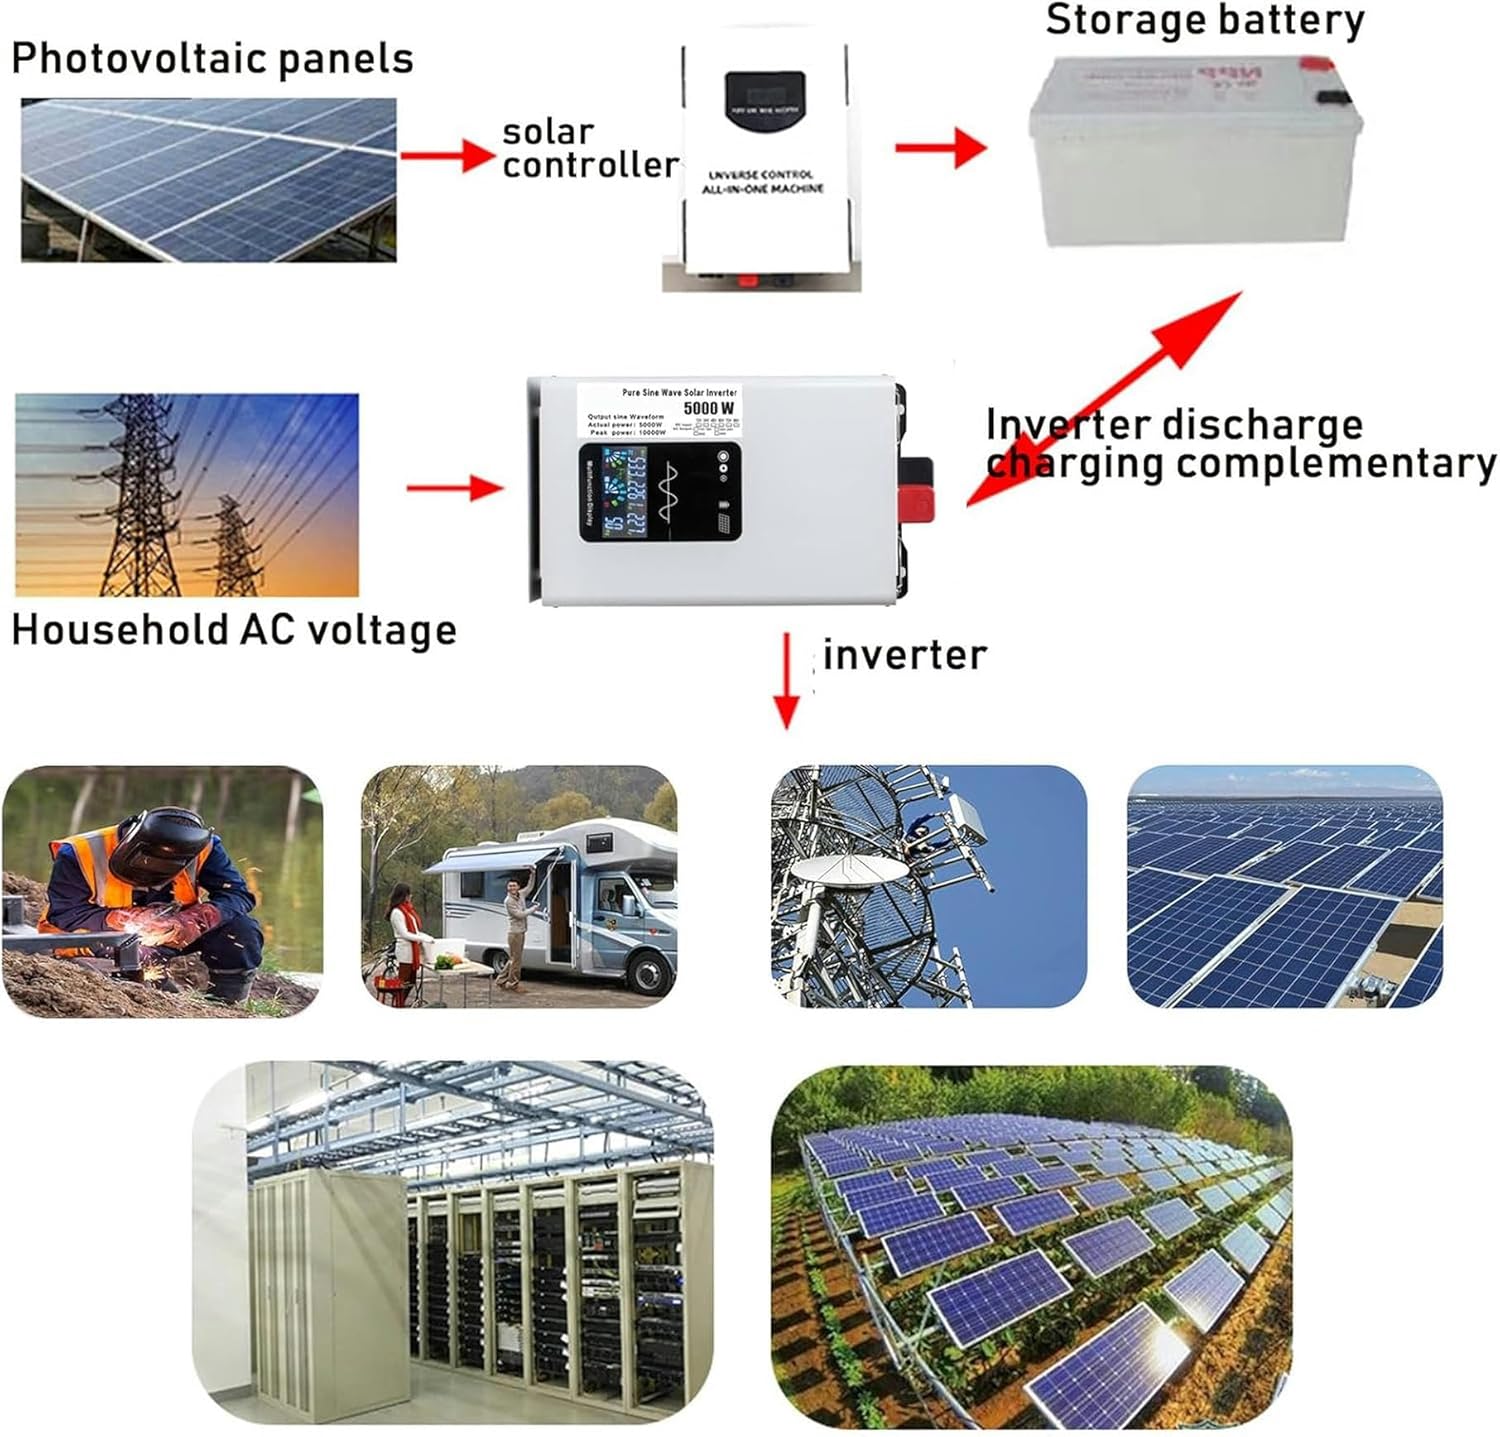
Figure 4: Example application diagram for the inverter, demonstrating its use in off-grid solar systems and other scenarios.
Operating Instructions
This section details how to operate your inverter safely and effectively.
- Powering On: After successful setup, turn the inverter's main power switch to the "ON" position. The LCD display will show operational parameters.
- Connecting AC Devices: Plug your AC appliances into the output ports on the front of the inverter. Ensure the total wattage of connected devices does not exceed the inverter's continuous output power (5000W).
- Monitoring Performance: Regularly check the LCD display for input voltage, output voltage, output frequency, and real-time power consumption. This helps in understanding the load and battery status.
- Inductive Loads: When connecting inductive loads (e.g., refrigerators, pumps, power tools), be aware of their high startup surge current. Ensure the inverter's peak power (10000W) can handle these surges. It is recommended to select an inverter with a continuous output power 3 to 7 times the device's rated power for such loads.
- Powering Off: Before disconnecting any AC devices or the DC input, switch the inverter to the "OFF" position.
Maintenance
Proper maintenance ensures the longevity and reliable performance of your inverter.
- Regular Cleaning: Keep the inverter's exterior clean and free from dust and debris. Use a dry, soft cloth. Do not use liquid cleaners.
- Ventilation Check: Periodically inspect the cooling fans and vents to ensure they are not obstructed. Blocked vents can lead to overheating.
- Connection Check: Annually, or as needed, check all electrical connections (DC input, AC output) for tightness. Loose connections can cause resistance, heat, and power loss.
- Storage: If storing the inverter for an extended period, ensure it is disconnected from all power sources, cleaned, and stored in a cool, dry place.
Troubleshooting
This section provides solutions to common issues you might encounter.
| Problem | Possible Cause | Solution |
|---|---|---|
| Inverter does not turn on. | No DC input power; Loose battery connections; Blown fuse. | Check battery voltage; Ensure DC cables are securely connected; Inspect and replace fuse if necessary. |
| No AC output. | Inverter in protection mode (overload, undervoltage, over-temperature); Faulty AC device. | Reduce load; Check battery voltage; Allow inverter to cool down; Test AC device with another power source. |
| Overload warning on LCD. | Connected load exceeds 5000W continuous power or 10000W peak power. | Disconnect some appliances to reduce the load. Restart the inverter. |
| Undervoltage warning. | Battery voltage is too low. | Recharge or replace the battery. |
| Over-temperature warning. | Inverter is overheating due to poor ventilation or excessive load. | Ensure adequate ventilation; Reduce load; Allow inverter to cool down. |

Figure 5: Visual representation of the inverter's 8 protection functions, including low voltage, overload, short-circuit, and over-temperature protection.
Specifications
| Model Number | A-1 |
| Input Voltage (DC) | 24V / 48V / 60V / 72V / 96V (model dependent) |
| Output Voltage (AC) | 110V - 120V / 220V - 240V (model dependent) |
| Continuous Output Power | 5000W |
| Peak Power | 10000W |
| Inverter Efficiency | > 90% |
| Material | Aluminum-magnesium alloy heat dissipation shell |
| Protection Functions | Overload, Short Circuit, Over-temperature, Undervoltage/Overvoltage, Battery Reverse Connection (fuse), Automatic Voltage Regulation (AVR), Intelligent Power Management (IPM), Intelligent Fan Control (IFC) |
| ASIN | B0F5NNY4FN |
| Manufacturer | Generic |
Warranty and Support
Information regarding product warranty and customer support was not available in the provided product data. Please refer to the product packaging or contact the retailer/manufacturer directly for details on warranty coverage and technical assistance.


