1. Introduction
This manual provides essential information for the proper installation, configuration, and operation of your HGLRC Specter F411 12A AIO Flight Controller. This device integrates a flight controller, a 4-in-1 Electronic Speed Controller (ESC), and an ELRS 2.4G receiver into a compact unit, designed for 2-4S freestyle drones. Please read this manual thoroughly before use to ensure optimal performance and safety.
2. Safety Information
- Always disconnect the battery before performing any installation, maintenance, or repair work.
- Ensure correct polarity when connecting power. Incorrect connections can cause permanent damage.
- Avoid short circuits. Inspect all solder joints and connections carefully.
- Operate in a well-ventilated area. Soldering fumes can be hazardous.
- Keep the flight controller away from moisture, dust, and extreme temperatures.
- This product is intended for experienced users of RC drones. Improper use can lead to equipment damage or personal injury.
3. Product Overview
The HGLRC Specter F411 AIO Flight Controller combines multiple critical components into a single board, simplifying drone builds and reducing weight. It features a powerful F411 microcontroller, a 12A 4-in-1 ESC, and an integrated ELRS 2.4G receiver.
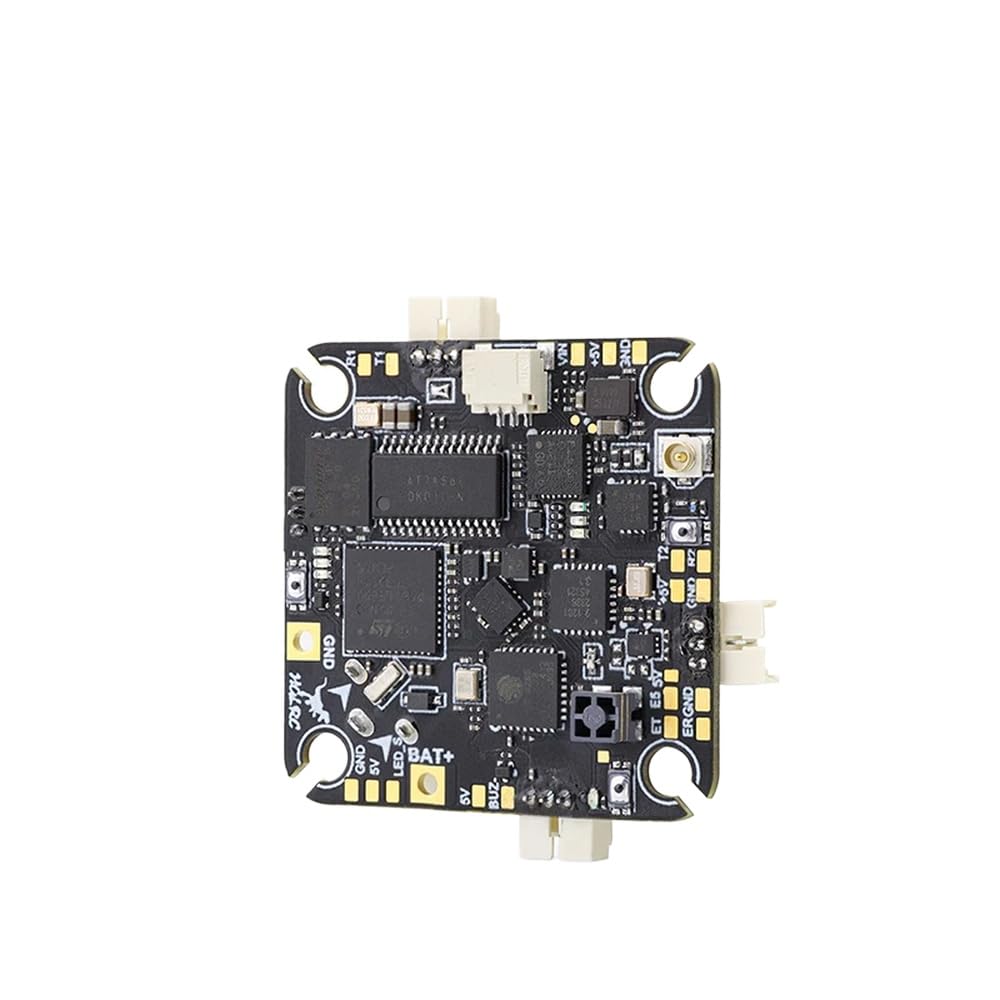
Figure 1: Top view of the HGLRC Specter F411 12A AIO Flight Controller. Key components visible include the STM32F411 microcontroller, AT7456F OSD chip, EOPARE ELRS receiver chip, and various power pads and signal pads such as BAT+, GND, 5V, BUZ-, LED S, VIN, +5V, T1, R1, T2, R2, and ERGND.
3.1 Key Features
- Flight Controller: STM32F411 Microcontroller
- ESC: Integrated 12A 4-in-1 ESC, supporting 2-4S LiPo
- Receiver: Built-in ELRS 2.4G receiver
- Video Transmitter: 400mW UART VTX (if applicable, based on product title, though not explicitly detailed in feature bullets)
- OSD: Integrated OSD (likely AT7456F chip visible)
- Mounting Pattern: 25.5x25.5mm
4. Setup
4.1 Mounting
Mount the HGLRC Specter F411 AIO Flight Controller onto your drone frame using appropriate vibration-damping standoffs. Ensure the arrow on the board points towards the front of the drone. The compact 25.5x25.5mm mounting pattern is suitable for micro and small freestyle drone frames.
4.2 Wiring Diagram
Refer to the following general wiring guidelines. Specific pinouts are labeled on the board (refer to Figure 1).
- Battery Connection: Solder your main battery lead to the BAT+ and GND pads. Ensure correct polarity.
- Motors: Connect your motors to the designated motor pads (M1, M2, M3, M4) on the corners of the board. The 4-in-1 ESC handles motor control.
- VTX (Video Transmitter): If using an external VTX, connect its power and video signal to the appropriate pads (e.g., 5V and a video signal pad if available, or use the integrated 400mW UART VTX if present).
- Camera: Connect your FPV camera to the VIN (Video In) and GND pads. Power the camera from a 5V pad.
- Buzzer: Connect an external buzzer to the BUZ- and 5V pads.
- LED Strip: Connect an LED strip to the LED S and GND pads.
- UART Ports: The board features UART ports (e.g., T1, R1, T2, R2) for connecting external peripherals like GPS, external receivers (if not using the integrated ELRS), or other sensors.
- ELRS Antenna: Connect the ELRS antenna to the U.FL connector on the board.
4.3 Software Configuration
The HGLRC Specter F411 AIO Flight Controller typically runs Betaflight firmware. Follow these steps for initial setup:
- Install Betaflight Configurator: Download and install the latest Betaflight Configurator software on your computer.
- Connect to PC: Connect the flight controller to your computer using a USB-C cable.
- Flash Firmware: If necessary, flash the appropriate Betaflight firmware for the STM32F411 target. Refer to the HGLRC website or Betaflight documentation for the exact target name.
- Initial Configuration:
- Configure ports for UARTs (e.g., Serial RX for ELRS, VTX SmartAudio/TrampHV).
- Set up the receiver protocol (Serial-based receiver, CRSF for ELRS).
- Calibrate accelerometers.
- Configure ESC protocol (e.g., DShot600).
- Set up OSD elements.
- ELRS Binding: Put your ELRS radio transmitter into binding mode. Power on the drone by connecting the battery. The integrated ELRS receiver should enter binding mode after three power cycles (plugging and unplugging the battery three times quickly). Once bound, the receiver LED will be solid.
5. Operating Instructions
After successful setup and configuration, follow these steps for safe operation:
- Pre-Flight Check: Ensure all connections are secure, propellers are correctly installed, and the battery is fully charged.
- Power On: Connect the flight battery. The flight controller will initialize, and the ELRS receiver LED should indicate a solid connection to your radio.
- Arming: Arm the drone using the configured switch on your radio transmitter. Ensure you are in a safe, open area before arming.
- Flight: Operate the drone according to your skill level. The F411 processor and 12A ESC provide responsive control for freestyle flying.
- Disarming: Disarm the drone immediately after landing or in an emergency.
- Power Off: Disconnect the flight battery after each flight session.
6. Maintenance
- Regular Inspection: Periodically inspect the board for any signs of damage, loose connections, or corrosion.
- Cleaning: Gently clean the board with isopropyl alcohol and a soft brush if dust or debris accumulates. Ensure the board is completely dry before powering on.
- Firmware Updates: Keep the Betaflight firmware and ELRS firmware updated to benefit from performance improvements and bug fixes. Refer to official Betaflight and ELRS resources for update procedures.
- Storage: Store the flight controller in a dry, anti-static environment when not in use.
7. Troubleshooting
- No Power: Check battery connections and polarity. Ensure the battery is charged. Inspect for any visible short circuits.
- No Connection to Betaflight Configurator: Ensure the correct USB driver is installed (e.g., STM32 Virtual COM Port Driver, Zadig for DFU mode). Try a different USB cable or port.
- Motors Not Spinning:
- Verify ESC calibration and protocol in Betaflight.
- Check motor wiring and solder joints.
- Ensure the drone is armed and throttle is above minimum.
- ELRS Not Binding: Ensure your radio transmitter is in binding mode. Perform the 3-cycle power-on sequence for the receiver. Verify ELRS firmware versions on both receiver and transmitter are compatible.
- Unstable Flight: Check PID tuning, motor direction, and propeller orientation. Ensure the flight controller is securely mounted and free from excessive vibrations.
8. Specifications
| Feature | Specification |
|---|---|
| Model | HGLRC Specter F411 AIO |
| Flight Controller MCU | STM32F411 |
| IMU | Not specified (typically MPU6000 or BMI270) |
| Integrated ESC | 12A 4-in-1 BLHeli_S |
| Input Voltage | 2-4S LiPo |
| Integrated Receiver | ELRS 2.4G |
| VTX Power | 400mW UART (if integrated) |
| OSD | Yes (AT7456E) |
| Mounting Pattern | 25.5x25.5mm |
| Dimensions | Compact (exact dimensions not specified, but implied by mounting) |
9. Warranty and Support
This product is covered by a limited manufacturer's warranty against defects in materials and workmanship. Please refer to the official HeEHQA website or contact your retailer for specific warranty terms and conditions. For technical support, firmware updates, and additional resources, visit the manufacturer's official support channels or community forums.
For further assistance, you may contact HeEHQA customer support via their official website: www.heehqa.com (Note: This is a placeholder URL as no specific support link was provided.)