Introduction
This manual provides detailed instructions for the setup, operation, and maintenance of your JMBay Digital Wireless Rain Gauge with Thermometer. Please read this manual thoroughly before using the device to ensure optimal performance and longevity. This innovative device allows for convenient, remote monitoring of rainfall and temperature, eliminating the need to manually check outdoor gauges.

Image: Comparison illustrating the convenience of the JMBay Digital Wireless Rain Gauge for indoor viewing versus traditional outdoor gauges.
Product Components
Your JMBay Digital Wireless Rain Gauge system includes the following main components:
- Indoor Display Console
- Outdoor Self-Emptying Rain Collector
- Mounting Hardware (screws, etc.)
- User Manual (this document)
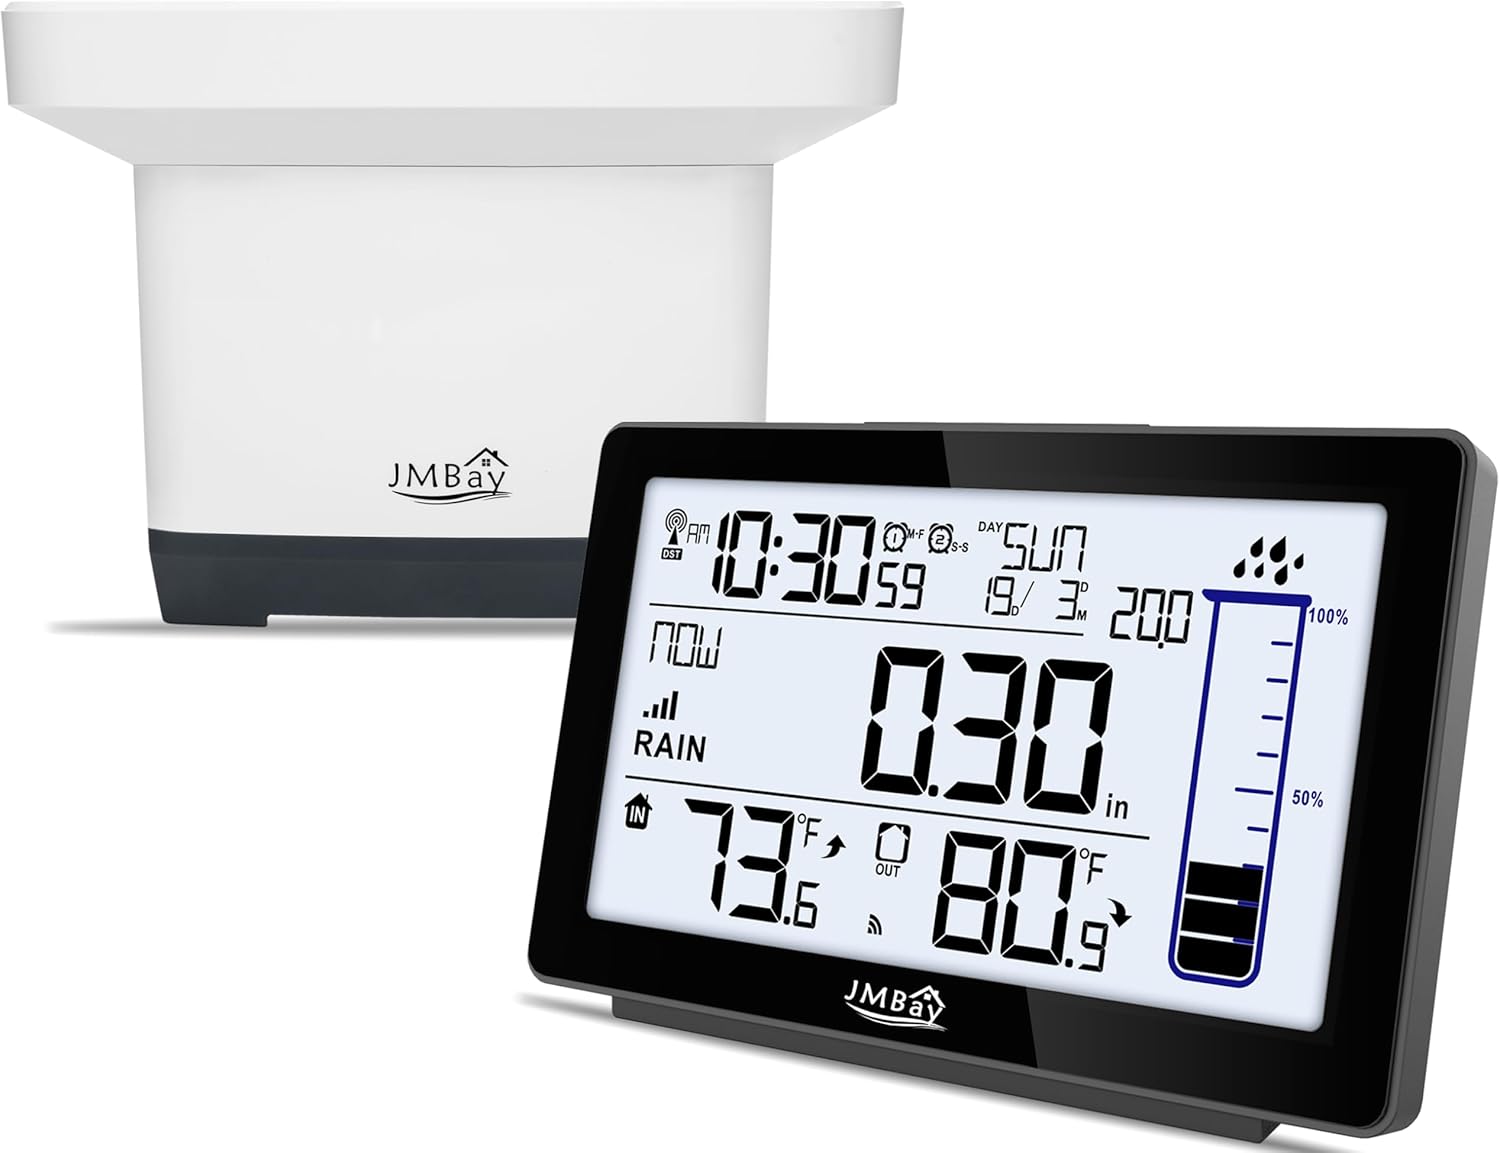
Image: The indoor display console and the outdoor self-emptying rain collector, the main components of the JMBay Digital Wireless Rain Gauge system.
Setup
1. Battery Installation
Install batteries in both the indoor display console and the outdoor rain collector.
- Outdoor Rain Collector:
- Separate the rain gauge cover from the base by turning clockwise.
- Loosen the screws on the rainwater collector's waterproofing board and pull out the board.
- Insert 2xAA batteries into the battery compartment, ensuring correct polarity.
- Replace the waterproofing board and tighten the screws.
- Place the rainwater collector back on its base.
- Indoor Display Console:
- Open the battery compartment cover on the back of the display console.
- Insert 2xAAA batteries, observing polarity.
- Close the battery compartment cover.

Image: Step-by-step guide for installing batteries in the outdoor rain collector.
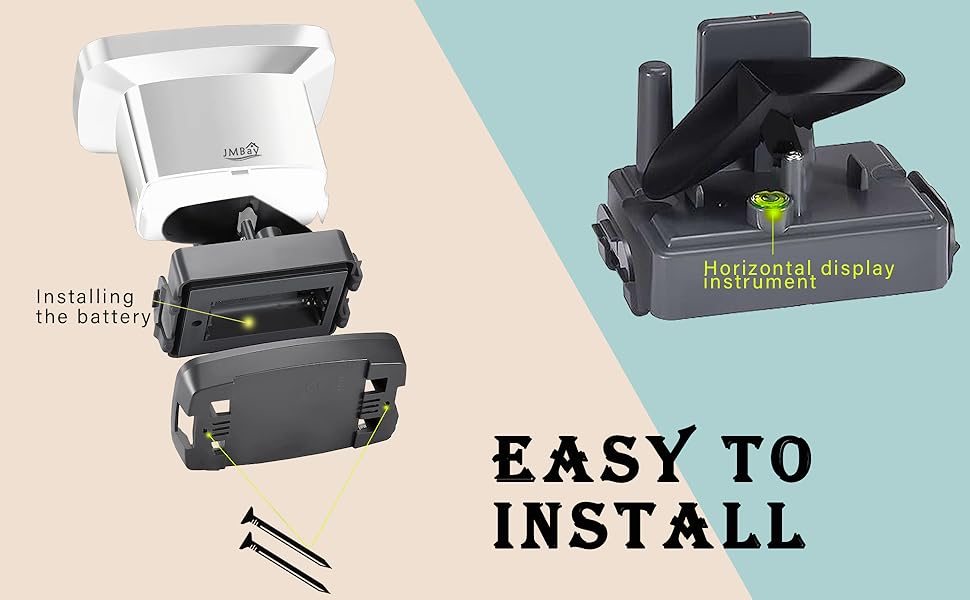
Image: Rear view of the indoor display console, highlighting the battery compartment for AAA batteries.
2. Mounting the Outdoor Rain Collector
For accurate readings, the outdoor rain collector should be mounted in an open area, away from obstructions like trees or buildings that could block rainfall or affect wind patterns. It should also be placed on a flat, level surface.
- Locate the three holes on the base of the rain gauge.
- Use hand tools to secure the rain gauge base to a solid surface such as a deck railing or fence post with the provided screws.
- Ensure the collector is level to guarantee accurate self-emptying and measurement.

Image: Wireless signal transmission between the outdoor rain collector and the indoor display console.
3. Pairing (Automatic)
Once batteries are installed in both units, the indoor display console will automatically attempt to connect with the outdoor rain collector. This process may take a few minutes. Ensure both units are within the effective wireless range (up to 330ft in open areas, 100ft under most conditions).
Operating Instructions
1. Display Overview
The indoor display console provides a comprehensive overview of weather data, including:
- Current Time and Date
- Indoor and Outdoor Temperatures
- Rainfall Measurements (various intervals)
- Moon Phase and Tide Indicator
- Weather Forecast Icons
- Indoor Comfort Indicator
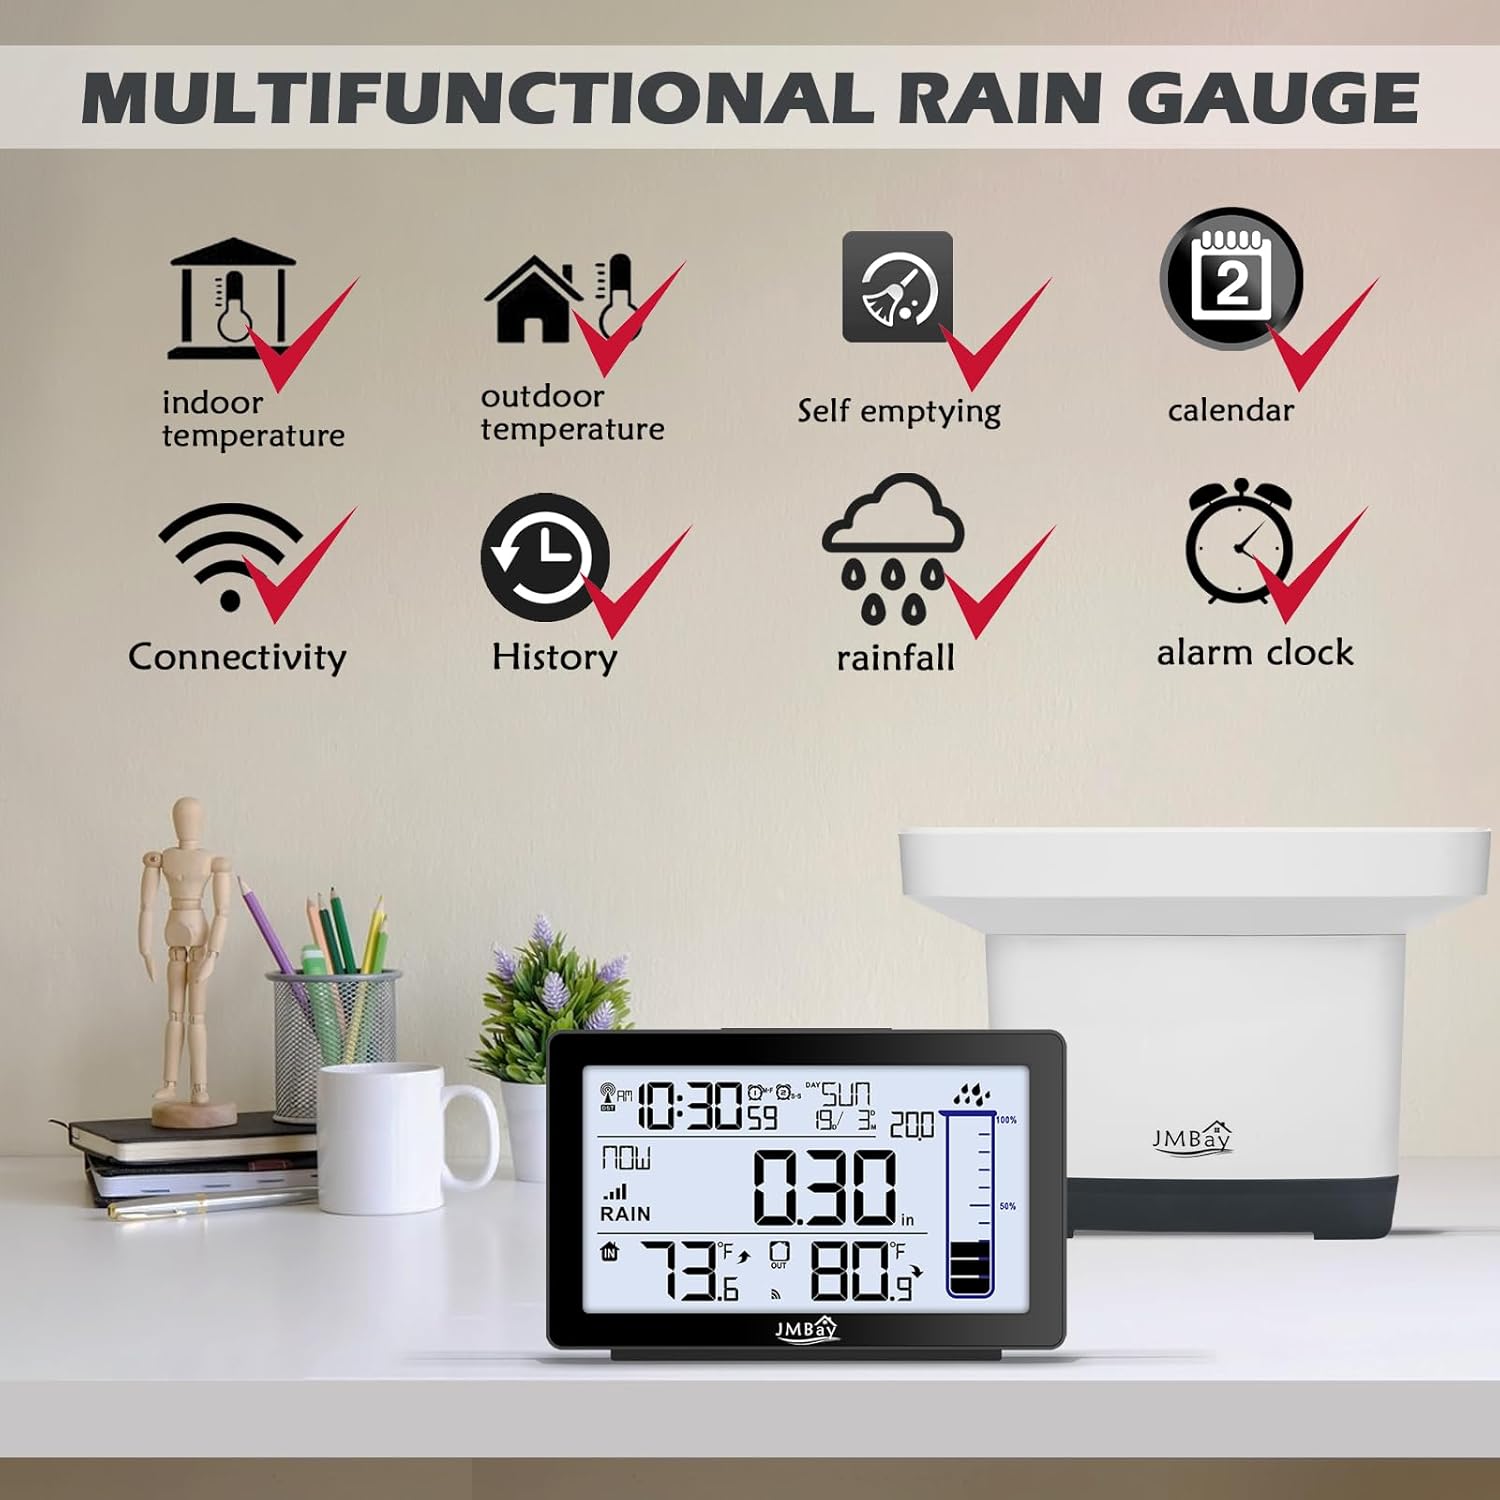
Image: Multifunctional display of the indoor console, showing various data points.
2. Rainfall Measurement Modes
The digital rain gauge provides 8 different rainfall measurements:
- Now (current rainfall)
- 1 Hour
- 24 Hours
- Today
- 7 Days
- Month
- Year
- Total
Numeric measurements are monitored on the digital indoor display console and include historical data and a cylindrical rainfall graph.

Image: Key features of the digital wireless rain gauge, including various rainfall measurement options.
3. Temperature Display
The display shows real-time indoor and outdoor temperatures. The outdoor sensor is designed for accurate temperature measurement.
4. Time and Date Settings
The device features WWVB Radio control time function, automatically syncing to the WWVB signal for accurate time display and automatic Daylight Saving Time (DST) adjustments.

Image: Explanation of the Atomic Clock with WWVB and Auto DST functionality.
5. Alarms
The rain gauge includes programmable rain alarms to help identify flood conditions. It also features a dual alarm clock with snooze function for daily use.

Image: Dual digital alarm clock with snooze function.
6. Backlight
Press the "Light" button above the screen to activate the soft, blue backlight. It will remain on for 15 seconds, aiding nighttime viewing of temperature, time, and rainfall data.
Maintenance
1. Cleaning the Rain Collector
The outdoor rain collector is self-emptying, minimizing manual maintenance. However, periodically check the collector for debris (leaves, insects) that might obstruct the tipping bucket mechanism. Clean gently with a soft cloth and water if necessary.
2. Battery Replacement
Replace batteries in both units when the low battery indicator appears on the display console. Refer to the "Battery Installation" section for detailed steps.
Troubleshooting
| Problem | Possible Cause | Solution |
|---|---|---|
| No outdoor data displayed. | No connection between console and collector; low batteries in collector; interference. | Ensure both units have fresh batteries. Move units closer together. Avoid large metal objects or electronics between units. Re-pair if necessary (refer to manual for specific re-pairing steps if not automatic). |
| Inaccurate rainfall readings. | Collector not level; debris in collector; obstructed placement. | Ensure the outdoor collector is on a perfectly level surface. Clear any debris from the tipping bucket mechanism. Relocate the collector to an open area free from obstructions. |
| Time/Date incorrect. | WWVB signal not received; manual setting required. | Ensure the console is placed in an area with good reception for the WWVB signal. Manually set the time and date if automatic sync fails. |
Specifications
- Product Dimensions: 7.1 x 4.3 x 5.1 inches
- Item Weight: 1.21 pounds
- Manufacturer: JMBay
- Model Number: Digital Rain Gauge Outdoor
- Rainfall Measurement: Now, 1 Hour, 24 Hours, Today, 7 Days, Month, Year, Total
- Temperature Display: Indoor and Outdoor
- Time Features: WWVB Radio Control Time, Auto DST, Dual Alarm Clock with Snooze
- Backlight: Blue, 15-second duration
- Power Source: AA batteries (outdoor collector), AAA batteries (indoor console)
Warranty and Support
For warranty information, technical support, or any product-related inquiries, please refer to the contact information provided on the product packaging or visit the official JMBay website. If the product does not meet your expectations or if you encounter any issues, please contact customer service immediately for assistance.


