1. Introduction
The RODEDIO V300/V519 OBD2 Scanner is a versatile and user-friendly diagnostic tool designed to help you monitor your vehicle's health. This device allows you to read and clear engine fault codes, view live sensor data, check I/M readiness status, and perform battery voltage tests. It is compatible with most vehicles manufactured after 1996 that support OBD-II/EOBD protocols. Its intuitive interface and robust design make it suitable for both automotive enthusiasts and professional mechanics.
This manual provides detailed instructions on how to set up, operate, and maintain your OBD2 scanner, along with troubleshooting tips and technical specifications.
2. Product Overview
2.1 Package Contents
- RODEDIO V300/V519 OBD2 Scanner (fuselage)
- Integrated OBD-II Cable
2.2 Device Layout and Controls
The V300/V519 scanner features a clear LCD display and dedicated buttons for easy navigation and operation.

Figure 2.1: Front view of the RODEDIO V300/V519 OBD2 Scanner, showing the LCD screen, DTC, OK, EXIT buttons, and navigation arrows.
- LCD Display: Shows diagnostic data, menus, and results.
- DTC Button: Directly accesses Diagnostic Trouble Code lookup.
- OK Button: Confirms selections or enters sub-menus.
- EXIT Button: Returns to the previous menu or exits a function.
- Up/Down Arrow Buttons: Navigates through menu options.
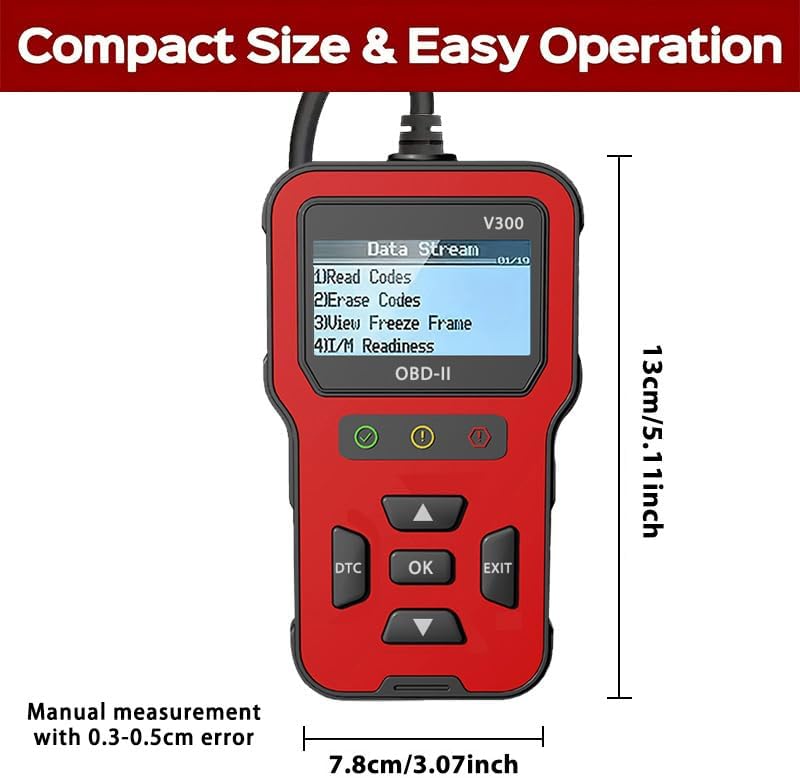
Figure 2.2: Dimensions of the RODEDIO V300/V519 OBD2 Scanner, approximately 13cm (5.11 inches) in length and 7.8cm (3.07 inches) in width.
3. Setup
3.1 Initial Connection
The RODEDIO V300/V519 OBD2 Scanner is designed for plug-and-play operation. No batteries or external power sources are required as it draws power directly from your vehicle's OBD-II port.
- Locate the 16-pin Data Link Connector (DLC) in your vehicle. This port is typically located under the dashboard on the driver's side.
- Ensure the vehicle's ignition is in the OFF position.
- Firmly plug the scanner's OBD-II cable into the vehicle's DLC.
- Turn the vehicle's ignition to the ON position (engine off). The scanner will automatically power on and begin communicating with the vehicle's onboard computer.

Figure 3.1: The OBD2 scanner being held in a user's hand, demonstrating its compact size and ease of use within a vehicle's interior.
4. Operation
4.1 Basic Navigation
Once powered on, the scanner will display the main menu. Use the Up and Down arrow buttons to scroll through menu options. Press the OK button to select an option or enter a sub-menu. Press the EXIT button to return to the previous screen or menu.
Figure 4.1: The scanner's main menu displaying options such as "Read Codes", "Erase Codes", "View Freeze Frame", and "I/M Readiness".
4.2 Reading Diagnostic Trouble Codes (DTCs)
This function allows you to retrieve stored Diagnostic Trouble Codes (DTCs) from the vehicle's computer, which indicate specific issues.
- From the main menu, select "Read Codes" and press OK.
- The scanner will display any stored DTCs. If multiple codes are present, use the arrow buttons to scroll through them.
- Each code will typically be accompanied by a brief description.
4.3 Erasing Diagnostic Trouble Codes (DTCs)
Clearing DTCs will turn off the Check Engine Light (MIL) and erase all diagnostic data from the vehicle's memory. Note: Only clear codes after addressing the underlying issue, otherwise, the codes will reappear.
- From the main menu, select "Erase Codes" and press OK.
- Confirm your selection when prompted.
- The scanner will indicate if the codes have been successfully erased. The Check Engine Light should turn off.

Figure 4.2: Illustration of the scanner's ability to identify engine problems and clear fault codes, thereby turning off the check engine light.
4.4 Viewing Freeze Frame Data
Freeze Frame Data is a snapshot of the vehicle's operating conditions at the moment a fault code was set. This data can help in diagnosing intermittent problems.
- From the main menu, select "View Freeze Frame" and press OK.
- The scanner will display various parameters recorded when the DTC occurred.
4.5 I/M Readiness Status
I/M Readiness (Inspection/Maintenance Readiness) indicates whether the various emissions-related systems on the vehicle are operating correctly and have completed their self-tests. This is useful for emissions testing.
- From the main menu, select "I/M Readiness" and press OK.
- The scanner will display the status of various monitors (e.g., O2 Sensor, EVAP System). A "Ready" status indicates the monitor has completed its test.
4.6 Live Data Stream
The Live Data Stream function displays real-time sensor data from the vehicle's engine control unit (ECU). This can include engine RPM, vehicle speed, coolant temperature, oxygen sensor readings, and more.
- From the main menu, select "Data Stream" or "Live Data" and press OK.
- The scanner will display a list of available data parameters. Use the arrow buttons to scroll and view different values.
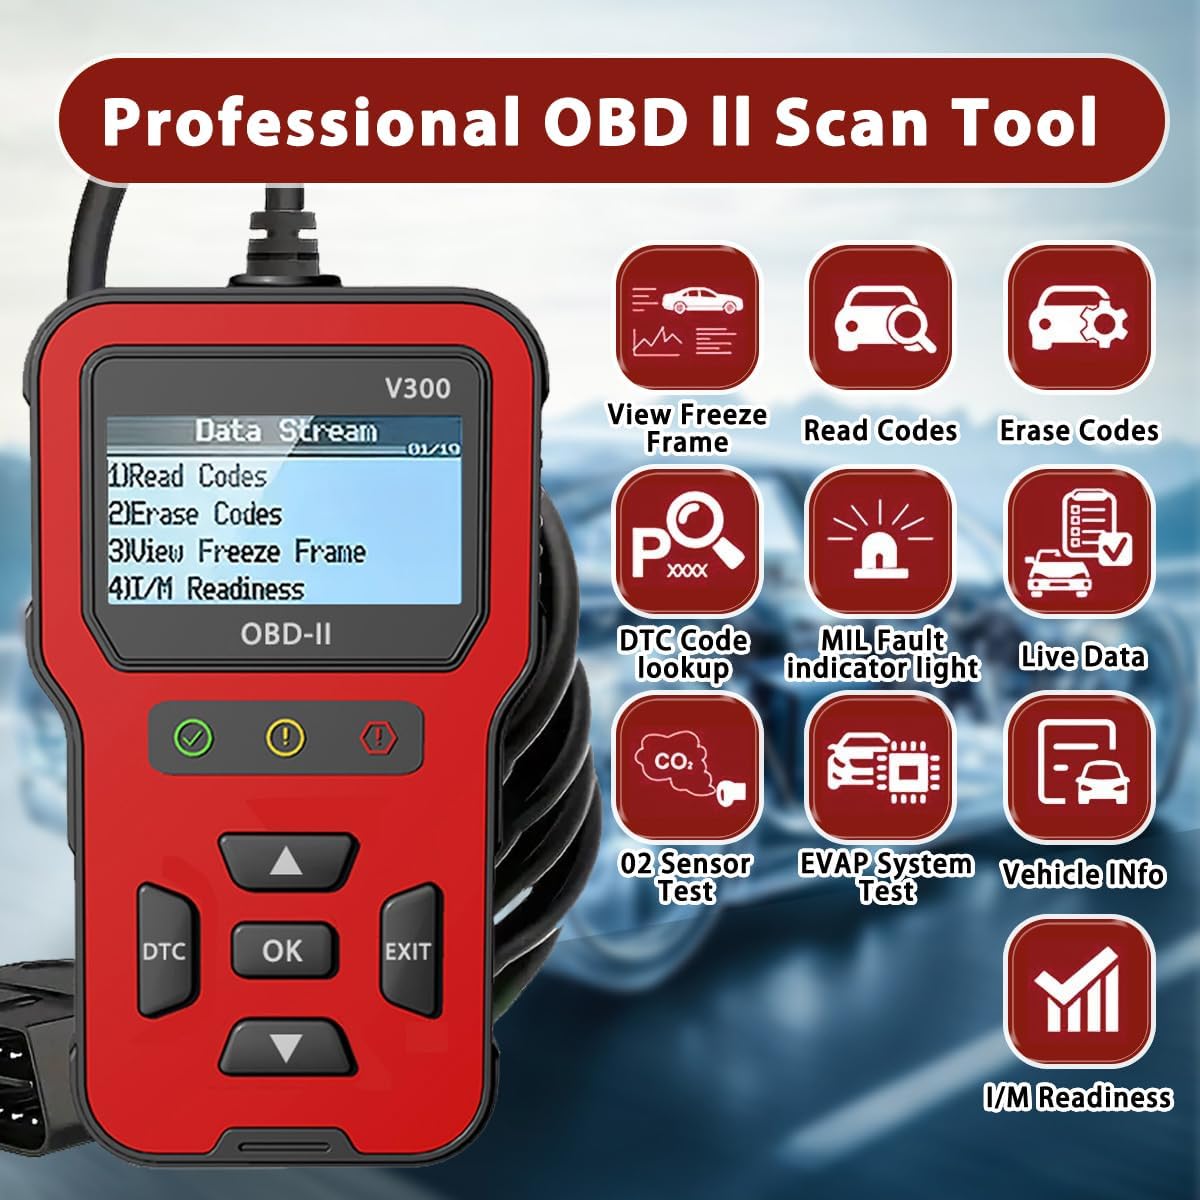
Figure 4.3: An overview of the professional OBD II scan tool's capabilities, including View Freeze Frame, Read Codes, Erase Codes, DTC Code Lookup, MIL Fault Indicator Light, Live Data, O2 Sensor Test, EVAP System Test, Vehicle Info, and I/M Readiness.
4.7 Battery Voltage Test
This function allows you to check the vehicle's battery voltage, providing a quick assessment of its health.
- From the main menu, select the option related to "Battery Voltage Test" and press OK.
- The scanner will display the current battery voltage.
4.8 DTC Lookup
If you have a specific DTC code, you can use the DTC Lookup function to get a detailed description of the code.
- Press the dedicated DTC button or select "DTC Lookup" from the menu.
- Enter the DTC code using the arrow buttons to navigate characters and OK to select.
- The scanner will display the definition of the code.
5. Compatibility
5.1 Supported Vehicles
The RODEDIO V300/V519 OBD2 Scanner is compatible with most vehicles that support the OBD-II/EOBD protocols. This generally includes:
- US Vehicles: All vehicles manufactured after 1996.
- EU Vehicles: All vehicles manufactured after 2002.
- Asian Vehicles: All vehicles manufactured after 2008.
It supports all full OBDII modes.

Figure 5.1: Compatibility details for the scanner, indicating support for most vehicles after 1996 and listing various supported OBD protocols for diesel vehicles.
5.2 Important Limitations
Please note the following limitations:
- This product does not support ABS, SRS, or TPMS detection. It is primarily for engine-related diagnostics.
- For diesel vehicles, please ensure your vehicle supports one of the following protocols, otherwise, this product may not be compatible:
- SAE J1850 PWM (41.6KBaud)
- SAE J1850 VPW (10.4KBaud)
- ISO9141-2 (5 baud init, 10.4KBaud)
- ISO14230-4 KWP (5 baud init, 10.4 KBaud)
- ISO14230-4 KWP (fast init, 10.4 KBaud)
- ISO15765-4 CAN (11bit ID, 500 KBaud)
- ISO15765-4 CAN (29bit ID, 500 KBaud)
- ISO15765-4 CAN (11bit ID, 250 KBaud)
- ISO15765-4 CAN (29bit ID, 250 KBaud)
6. Technical Specifications
| Feature | Specification |
|---|---|
| Brand | RODEDIO |
| Model | V519 (also referred to as V300) |
| Product Dimensions | 5.1"L x 1.5"W x 7.8"H (approx. 13cm x 3.8cm x 19.8cm) |
| Item Weight | 8 ounces (approx. 227 grams) |
| Display Resolution | 128 x 64 LCD |
| Operating System (for PC connection, if applicable) | Windows XP (Note: Device is plug-and-play, no PC software typically required for basic operation) |
| Automotive Fit Type | Universal Fit (OBD2/EOBD compliant vehicles) |
| Country of Origin | China |
7. Troubleshooting
If you encounter issues while using your RODEDIO OBD2 Scanner, please refer to the following common problems and solutions:
- Scanner does not power on:
- Ensure the scanner's cable is firmly connected to the vehicle's 16-pin DLC.
- Verify the vehicle's ignition is in the ON position (engine off).
- Check the vehicle's fuse for the OBD-II port (consult your vehicle's owner's manual for fuse box location and diagram).
- "Link Error" or "Communication Error" message:
- Confirm the vehicle is OBD-II compliant (most vehicles after 1996 in the US, 2002 in EU, 2008 in Asia).
- Ensure the ignition is ON and the engine is off.
- Try connecting the scanner to a different OBD-II compliant vehicle to rule out a scanner issue.
- Check for any aftermarket devices connected to the OBD-II port that might interfere with communication.
- Cannot clear codes:
- Ensure the ignition is ON and the engine is off.
- Codes cannot be cleared if the underlying fault is still present. Diagnose and repair the issue first, then attempt to clear codes.
- Inaccurate readings:
- Ensure the vehicle's battery voltage is stable.
- Verify the scanner's connection is secure.
- If possible, compare readings with another known good scanner.
8. Maintenance
To ensure the longevity and optimal performance of your RODEDIO OBD2 Scanner, follow these maintenance guidelines:
- Keep the device clean by wiping it with a soft, dry cloth. Avoid using abrasive cleaners or solvents.
- Store the scanner in a cool, dry place away from direct sunlight and extreme temperatures.
- Do not expose the device to water or excessive moisture.
- Avoid dropping the scanner or subjecting it to strong impacts.
- Do not attempt to disassemble or repair the unit yourself, as this will void any potential warranty.
9. Warranty and Support
For warranty information or technical support, please contact RODEDIO customer service through the retailer where you purchased the product or refer to the contact information provided with your purchase. Please have your product model number (V300/V519) and purchase details ready when contacting support.


