1. Product Overview
The Katalic Automatic Cat Feeder is designed to provide scheduled and portion-controlled meals for your pets, ensuring they are fed consistently even when you are away. This 6-liter capacity feeder is suitable for cats and small dogs, featuring a 10-second voice recorder for meal calls and dual stainless steel bowls for multi-pet households.

Image: The Katalic Automatic Cat Feeder, showcasing its 6-liter food reservoir and two stainless steel feeding bowls.
2. Setup Guide
2.1 Unboxing and Component Identification
Carefully remove all components from the packaging. Ensure you have the following parts:
- Main Feeder Unit (with control panel)
- Food Storage Container (6L capacity)
- Lid with Desiccant Bag Compartment
- Food Dispenser Base with Dual Bowl Slots
- 2 Stainless Steel Bowls
- Power Adapter
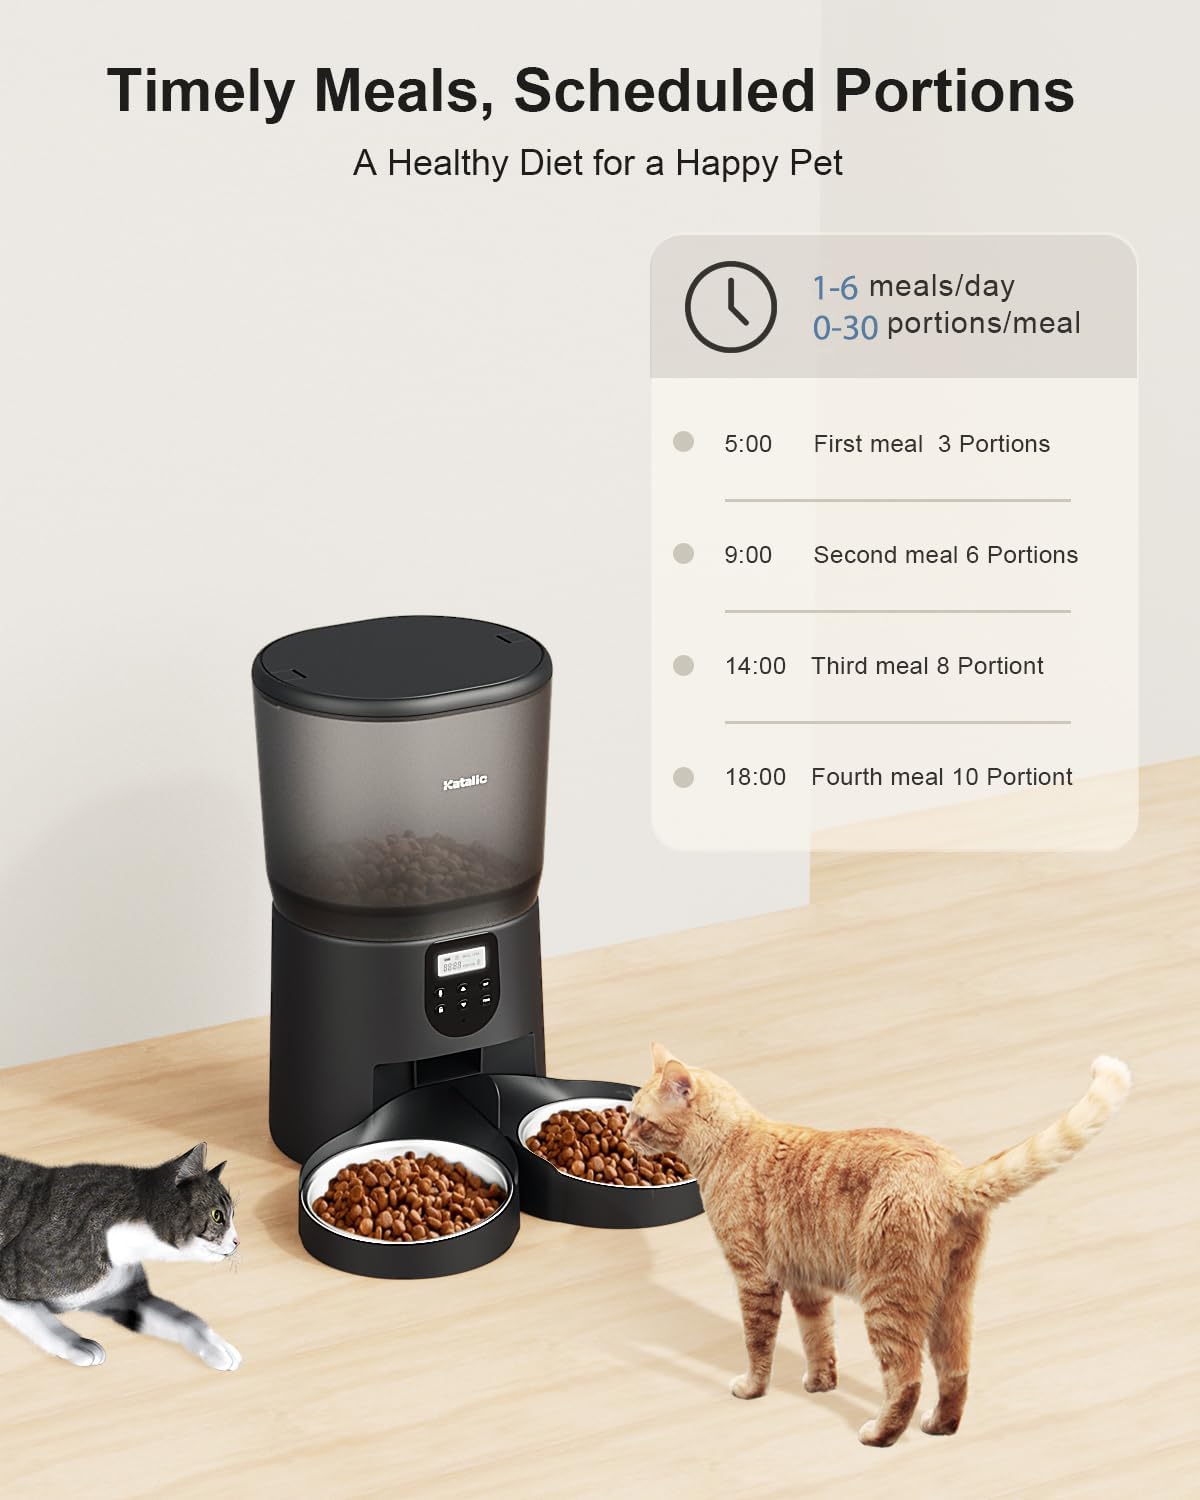
Image: All individual components of the feeder, including the main unit, food container, lid, base, and bowls, ready for assembly.
2.2 Assembly Instructions
- Place the main feeder unit on a flat, stable surface.
- Insert the food storage container onto the main unit, ensuring it clicks securely into place.
- Place the food dispenser base onto the main unit, aligning the dispensing chute.
- Insert the two stainless steel bowls into their respective slots on the dispenser base.
- Open the lid and insert the desiccant bag into its designated compartment to keep food fresh. Close the lid securely.
Video: A step-by-step guide on how to install and assemble the Katalic Automatic Cat Feeder components.
2.3 Power Connection
Connect the power adapter to the feeder's power port and plug it into a wall outlet. For backup power during outages, install three D-size alkaline batteries (not included) into the battery compartment at the bottom of the unit. The feeder will automatically switch to battery power if AC power is interrupted.

Image: Illustration of the feeder connected to AC power and highlighting the battery compartment for backup power.
2.4 Filling the Food Container
Open the lid and pour dry pet food into the storage container. Ensure the kibble size is between 2-16mm (0.07-0.6 inches) for optimal dispensing and to prevent clogs. Do not overfill the container.

Image: A detailed view of the feeder's internal mechanism, designed to prevent food clogs and ensure smooth dispensing.
3. Operating Instructions
3.1 Control Panel Overview
The control panel features an LCD display and several buttons for programming: Lock/Unlock, Microphone (Record), Up, Down, SET, and FEED.
3.2 Setting the Current Time
- Press and hold the Lock/Unlock button for 3 seconds to unlock the control panel. The lock icon on the display will disappear.
- Press the SET button once. The hour display will start blinking.
- Use the Up and Down arrows to adjust the hour.
- Press SET again to confirm the hour and move to minutes. Use Up and Down arrows to adjust minutes.
- Press SET again to save the current time.
Video: Demonstrates how to unlock the feeder's control panel and set the current time.
3.3 Programming Meal Times and Portions
The feeder supports up to 4 meals per day, with 1-20 portions per meal. Each portion is approximately 12 grams.
- After setting the current time, press SET again. "MEAL: 1" will appear on the display.
- Use Up and Down arrows to set the desired feeding time for Meal 1 (hour and then minutes, pressing SET to switch).
- Press SET again. The "PORTION" display will blink. Use Up and Down arrows to set the number of portions for Meal 1.
- Press SET to save Meal 1 settings and move to Meal 2. Repeat steps for Meal 2, 3, and 4 if needed.
- If you only need fewer than 4 meals, simply press SET to skip the remaining meal settings. The feeder will only activate the meals you have programmed.

Image: The feeder's display showing programmed meal times and portion sizes, illustrating a typical feeding schedule.
Video: A demonstration of setting up the feeding schedule, including meal times and portion sizes.
3.4 Voice Recording for Meal Calls
You can record a 10-second voice message to call your pets at meal times.
- Ensure the panel is unlocked.
- Press and hold the Microphone button for 3 seconds until you hear a single "beep" sound.
- Begin recording your message (maximum 10 seconds).
- Release the Microphone button when finished. You will hear a double "beep" sound, indicating the recording is saved.
- The recorded message will play automatically at each scheduled meal time.

Image: The feeder's control panel highlighting the microphone button for recording personalized meal calls.
3.5 Manual Feeding
To dispense food manually outside of scheduled times:
- Ensure the control panel is unlocked.
- Press the FEED button once to dispense one portion of food. You can press it multiple times for additional portions.
4. Maintenance
4.1 Cleaning the Feeder
Regular cleaning ensures hygiene and proper operation. The food storage container, lid, and stainless steel bowls are removable and washable.
- Remove the food storage container, lid, and stainless steel bowls. Wash them with mild soap and water. Rinse thoroughly and dry completely before reassembling.
- Wipe the main feeder unit and dispenser base with a damp cloth. Do not submerge the main unit in water, as it contains electronic components.

Image: Various parts of the feeder disassembled, illustrating how easy they are to detach for cleaning.
4.2 Desiccant Bag Replacement
The desiccant bag helps keep the pet food fresh and dry. It is recommended to change the desiccant bag every half a month to ensure optimal food quality.

Image: A desiccant bag being inserted into its dedicated compartment within the feeder's lid.
5. Troubleshooting
5.1 Food Not Dispensing
- Check Power: Ensure the feeder is properly plugged in or that the backup batteries are installed and have sufficient charge.
- Check for Clogs: Verify that the food chute is not blocked by large kibble pieces or debris. Ensure kibble size is within the recommended 2-16mm range.
- Verify Schedule: Double-check your programmed meal times and portions to ensure they are set correctly.
5.2 Voice Recording Not Working
- Recording Process: Ensure you are pressing and holding the Microphone button for 3 seconds until the first "beep" and releasing it after the double "beep" to save the recording.
- Microphone Obstruction: Check if the microphone opening is clear of any dust or debris.
5.3 Resetting All Settings
If you encounter persistent issues or wish to clear all programmed settings:
- Ensure the control panel is unlocked.
- Press and hold the SET button for 6 seconds. All settings will be reset to factory defaults (time will reset to 00:00, and all meal plans will be cleared).
6. Specifications
| Feature | Detail |
|---|---|
| Brand | Katalic |
| Model Number | PF004 |
| Capacity | 6 Liters / 25 cups |
| Item Weight | 4.69 pounds |
| Product Dimensions | 6.8 x 10.8 x 6.8 inches |
| Color | White |
| Operation Mode | Automatic |
| Power Source | AC Adapter (Batteries not included for backup) |
| Max Meals Per Day | 4 |
| Max Portions Per Meal | 20 |
| Voice Recording | 10 seconds |
7. Warranty and Support
Katalic products are designed for reliability and performance. For warranty information, technical support, or any inquiries regarding your automatic pet feeder, please refer to the contact details provided on the official Katalic website or the product packaging.
You can also visit the Katalic Store on Amazon for additional resources and product information.