
1. Introduction
This manual provides comprehensive instructions for the installation, operation, and maintenance of your visiPower TUYA Smart Electronic Door Lock, Model Z17-16cm. This smart lock offers multiple unlocking methods including fingerprint, password, IC card, mobile application (Tuya App), NFC, and traditional mechanical keys, providing enhanced security and convenience for your home or office.
2. Product Overview
2.1 Key Features
- 5-in-1 Keyless Entry: Fingerprint, Passcode, IC Card, Mechanical Key, and Tuya App (BLE) unlocking.
- Remote Control: Manage and control the lock from anywhere using the Tuya smart app (no additional bridge required).
- Fast Fingerprint Recognition: Unlock in under 0.3 seconds with a highly sensitive semiconductor 3D fingerprint sensor.
- Automatic Locking: Configurable automatic locking feature (3-900 seconds) upon exit.
- Enhanced Security: Semiconductor and biological characteristics technology prevents fake fingerprints. Features anti-pry, low battery, and trial-and-error alarms.
- Emergency Power: Type-C interface for emergency power supply using a 5V mobile power bank.
- User Capacity: Supports up to 9 administrators and a total capacity of 300 users (fingerprints, passwords, or cards).
2.2 Components
The product package includes the following main components:
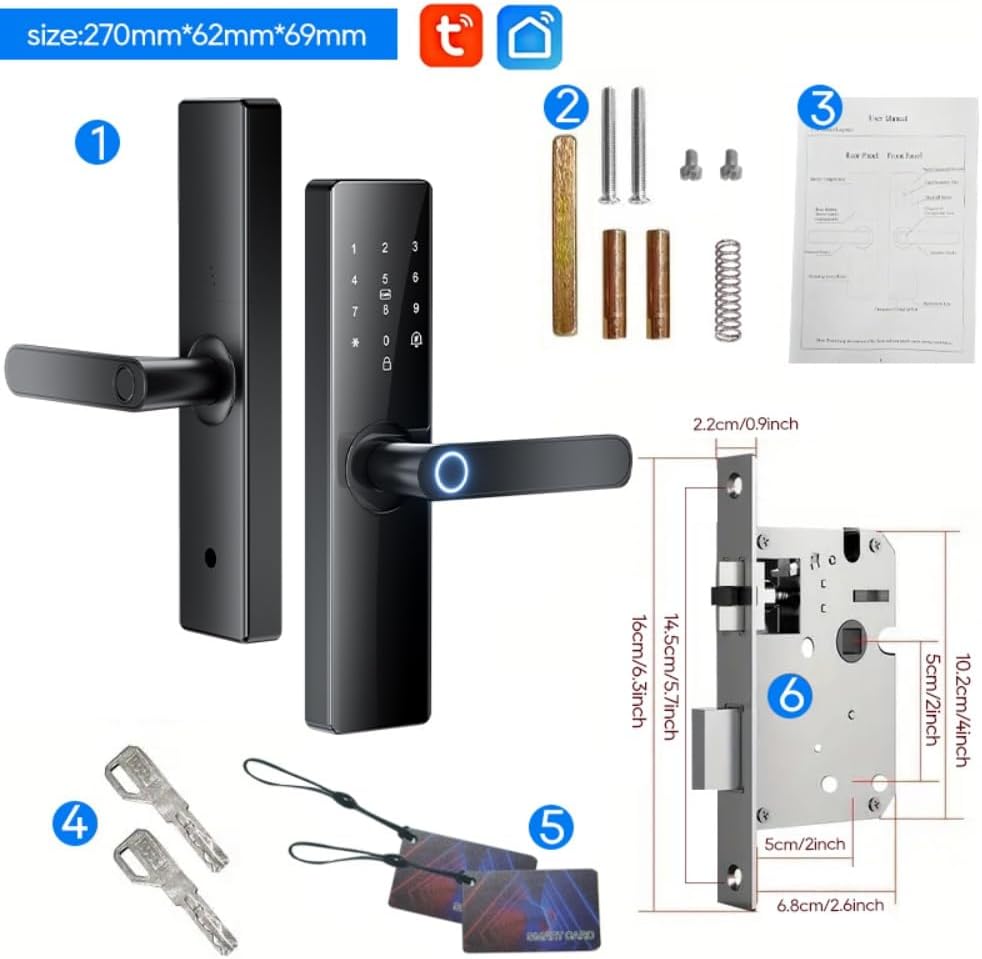
Image: Main components of the visiPower Smart Electronic Door Lock. This includes (1) the interior and exterior lock handles with keypad and fingerprint sensor, (2) installation accessories such as screws and spindles, (3) a template for installation, (4) two mechanical keys, (5) two IC cards, and (6) the lock body with dimensions.
- Exterior Lock Panel with Keypad and Fingerprint Sensor
- Interior Lock Panel
- 16CM Lock Body
- Installation Accessories (screws, spindles, etc.)
- 2 x IC Cards
- 2 x Mechanical Keys
- Instruction Manual
3. Setup and Installation
The visiPower Smart Electronic Door Lock is designed for easy installation, typically requiring only a Phillips screwdriver. It is suitable for both left and right-handed doors, eliminating the need for a locksmith in most cases.
3.1 Pre-Installation Check
- Ensure your door thickness is between 38mm and 55mm.
- Verify the door opening direction (left or right).
- Confirm all components listed in Section 2.2 are present.
3.2 Installation Steps
- Prepare the Door: Use the provided installation template to mark and drill holes on your door if necessary.
- Install the Lock Body: Insert the 16CM lock body into the door edge and secure it with screws.
- Install Exterior Panel: Connect the exterior lock panel to the lock body, ensuring cables are routed correctly.
- Install Interior Panel: Connect the interior lock panel, attach the cables, and secure it to the exterior panel using the provided screws.
- Insert Batteries: Open the battery compartment on the interior panel and insert 4 AA batteries (not included).
- Test Operation: Test all unlocking methods and ensure the lock operates smoothly.
4. Operating Instructions
4.1 Unlocking Methods
The lock supports multiple ways to unlock:

Image: Overview of the six available unlocking methods for the smart door lock.
- Fingerprint Unlock: Place your registered finger on the fingerprint sensor. The lock will unlock in approximately 0.3 seconds. The lock uses a highly sensitive semiconductor 3D fingerprint sensor for accurate identification.
- Password Unlock: Enter your registered 6-12 digit password on the touchscreen keypad, followed by the '#' key.
- IC Card Unlock: Present a registered IC card to the card reader area on the lock. The lock will beep and unlock. Lost IC cards can be deleted from the system.
- Tuya App Unlock (BLE): Use the Tuya Smart app on your smartphone to unlock the door via Bluetooth Low Energy (BLE). Ensure your phone is within range.
- NFC Unlock: If your device supports NFC, you can use it to unlock the door after proper setup within the Tuya app.
- Mechanical Key Unlock: In case of emergencies or battery depletion, use the provided mechanical keys to unlock the door.

Image: Detailed view of the semiconductor fingerprint identification technology, highlighting its high accuracy and speed.

Image: A user unlocking the door using an IC card, demonstrating the card reader function.
4.2 Tuya App Setup and Remote Control
- Download the Tuya Smart app from your device's app store.
- Register or log in to your Tuya account.
- Add the smart door lock device within the app by following the on-screen instructions.
- Once connected, you can manage users, view access logs, and unlock the door remotely.
- Remote Unlock for Visitors: When a visitor rings the doorbell (if integrated), the owner can use the mobile phone app to unlock the door remotely. Note: Active remote unlocking without a doorbell trigger is not supported.
4.3 User Management
- Administrator Setup: The local administrator has the highest authority. Up to 9 administrators can be set using fingerprints, passwords, or IC cards. Administrators can edit and set lock parameters.
- User Capacity: The lock supports a total of 300 users (fingerprints, passwords, or cards).
- Dual Verification Mode: For special occasions, set up a dual verification mode where two users must verify simultaneously (e.g., two fingerprints, or a fingerprint and a password) to unlock the door.
4.4 Automatic Locking
The lock can be configured to automatically secure itself after a set period. This duration can be adjusted from 3 to 900 seconds via the lock settings or Tuya app.
4.5 Emergency Unlocking
In situations where the battery is depleted, the lock offers two emergency unlocking options:
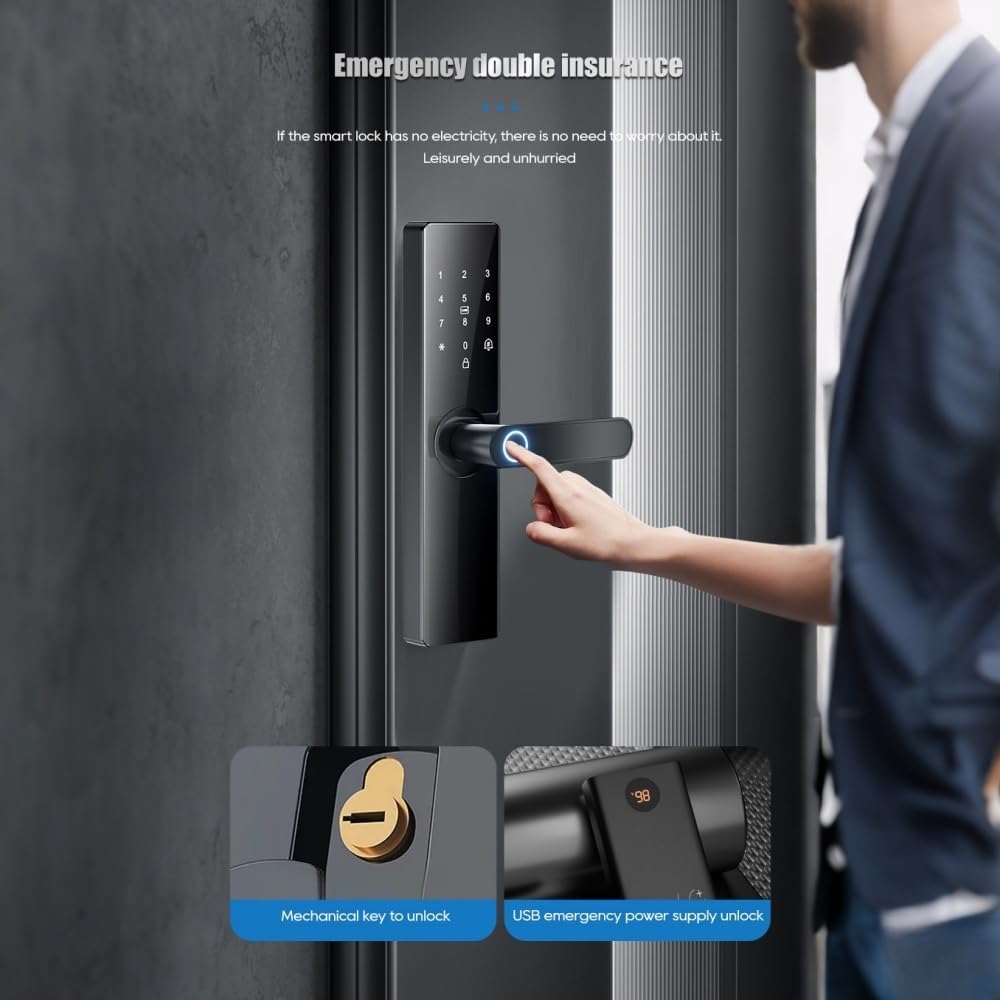
Image: Emergency unlocking options, including mechanical key access and temporary power via a Type-C USB port.
- Mechanical Key: Use one of the provided mechanical keys to manually unlock the door.
- Emergency Power Supply: Connect a 5V mobile power bank to the Type-C interface on the lock's exterior panel to temporarily power the lock and use electronic unlocking methods.
5. Maintenance
5.1 Battery Replacement
The lock operates on 4 AA batteries (not included), which typically last for about half a year. Replace batteries when the low battery alarm is triggered to ensure continuous operation.
- Open the battery compartment on the interior lock panel.
- Remove the old batteries and insert new 4 AA batteries, ensuring correct polarity.
- Close the battery compartment.
5.2 Cleaning
Wipe the lock's surface with a soft, dry cloth. Avoid using abrasive cleaners or solvents that may damage the finish or electronic components.
6. Troubleshooting
The smart lock is equipped with multiple alarm functions to alert you to potential issues:

Image: Visual representation of the anti-pry, low battery, and trial-and-error alarm features.
- Anti-Pry Alarm: If the lock body is abnormally pried, a treble alarm will be triggered.
- Low Battery Alarm: When battery power is less than 20%, a voice alert will sound. Replace batteries promptly.
- Trial and Error Alarm: If an incorrect password is entered 5 times in a row, the system will automatically lock and trigger a treble alarm. An alarm notification will be pushed to your phone. The lock will be temporarily disabled for 90 seconds before another attempt can be made.
6.1 Common Issues and Solutions
| Issue | Possible Cause | Solution |
|---|---|---|
| Lock does not respond | Dead batteries | Replace batteries or use emergency Type-C power. |
| Fingerprint not recognized | Finger wet/dirty, unregistered fingerprint, sensor dirty | Ensure finger is clean and dry. Re-register fingerprint if needed. Clean sensor. |
| App cannot connect to lock | Bluetooth off, out of range, app not paired | Ensure Bluetooth is on. Move closer to the lock. Re-pair the device in the Tuya app. |
| Lock beeps continuously | Low battery, tamper alarm | Check battery level. Inspect lock for tampering. |
7. Specifications
| Feature | Detail |
|---|---|
| Model Number | Z17-16cm |
| Brand | visiPower |
| Unlocking Methods | APP, Mechanical Keys, Fingerprint, Password, IC Card, NFC |
| Smart Home Platform | Tuya |
| Material | Acrylic mirror + Alloy (Aluminum) |
| Lock Type | Biometric |
| Power Type | 4 x AA Batteries (not included) |
| Emergency Power | Type-C USB |
| Password Length | 6-12 bits |
| User Capacity | 9 Administrators, 300 Total Users |
| Applicable Door Type | Wooden door, Aluminum door |
| Applicable Door Thickness | 38~55mm |
| Product Dimensions (L x W x H) | 270mm x 62mm x 69mm (10.5 x 2.3 x 2.7 inches) |
| Item Weight | 5 pounds |
| Connectivity Protocol | Wi-Fi, BLE |
| UPC | 762700919470 |
8. Warranty and Support
8.1 Manufacturer's Warranty
This visiPower Smart Electronic Door Lock comes with a 1-Year Manufacturer's Warranty from the date of purchase. This warranty covers defects in materials and workmanship under normal use.
8.2 Customer Support
For technical assistance, troubleshooting, or warranty claims, please contact visiPower customer support through the retailer where the product was purchased or refer to the official visiPower website for contact information.