1. Introduction
This manual provides detailed instructions for the assembly, operation, and maintenance of your Generic F70076 Astronomical Telescope. This reflective telescope is designed for observing celestial objects such as the Moon, planets, and brighter deep-sky objects. Please read this manual thoroughly before using your telescope to ensure proper setup and safe operation.

Image 1.1: The Generic F70076 Astronomical Telescope fully assembled.
2. Safety Information
- NEVER look directly at the Sun through the telescope without a professionally manufactured solar filter. Doing so can cause immediate and irreversible eye damage, including blindness.
- Always supervise children when using the telescope.
- Do not leave the telescope unattended in direct sunlight, as it can focus sunlight and create a fire hazard.
- Handle optical components with care to avoid scratches or damage.
- Ensure the tripod is stable on a level surface to prevent tipping.
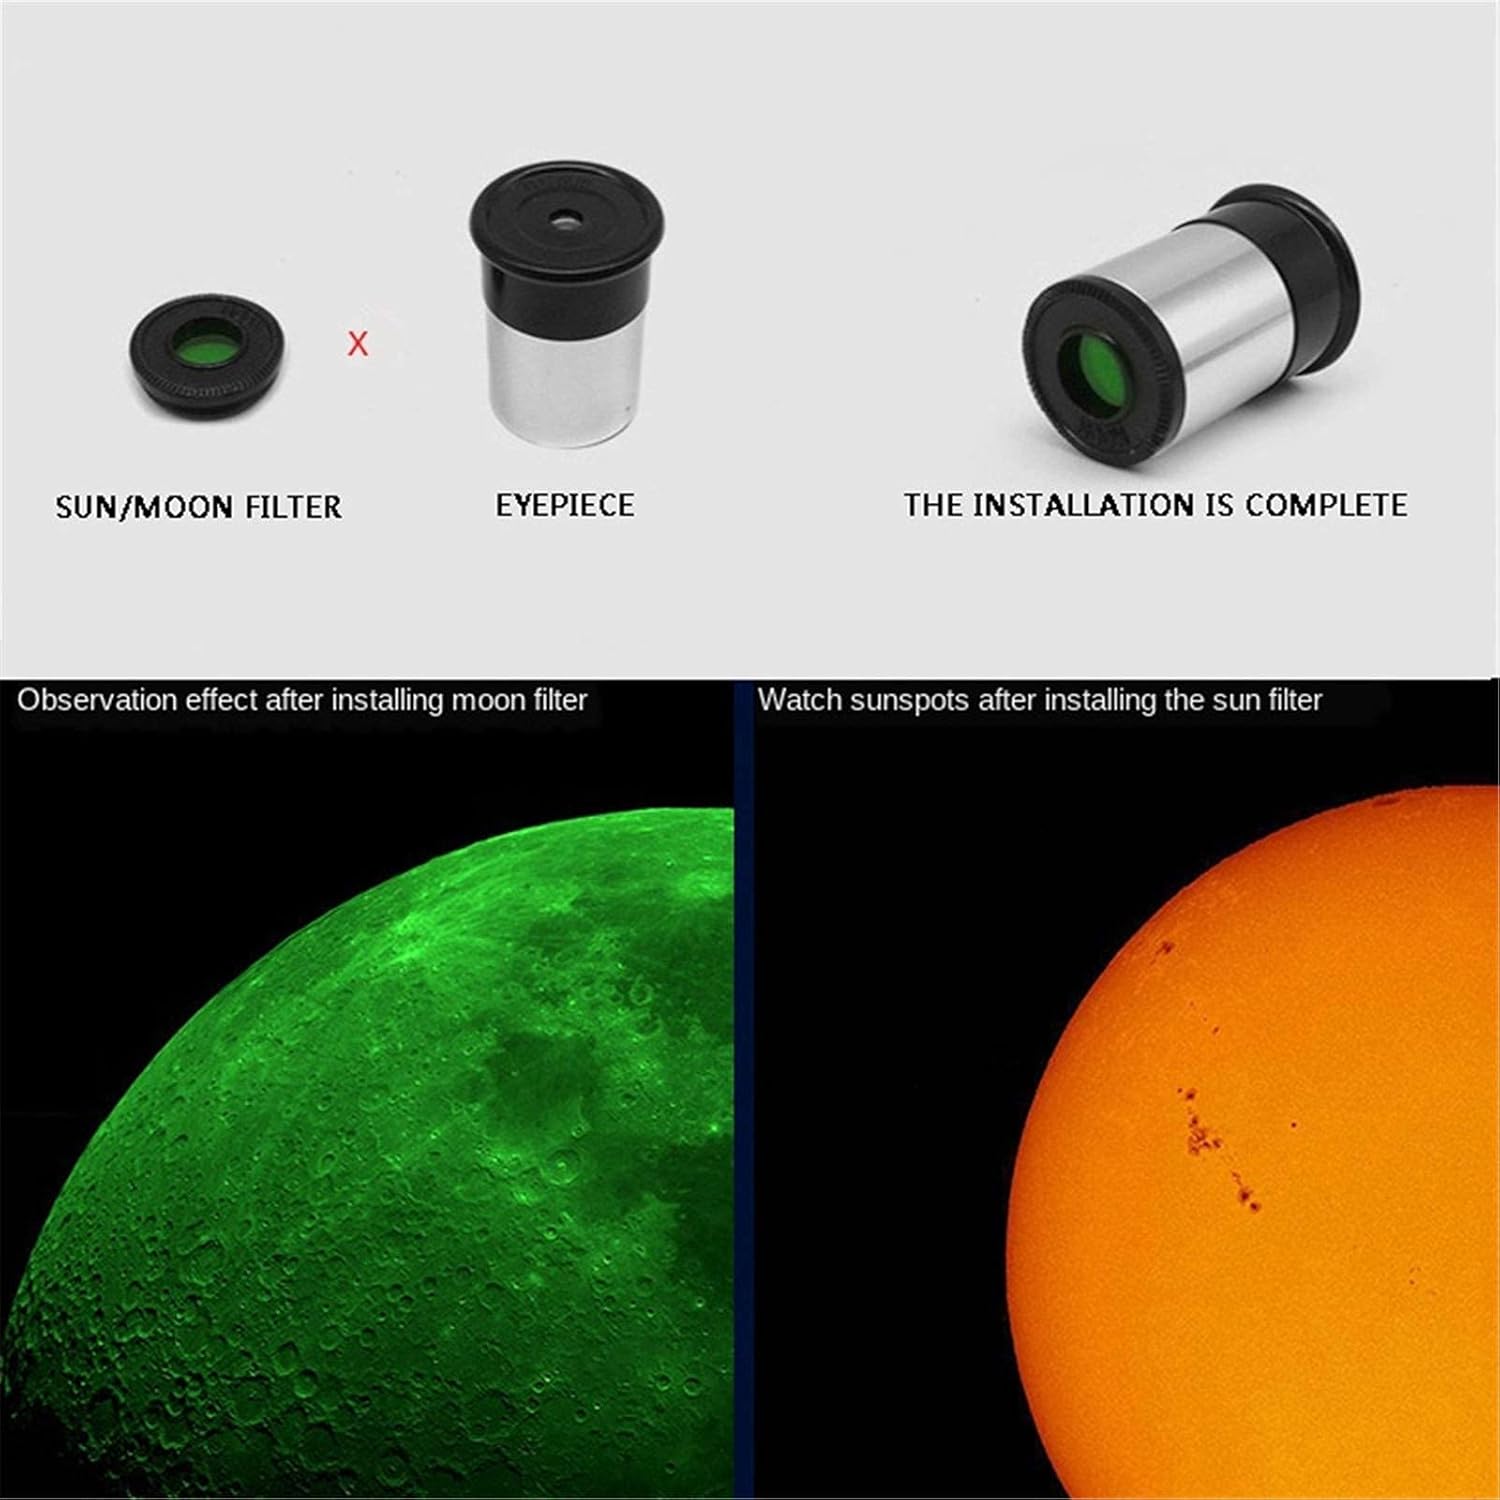
Image 2.1: Illustration of sun and moon filter installation and their effects on observation. Always use a certified solar filter for sun observation.
3. Package Contents
Before assembly, verify that all components listed below are present in your package:
Image 3.1: All components included in the Generic F70076 Telescope package.
- Telescope Body Tube
- Tripod (with two-layer adjustable legs)
- Eyepieces (various magnifications)
- Finderscope with Bracket
- Teleconverter (Barlow Lens)
- Moonlight Filter
- Sun Filter (for safe solar observation)
- Accessories Plate
- U-shaped Frame / Main Bracket
- Trimmer Rod (Fine Adjustment Rod)
- Screw Set for Assembly
- Phone Adapter (for astrophotography)
4. Assembly and Setup
Follow these steps to assemble your telescope:
- Set up the Tripod: Extend the tripod legs to a stable height on a level surface. Secure the legs using the locking mechanisms. Attach the accessories plate to the center of the tripod for stability and storage.
- Attach the Main Bracket: Secure the U-shaped frame (main bracket) to the top of the tripod using the provided screws and horizontal locking knob.
- Mount the Telescope Body: Carefully place the telescope body tube onto the main bracket. Align the mounting points and secure it with the raised bar locking knob and other relevant fasteners.
- Install the Finderscope: Attach the finderscope to its bracket on the main telescope body. Secure it with the finderscope fixing nut. The finderscope helps in locating objects before viewing them through the main telescope.
- Insert Eyepiece: Loosen the screw on the eyepiece extension tube (focuser). Insert your desired eyepiece into the focuser and tighten the screw to hold it in place. For higher magnification, you can insert the teleconverter (Barlow lens) first, then the eyepiece into the teleconverter.
- Attach Phone Adapter (Optional): If using the phone adapter for astrophotography, attach it to the eyepiece as shown in the diagram. Ensure your phone's camera lens is aligned with the eyepiece.

Image 4.1: Telescope assembly showing the U-shaped frame and fine adjustment rod.

Image 4.2: Labeled diagram of the telescope's main components.

Image 4.3: Installation of the phone adapter for capturing images through the telescope.
5. Operating Instructions
5.1 Aligning the Finderscope
The finderscope has a wider field of view than the main telescope, making it easier to locate objects. To align it:
- Point the main telescope at a distant, stationary object (e.g., a distant tree or building) during daylight hours.
- Center the object in the main telescope's eyepiece.
- Look through the finderscope and adjust its alignment screws until the same object is centered in the finderscope's crosshairs.
5.2 Observing Celestial Objects
- Locate Object: Use the aligned finderscope to locate your desired celestial object.
- Center in Main Telescope: Once the object is in the finderscope's crosshairs, it should be visible in the main telescope's eyepiece. Use the fine adjustment rod to make small adjustments to the telescope's position (up and down 120 degrees adjustment). The U-shaped frame allows for 360-degree horizontal adjustment.
- Focus: Turn the focusing knob bending and lifting fine-tuning knob slowly until the image is sharp and clear.
- Change Magnification: To change magnification, swap eyepieces. Start with a low-power eyepiece (higher focal length, e.g., 20mm) for a wider field of view, then switch to a higher-power eyepiece (lower focal length, e.g., 4mm) for more detail. The teleconverter (Barlow lens) doubles the magnification of any eyepiece.
- Use Filters: For lunar observation, install the moonlight filter to reduce glare and enhance contrast. For solar observation, ALWAYS use the provided sun filter by attaching it securely to the front of the telescope's objective lens. Never use an eyepiece filter for solar observation.

Image 5.1: The objective lens, which gathers light for observation. Note: While this image illustrates a larger aperture, the F70076 model has a 76mm diameter objective lens.
6. Maintenance
- Cleaning Lenses: Use a soft, lint-free cloth specifically designed for optical lenses. Gently brush away any dust particles first. For smudges, use a small amount of lens cleaning fluid on the cloth, not directly on the lens.
- Cleaning the Body: Wipe the telescope body and tripod with a soft, damp cloth. Avoid harsh chemicals.
- Storage: Store the telescope in a dry, dust-free environment. Keep all caps on the lenses when not in use. If possible, store it in its original packaging or a dedicated telescope case.
- Avoid Extreme Temperatures: Do not expose the telescope to rapid temperature changes or extreme heat/cold, as this can affect optical components.
7. Troubleshooting
- Image is blurry: Adjust the focusing knob slowly. Ensure the eyepiece is fully inserted and secured. Check for condensation on lenses.
- Cannot find objects: Ensure the finderscope is properly aligned with the main telescope. Start with a low-power eyepiece for a wider field of view.
- Image is dim: This can be normal for very faint deep-sky objects. Ensure your observation location is dark, away from light pollution. Use a larger aperture telescope for brighter views of faint objects.
- Image is upside down/reversed: This is normal for astronomical telescopes. Terrestrial (land) viewing may require an optional erecting prism (not included).
8. Specifications
| Model | F70076 (YB300) |
| Optical Design | Reflective Telescope |
| Aperture (D) | 76mm |
| Focal Length (F) | 700mm |
| Focal Ratio | f/9.2 |
| Mount Type | Alt-Azimuth (with fine adjustment) |
| Tripod Material | Aluminum Alloy |
Note: Specifications are based on the product label (Model YB300 Telescope D=76mm F=700mm) shown in product images.
9. Warranty and Support
For any questions, technical support, or warranty inquiries regarding your Generic F70076 Astronomical Telescope, please refer to the contact information provided at your point of purchase. Keep your purchase receipt as proof of purchase.
