Introduction
This manual provides detailed instructions for the installation, operation, and maintenance of your MAHVEC Android 15 Car Stereo. Designed specifically for Fiat 500 models from 2007 to 2015, this unit features a 9-inch 1280x720P IPS touchscreen, Android 15 operating system, 4GB RAM, 64GB ROM, Wireless CarPlay, Android Auto, Bluetooth 5.0, DSP 32-band EQ, GPS navigation, WiFi connectivity, and supports an AHD backup camera.
Please read this manual thoroughly before installation and use to ensure proper functionality and to maximize your experience with the product.
What's in the Box
Verify that all components are present before beginning installation:
- Android Car Stereo & Frame
- AHD Backup Camera
- External Microphone
- GPS Antenna
- RCA Cable
- USB Cable
- Installation Tool
- Power Cable
- Canbus (if applicable for your vehicle model)
- User Manual (this document)
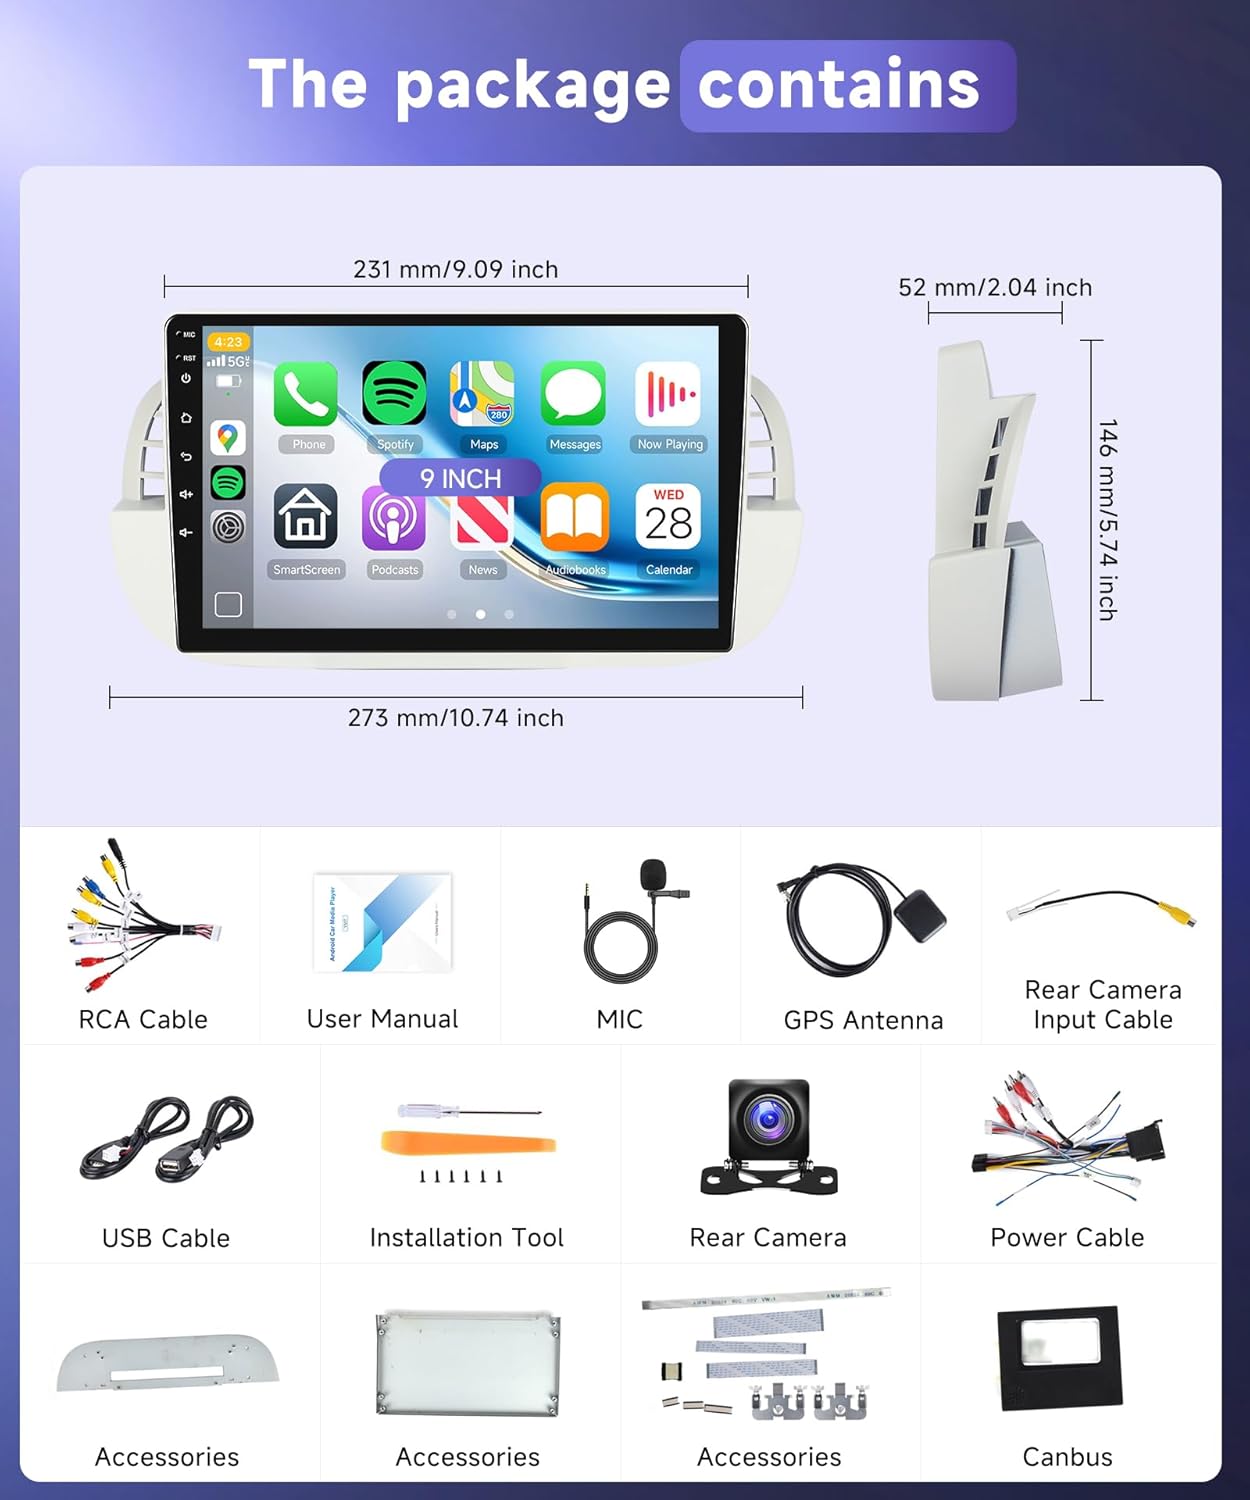
Figure 1: Package Contents. This image displays the main Android car stereo unit with its frame, an AHD backup camera, an external microphone, a GPS antenna, various cables (RCA, USB, power), and an installation tool. A Canbus module is also shown, indicating its inclusion for compatible vehicles.
Installation Guide
Professional installation is recommended. Ensure the vehicle's battery is disconnected before starting the installation process.
1. Wiring Instructions
Refer to the wiring diagrams below for proper connections. Incorrect wiring can damage the unit or vehicle electronics.

Figure 2: Main Wiring Diagram. This diagram illustrates the connections for the power cable, RCA cables (audio out, aux in, video out, subwoofer), USB cables, and radio antenna. It also shows the pinout for the main harness and the Canbus plug.
2. Backup Camera Wiring
Connect the AHD backup camera as shown in the diagram. Ensure the reverse trigger cable is correctly connected to activate the camera when the vehicle is in reverse gear.
- Connect the video output of the camera to the "CAM IN" port on the stereo.
- Connect the camera's power cable (red) to the vehicle's reverse light positive (+) wire.
- Connect the camera's ground cable (black) to the vehicle's ground (GND).
- Connect the reverse trigger cable (labeled "back" or "reverse") from the stereo harness to the vehicle's reverse light positive (+) wire.

Figure 3: Backup Camera Wiring. This diagram details the connections for the AHD backup camera, including the video input to the head unit, power connection to the reverse light, and the reverse trigger wire.
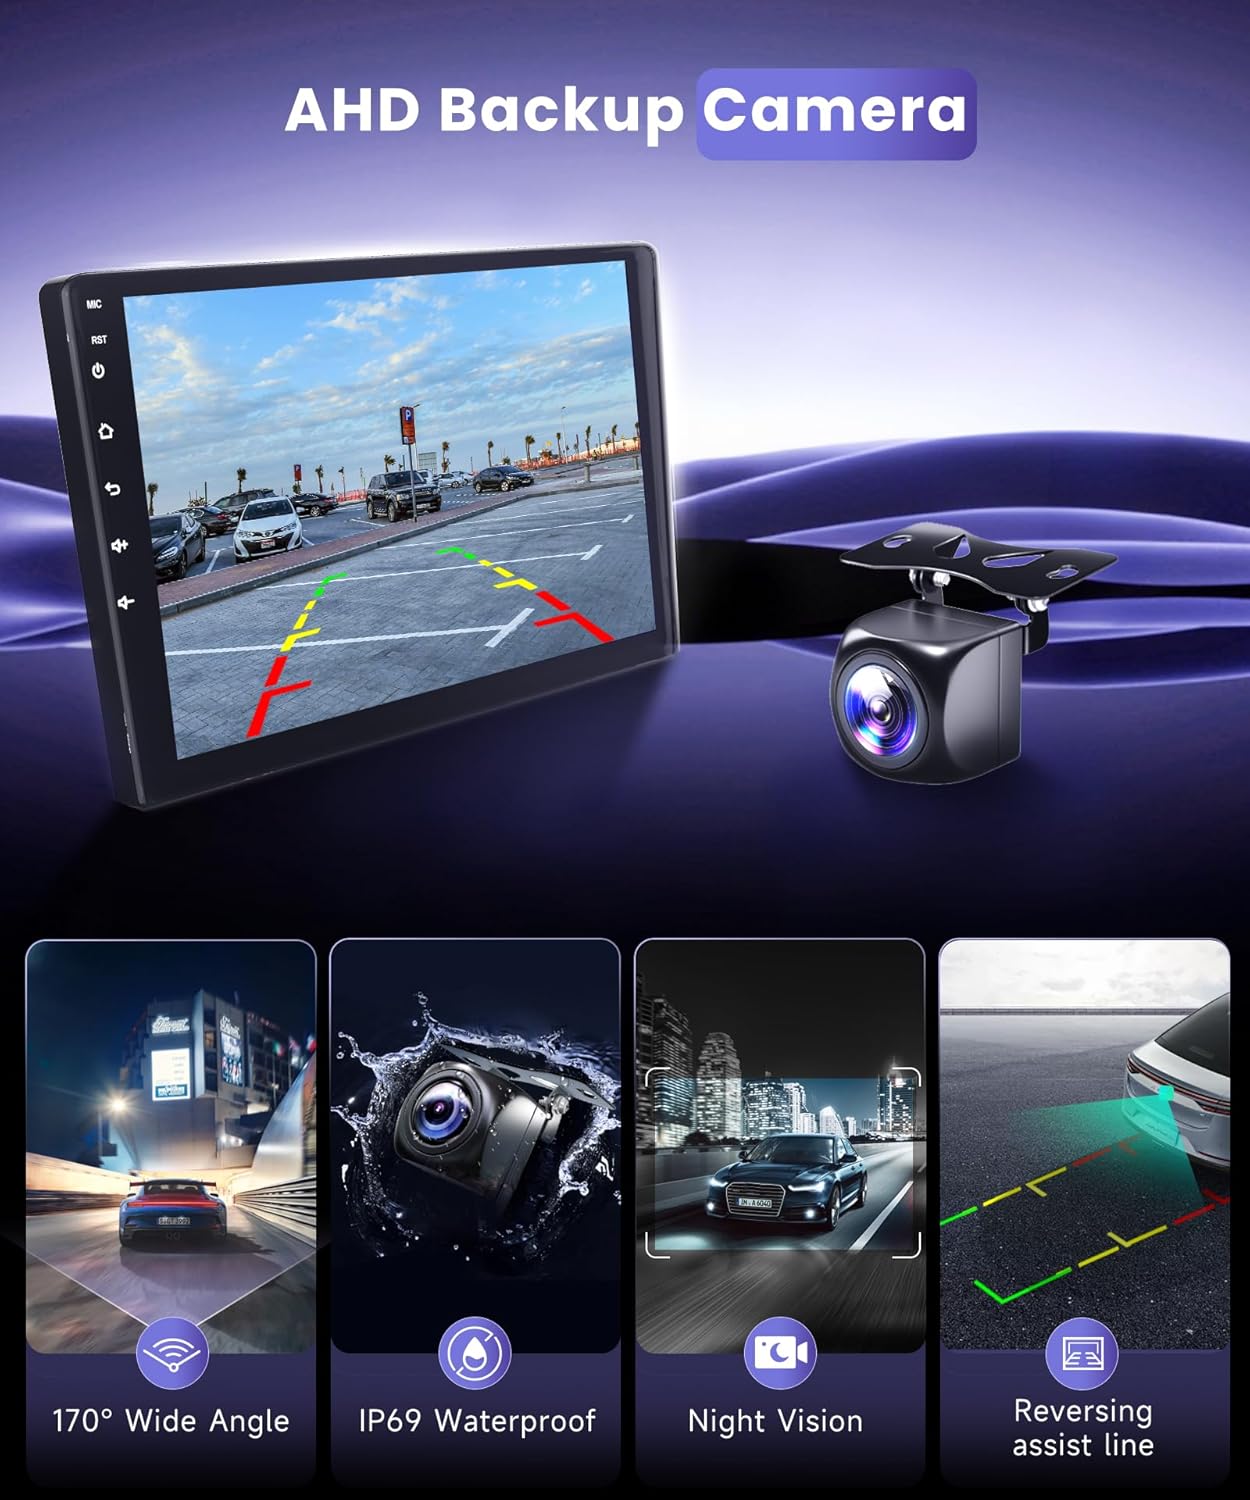
Figure 4: AHD Backup Camera Features. This image highlights the key attributes of the included backup camera, such as its 170° wide-angle view, IP69K waterproof and shockproof design, night vision capabilities, and dynamic reversing assist lines for enhanced safety.
3. Physical Installation
Carefully remove the original car stereo and install the new MAHVEC unit using the provided frame and installation tools. Ensure all cables are securely connected and routed to avoid pinching or damage.
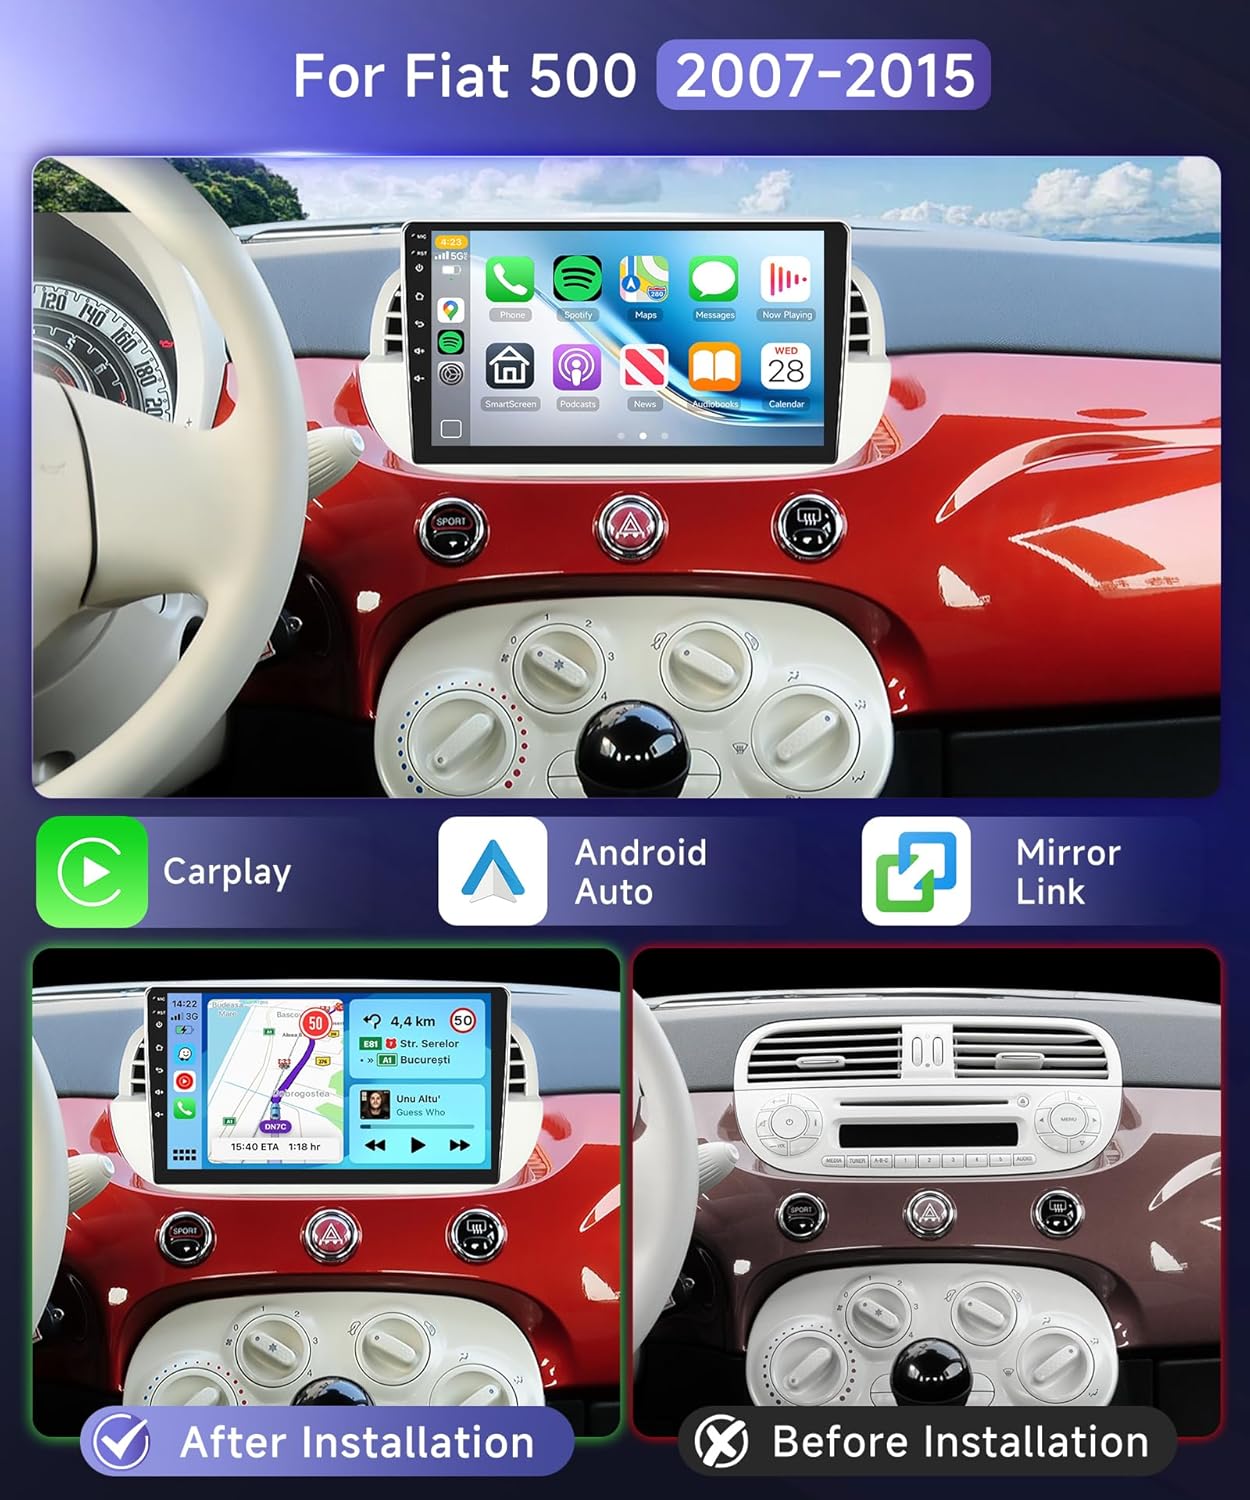
Figure 5: Before and After Installation. This image provides a visual comparison of the Fiat 500 dashboard, demonstrating the seamless integration of the MAHVEC Android 15 Car Stereo after installation, contrasting it with the original setup.
Operating Instructions
1. Basic Interface Navigation
The unit features a responsive 9-inch 1280x720P IPS touchscreen. Navigate through applications and settings by tapping and swiping. The main screen can display multiple panels for quick access to frequently used functions.

Figure 6: Display Features. This image demonstrates the high-resolution 1280x720P display, the ability to use split-screen mode for multitasking, a three-panel homepage layout for organized access, and customizable shortcuts.
Video 1: User Interface Overview. This video provides a brief demonstration of the car stereo's user interface, showing how to navigate between different applications and screens.
2. Wireless CarPlay & Android Auto
The unit supports wireless CarPlay and Android Auto via Bluetooth, allowing seamless integration with your smartphone for navigation, music, calls, and more.
- Pair your phone's Bluetooth with the car stereo.
- Open the "AppleCarplay" or "Android Auto" app on the car stereo.
- Wait for the connection to establish.

Figure 7: Wireless CarPlay and Android Auto Connection. This image illustrates the simple three-step process for connecting your smartphone wirelessly to the car stereo using either Apple CarPlay or Android Auto via Bluetooth.
3. Bluetooth 5.0 Connectivity
Equipped with Bluetooth 5.0, the stereo offers faster pairing, stable connectivity, and precise positioning. Enjoy hands-free calls and music streaming. An external microphone is included for clear audio during calls.

Figure 8: Bluetooth and Radio Features. This image displays the FM/RDS radio interface, highlighting Bluetooth 5.0 for hands-free calls and music streaming, and the graphical interface for the 32-band Equalizer with various sound presets.
4. GPS Navigation (Online & Offline)
The built-in GPS chip supports offline navigation. Connect to WiFi for online map updates and to download other navigation or entertainment applications.

Figure 9: GPS and WiFi Functionality. This image demonstrates the unit's ability to provide both online and offline GPS navigation, along with WiFi connectivity for downloading apps, streaming videos, and accessing other online content.
5. FM/RDS Radio & DSP 32-Band EQ
The FM/RDS radio automatically scans 87.5-108MHz channels with 18 presets. The 32-band EQ allows for sound customization with presets like Rock, Pop, Live, and more, for tailored audio output. AI DSP is supported (requires separate purchase).

Figure 10: DSP Equalizer and Bluetooth. This image highlights the detailed 32-band Digital Sound Processor (DSP) equalizer for fine-tuning audio, along with the Bluetooth 5.0 features for hands-free communication and wireless music playback.
Video 2: Settings Overview. This video demonstrates various settings within the car stereo, including adjustments for the DSP equalizer and Bluetooth pairing options.
6. Steering Wheel Control (SWC)
Connect the Steering Wheel Control (SWC) wires to operate the car stereo without touching the screen. This feature enhances driving safety by allowing control of volume, track changes, and other functions directly from your steering wheel.
Video 3: Factory Settings and CAN-BUS Setup. This video guides users through the factory settings menu, demonstrating how to adjust screen brightness, set up the CAN-BUS type for steering wheel controls, and recalibrate the touchscreen if needed.
7. UI Theme Customization
You can customize the user interface theme to personalize your car stereo experience. Access the theme settings to change colors, layouts, and icons.
Video 4: UI Theme Customization. This video demonstrates how to change the user interface theme, customize icons, and adjust the screen layout to personalize the car stereo's appearance.
Specifications
| Feature | Detail |
|---|---|
| Operating System | Android 15 |
| Processor | RK-3326S chip, 4Core |
| RAM | 4GB |
| ROM | 64GB |
| Display Size | 9 Inches |
| Screen Resolution | 1280x720P HD IPS Touchscreen |
| Connectivity | Bluetooth 5.0, WiFi |
| Special Features | Wireless CarPlay, Android Auto, DSP 32-Band EQ, GPS Navigation (Online/Offline), AHD Backup Camera Support, Steering Wheel Control (SWC) |
| Radio Tuner | FM/RDS (87.5-108MHz, 18 presets) |
| Audio Output Mode | Stereo |
| Mounting Type | Panel Mount |
| Item Weight | 3.79 pounds |
| Package Dimensions | 11.79 x 7.8 x 7.5 inches |
Maintenance
To ensure the longevity and optimal performance of your car stereo, follow these maintenance guidelines:
- Screen Cleaning: Use a soft, lint-free cloth to gently wipe the touchscreen. For stubborn smudges, slightly dampen the cloth with water or a screen-safe cleaner. Avoid harsh chemicals or abrasive materials.
- Software Updates: Periodically check for system updates via the unit's settings menu or the manufacturer's website. Keeping the software updated ensures access to the latest features, performance improvements, and security patches.
- Environmental Care: Avoid exposing the unit to extreme temperatures, direct sunlight for prolonged periods, or excessive moisture.
- Cable Connections: Regularly inspect all cable connections to ensure they are secure and free from damage. Loose connections can lead to intermittent issues.
Troubleshooting
If you encounter issues with your MAHVEC Android 15 Car Stereo, refer to the following common troubleshooting steps:
- No Power:
- Check all power connections to ensure they are secure.
- Verify the vehicle's fuse for the stereo is intact.
- Ensure the vehicle's battery is charged.
- No Sound:
- Check volume levels on the stereo and any connected devices.
- Ensure speaker wires are correctly connected and not short-circuited.
- Verify the audio output settings in the stereo's menu.
- Bluetooth Connection Issues:
- Ensure Bluetooth is enabled on both the stereo and your phone.
- Delete previous pairings on both devices and attempt to re-pair.
- Move your phone closer to the stereo.
- GPS Signal Loss:
- Ensure the GPS antenna is properly installed and has a clear view of the sky.
- Check GPS settings in the stereo's menu.
- Backup Camera Not Displaying:
- Verify the camera's video input and reverse trigger wires are correctly connected.
- Ensure the camera is receiving power when the vehicle is in reverse.
- Touchscreen Unresponsive/Inaccurate:
- Perform a soft reset of the unit (refer to the operating section for details).
- If available, recalibrate the touchscreen via the system settings.
- System Freezes/Crashes:
- Restart the unit.
- If the issue persists, consider performing a factory reset (note: this will erase all user data and settings).
If these steps do not resolve the issue, please contact customer support.
Warranty and Support
Your MAHVEC Android 15 Car Stereo comes with a 3-year warranty from the date of purchase, covering manufacturing defects and malfunctions under normal use. Please retain your proof of purchase for warranty claims.
For technical assistance, troubleshooting, or warranty inquiries, please contact MAHVEC customer support through the Amazon platform or visit the official MAHVEC store page. Our support team is available to assist you with any questions or concerns.
MAHVEC Store: Visit MAHVEC Store on Amazon