1. Introduction
Thank you for choosing the Wodeer Shoe Cabinet with 3 Flip Drawers. This manual provides essential information for the safe assembly, installation, operation, and maintenance of your new shoe cabinet. Please read these instructions thoroughly before beginning assembly and retain them for future reference.

Image: The Wodeer Shoe Cabinet with 3 Flip Drawers, shown closed in an entryway setting.
2. Safety Information
WARNING: To prevent serious injury, always secure the cabinet to the wall using the provided anti-tipping hardware. This is especially important in homes with children or pets.
- Read and follow all assembly instructions carefully.
- Keep the area around the cabinet clear of obstructions during and after assembly.
- Ensure all screws and fasteners are tightened securely before use.
- Do not allow children to climb on or play with the cabinet.
- Do not overload the drawers.
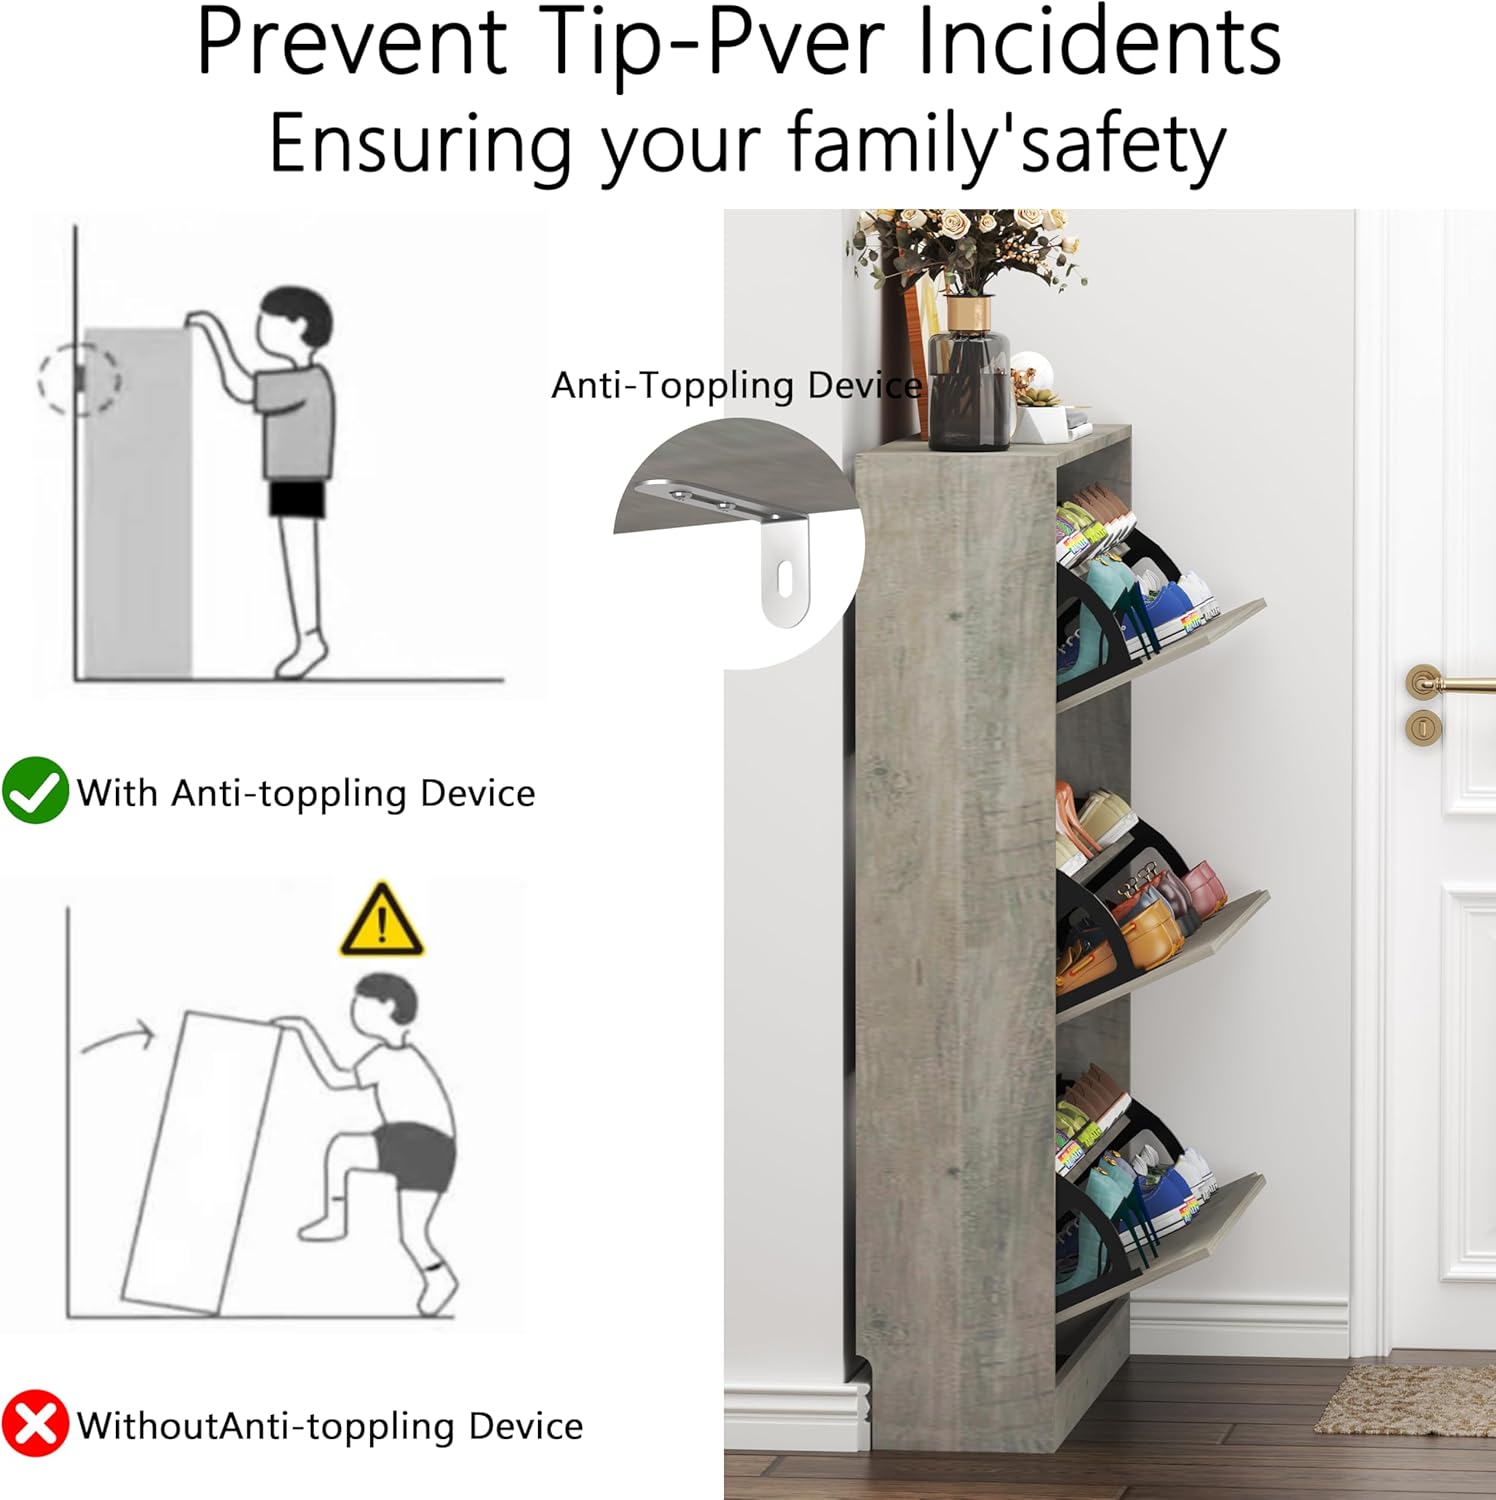
Image: A diagram showing the proper installation of the anti-tipping device and a warning against potential hazards if not installed.
3. Package Contents
Verify that all parts and hardware are present before beginning assembly. If any items are missing or damaged, please contact customer support.
- Shoe cabinet panels (engineered wood)
- 3 flip drawers with adjustable/removable shelves
- Assembly hardware (screws, dowels, etc.)
- Anti-tipping kit
- Instruction manual
4. Assembly Instructions
Estimated assembly time: 30 minutes (with 2 persons). Tools required: Phillips head screwdriver, drill, mallet (optional).
4.1 Unboxing and Preparation
Carefully unpack all components and lay them out on a clean, soft surface to prevent scratches. Identify each part using the labels provided.
4.2 Cabinet Frame Assembly
Follow the pictorial directions in the included manual to assemble the main frame of the shoe cabinet. Ensure all pre-drilled holes align correctly and secure connections with the provided hardware.
4.3 Drawer Assembly and Installation
Assemble each of the three flip drawers. The internal shelves within each drawer are adjustable and removable. This allows for customization based on shoe height. Insert the assembled drawers into the cabinet frame.

Image: A close-up view of a flip drawer, highlighting the adjustable and removable shelf mechanism for accommodating various shoe types.
4.4 Anti-Tipping Device Installation
For enhanced stability and safety, install the anti-tipping device. Attach the bracket to the top rear of the cabinet and secure it to a wall stud using appropriate fasteners. This step is crucial to prevent accidental tipping.
4.5 Assembly Overview Video
Video: An official Wodeer video demonstrating the assembly process and key features of the shoe cabinet, including the smooth handle, large storage space, adjustable shelves, and anti-toppling device.
5. Setup
Once assembled, place the shoe cabinet in your desired location, such as an entryway, hallway, or bedroom. Ensure the anti-tipping device is securely fastened to the wall. The slim profile of the cabinet is designed to fit well in narrow spaces.

Image: The Wodeer Shoe Cabinet with its three flip drawers open, showcasing shoes neatly stored inside, positioned in an entryway.
6. Operating Instructions
6.1 Storing Shoes
Each of the three flip drawers can be opened by gently pulling the top edge. Inside, you will find two tiers for shoe storage. The middle panel within each tier can be adjusted vertically or removed entirely to accommodate different shoe types and sizes, such as sneakers, heels, ankle boots, or larger footwear.

Image: The shoe cabinet with its drawers open, displaying various types of shoes, including sneakers, heels, and boots, illustrating its storage capacity.
6.2 Top Surface and Small Drawer Use
The top surface of the cabinet can be used for decorative items or for storing small essentials like keys and wallets. Some models may include a small additional drawer on top for extra storage.
7. Maintenance
- Cleaning: Wipe the cabinet surfaces with a soft, damp cloth. Avoid harsh chemicals or abrasive cleaners, as they may damage the engineered wood finish.
- Inspection: Periodically check all screws and connections to ensure they remain tight. Re-tighten if necessary.
- Anti-Tipping Device: Regularly inspect the anti-tipping device to confirm it is still securely attached to both the cabinet and the wall.
8. Troubleshooting
- Drawers not closing properly: Ensure no shoes are obstructing the closing mechanism. Check that the internal shelves are correctly positioned.
- Cabinet feels unstable: Verify that the anti-tipping device is correctly installed and securely anchored to a wall stud. Ensure the cabinet is placed on a level surface.
- Missing parts during assembly: Refer to the package contents list. If any parts are missing, contact Wodeer customer support for assistance.
9. Specifications
| Brand | Wodeer |
| Model Name | Shoe Storage Cabinet |
| Item Model Number | WD-2003-80-10 |
| Color | Grey |
| Material | Engineered Wood |
| Product Dimensions | 9.25"D x 31.51"W x 47.24"H |
| Item Weight | 52.5 pounds |
| Mounting Type | Floor Mount (with wall anchor) |
| Special Features | Adjustable Shelf, Anti-Tipping, Removable Shelf |
| Number of Compartments | 6 (2 per drawer) |

Image: A detailed diagram illustrating the product dimensions (height, width, depth) and highlighting key features such as adjustable/removable shelves and the anti-tipping device.
10. Warranty & Support
Wodeer products are designed for quality and durability. For specific warranty information, please refer to the documentation included with your purchase or visit the official Wodeer website. If you encounter any issues or require assistance, please contact Wodeer customer support. Contact details can typically be found on the product packaging or the brand's official website.