BSNANCA 36 Eggs Incubator
BSNANCA 36 Egg Digital Poultry Incubator Instruction Manual
Model: 36 Eggs Incubator
1. Introduction
Thank you for choosing the BSNANCA 36 Egg Digital Poultry Incubator. This automatic incubator is designed for efficient and reliable hatching of various poultry eggs, including chicken, duck, goose, and quail. It features automatic egg turning, precise digital temperature and humidity control, an LED display, and an integrated LED candler for monitoring embryo development. Please read this manual thoroughly before operation to ensure proper setup, safe use, and optimal hatching results.
2. Safety Information
- Read all instructions before using the incubator.
- Ensure the incubator is placed on a stable, level surface away from direct sunlight, drafts, or extreme temperature fluctuations.
- Connect the incubator only to a grounded power outlet with the specified voltage (110V for America/Japan or 220V for Europe, 50/60Hz).
- Do not immerse the incubator or its electrical components in water or other liquids.
- Keep out of reach of children and pets.
- Unplug the incubator from the power source before cleaning or performing any maintenance.
- Do not operate the incubator if the power cord or plug is damaged.
3. Product Features
- Automatic Egg Turning: Eggs are automatically turned every two hours to ensure even heating and proper embryo development.
- Digital Temperature Control: Maintains a stable and precise temperature for optimal hatching conditions.
- LED Display: Clearly shows temperature, humidity, hatching days, and egg turning times.
- LED Egg Candler: Integrated candling lamp allows for easy monitoring of embryo development without removing eggs.
- Temperature and Humidity Alarms: Alerts the user if conditions deviate from the set range.
- Observation Windows: Four large, clear windows allow for easy viewing of the incubation process.
- Easy to Clean: Designed for simple disassembly and cleaning.
- Versatile Capacity: Accommodates various egg sizes with adjustable trays.
4. Components Overview
Familiarize yourself with the main components and control panel of your incubator.

Image 4.1: Overview of the incubator's control panel and key indicators. This image highlights the LED light, LED ON/OFF button, temperature display, humidity display, hatching days display, setting indicator light, heating indicator light, Set button, Plus (+) button, Minus (-) button, and the main power switch.
- LED Light: Illuminates the interior for observation.
- LED ON/OFF: Button to control the internal LED light.
- Temperature Display: Shows the current internal temperature.
- Humidity Display: Shows the current internal humidity level.
- Hatching Days Display: Tracks the number of days since incubation began.
- Setting Indicator Light: Illuminates when settings are being adjusted.
- Heating Indicator Light: Illuminates when the heating element is active.
- Set Button: Used to enter and confirm settings.
- '+' Button: Increases values during setting adjustments.
- '-' Button: Decreases values during setting adjustments.
- Switch: Main power switch for the unit.
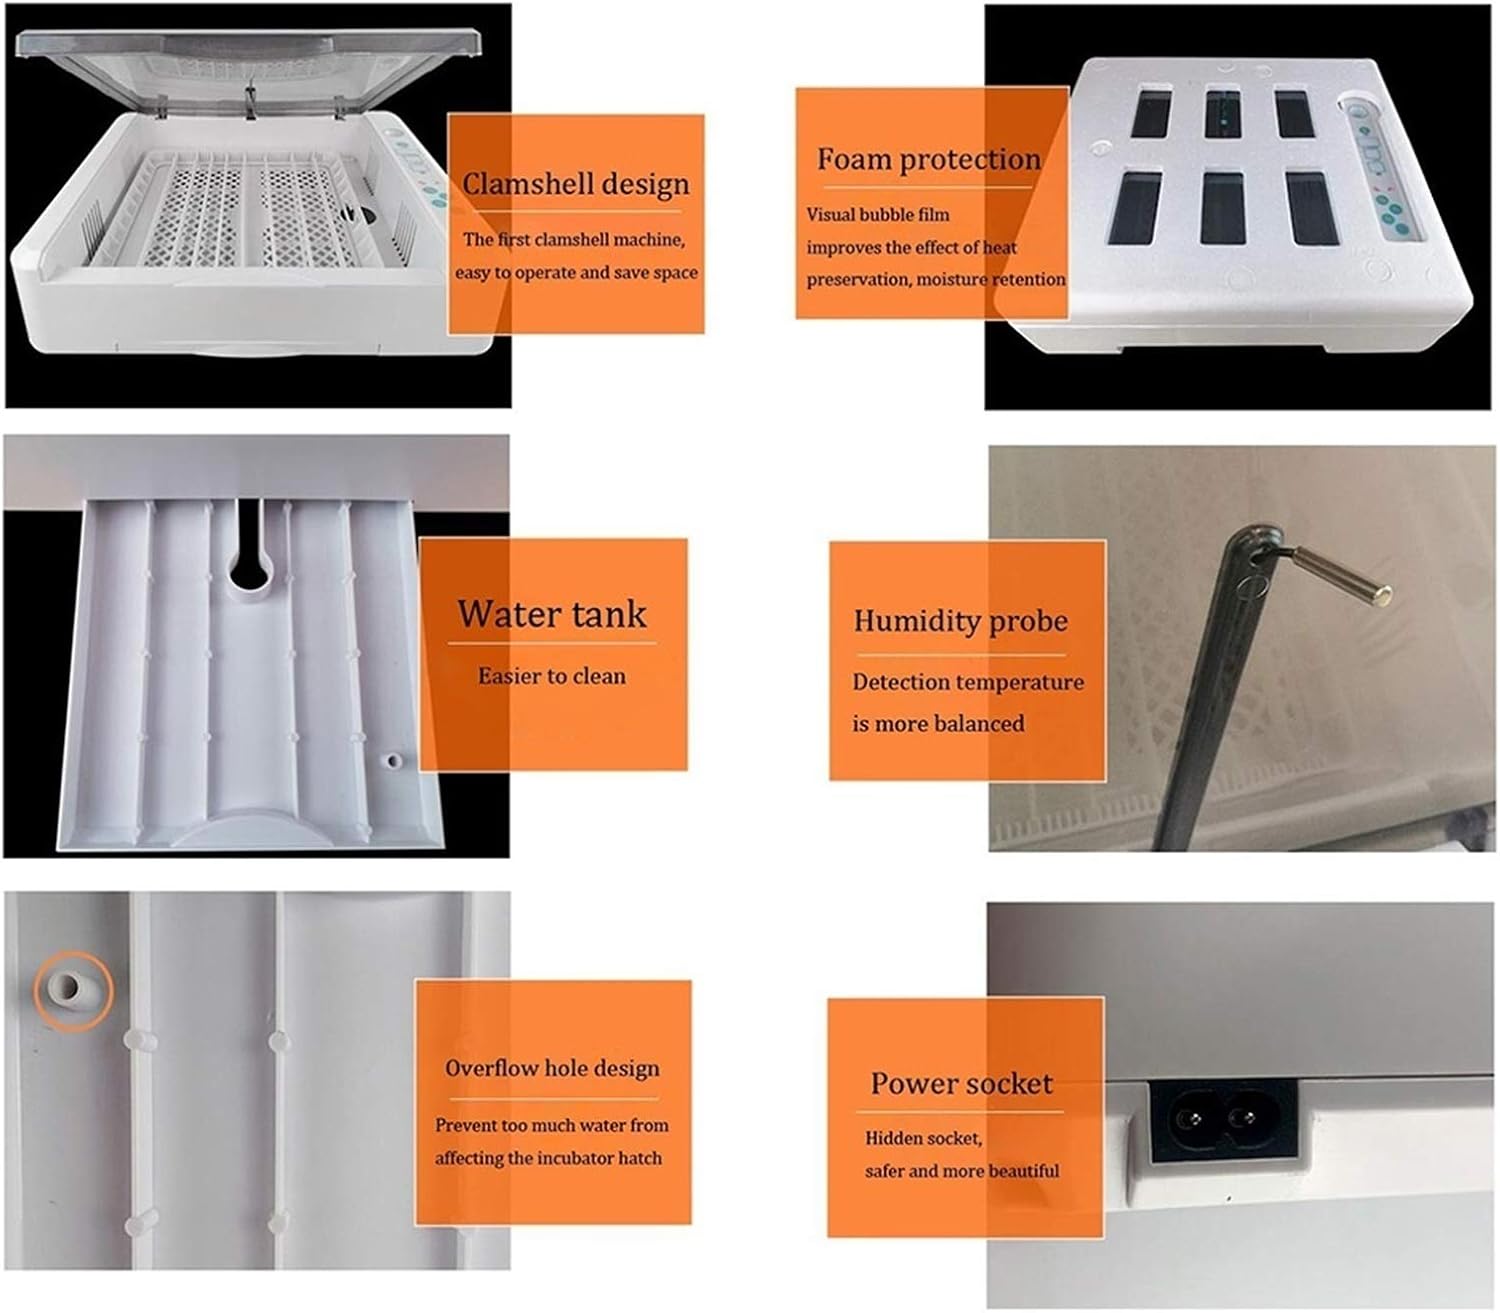
Image 4.2: Detailed view of the incubator's design elements. This image illustrates the clamshell design for easy operation, foam protection for heat preservation, an accessible water tank for cleaning, a humidity probe for balanced detection, an overflow hole to prevent excess water, and a hidden power socket for safety and aesthetics.
5. Setup Instructions
- Unpack the Incubator: Carefully remove all components from the packaging. Inspect for any damage.
- Placement: Place the incubator on a flat, stable surface in a room with a consistent ambient temperature (ideally between 20-25°C / 68-77°F). Avoid areas with direct sunlight, drafts, or significant temperature fluctuations.
- Remove Protective Films: Peel off any protective films from the observation windows to ensure clear visibility.
- Add Water: Locate the water tank at the bottom of the incubator. Carefully add distilled or demineralized water through the designated water inlet until the water level is visible but not overflowing. The overflow hole design helps prevent overfilling.
- Connect Power: Plug the power cord into the incubator's power socket, then plug the other end into a suitable electrical outlet.
- Initial Warm-up: Turn on the incubator using the main power switch. The incubator will begin to warm up. Allow it to run for 10-15 minutes to stabilize the internal temperature, which will typically reach around 38°C (100.4°F) for chicken eggs.
- Test Egg Turning: Observe the egg turning mechanism to ensure it functions correctly.
6. Operating Instructions
6.1. Setting Temperature and Humidity
The incubator comes with a default temperature setting suitable for chicken eggs (approximately 38°C / 100.4°F). You can adjust this if needed for different species.
- Press the 'Set' button once. The temperature display will flash.
- Use the '+' and '-' buttons to adjust the desired temperature.
- Press 'Set' again to confirm the temperature.
- The humidity is controlled by the amount of water in the tank. Monitor the humidity display and add water as needed to maintain the recommended levels for your specific egg type.
6.2. Egg Placement and Capacity
Carefully place fertilized eggs into the egg trays. Ensure they are positioned correctly for the automatic turning mechanism.

Image 6.1: Illustration of the adjustable egg tray and its capacity for different egg types. The incubator can hold 12 goose eggs, 25 duck eggs, 36 chicken eggs, or 120 small bird/quail eggs.
- Chicken Eggs: Up to 36 eggs
- Duck Eggs: Up to 25 eggs
- Goose Eggs: Up to 12 eggs
- Quail/Small Bird Eggs: Up to 120 eggs
6.3. Automatic Egg Turning
The incubator automatically turns the eggs every two hours. This is crucial for preventing the embryo from sticking to the shell and for proper development. The display will show the remaining time until the next turn.
6.4. Using the LED Egg Candler
The built-in LED candler allows you to observe the embryo's development without disturbing the incubation process. Simply place an egg over the candling lamp to illuminate its interior.

Image 6.2: Visual guide to the egg candling process and typical embryo development stages. This image shows how to use the candler and what to expect at Day 3, Day 6, Day 8, Day 10, Day 15, and Day 19 of incubation, alongside a general illustration of embryo growth from egg to chick.
6.5. Incubation Process and Hatching Times
The incubation period varies by species. The incubator's display will track the hatching days.

Image 6.3: Chart illustrating the typical incubation periods for various poultry. Chicken eggs hatch in approximately 21 days, duck eggs in 28 days, and pigeon eggs in 18 days. The image also shows newly hatched chicks.
- Chicken: Approximately 21 days
- Duck: Approximately 28 days
- Pigeon: Approximately 18 days
- Quail: Approximately 18 days

Image 6.4: Visual representation of the incubation process from egg to chick. This image depicts the stages of incubation, the moment of breaking out of the shell, and the subsequent feeding stage for newly hatched chicks.
7. Maintenance
7.1. Cleaning
Regular cleaning is essential for hygiene and to prevent the spread of bacteria, especially after each hatch.
- Unplug: Always unplug the incubator from the power source before cleaning.
- Disassemble: Remove the egg trays and any other removable components.
- Wash: Wash removable parts with warm, soapy water. A mild disinfectant can also be used. Rinse thoroughly.
- Wipe Down: Wipe the interior and exterior surfaces of the incubator with a damp cloth and a mild disinfectant. Avoid getting water into electrical components.
- Dry: Ensure all parts are completely dry before reassembling and storing or reusing the incubator.
7.2. Storage
When not in use, store the incubator in a clean, dry place, away from extreme temperatures and direct sunlight.
8. Troubleshooting
| Problem | Possible Cause | Solution |
|---|---|---|
| Incubator not turning on | No power, faulty power cord/plug, main switch off | Check power connection, ensure switch is ON, test outlet, inspect cord for damage. |
| Temperature/Humidity alarm sounds | Temperature/humidity outside set range | Check room temperature, add water for humidity, ensure incubator lid is closed properly. |
| Eggs not turning automatically | Mechanism jammed, motor issue, setting error | Ensure eggs are placed correctly, check for obstructions, restart incubator. If issue persists, contact support. |
| Low hatch rate | Incorrect temperature/humidity, infertile eggs, poor egg quality, improper ventilation | Verify settings, use fresh fertile eggs, ensure proper ventilation, avoid opening incubator frequently. |
9. Specifications
- Hatching Rate: Up to 95% (under optimal conditions)
- Power: 60W
- Frequency: 50/60Hz
- Voltage: 110V (America and Japan) / 220V (European)
- Capacity:
- 36 Chicken Eggs
- 25 Duck Eggs
- 12 Goose Eggs
- 120 Quail Eggs
- Package Dimensions: 53 x 17 x 48.5 cm (L x W x H)
- Gross Weight: 4.3 Kg
10. Warranty and Support
BSNANCA products undergo strict quality screening. If you encounter any issues or have questions regarding your incubator, please contact our customer service team for assistance. We are committed to ensuring your satisfaction.
For support, please refer to the contact information provided with your purchase or visit the BSNANCA official website.
Ask a question about this manual
Ask about setup, troubleshooting, compatibility, parts, safety, or missing instructions. Manuals+ will review the question and use this page’s manual context to help answer it.