1. Introduction
Thank you for purchasing the Generic Gold Rustic Espresso 7-Piece Dining Room Set RD614. This set includes one rectangular dining table and six side dining chairs, designed to enhance your dining space with its rustic espresso finish and gold accents. This manual provides essential information for assembly, safe use, and maintenance to ensure the longevity and enjoyment of your new furniture.

Figure 1.1: The complete Gold Rustic Espresso 7-Piece Dining Room Set, featuring a rectangular table and six chairs.
2. Safety Information
Please read and understand all instructions before assembly and use. Failure to follow these safety guidelines may result in injury or damage to the product.
- Keep all small parts and packaging materials away from children.
- Assemble the furniture on a soft, clean surface to prevent scratches.
- Ensure all bolts and screws are securely tightened before use. Periodically check and re-tighten as necessary.
- Do not exceed the weight limits specified for the table and chairs.
- Avoid standing on the table or chairs.
- Do not use power tools for assembly unless explicitly instructed, as this may overtighten and damage components.
- Place the furniture on a level surface to prevent tipping.
3. Package Contents
Verify that all components are present before beginning assembly. If any parts are missing or damaged, please contact customer support.
- 1 x Rectangular Dining Table
- 6 x Side Dining Chairs
- Assembly Hardware (screws, bolts, Allen wrench, etc.)

Figure 3.1: View of the dining table component, showcasing its robust structure.

Figure 3.2: A single side dining chair, highlighting its design and materials.
4. Setup and Assembly
Assembly is required for this dining set. It is recommended to have two adults for assembly. Please follow the detailed instructions provided in the separate assembly guide included with your package. The general steps are outlined below:
- Unpack Components: Carefully remove all parts from the packaging and lay them out on a protected surface.
- Identify Hardware: Separate and identify all screws, bolts, and tools.
- Assemble Table Base: Attach the table legs to the tabletop according to the assembly guide. Ensure all connections are secure.
- Assemble Chairs: For each chair, attach the legs to the seat frame, then secure the backrest.
- Final Tightening: Once all components are loosely assembled, gradually tighten all fasteners. Do not overtighten.
- Placement: Position the assembled dining set in its desired location, ensuring it is stable and level.
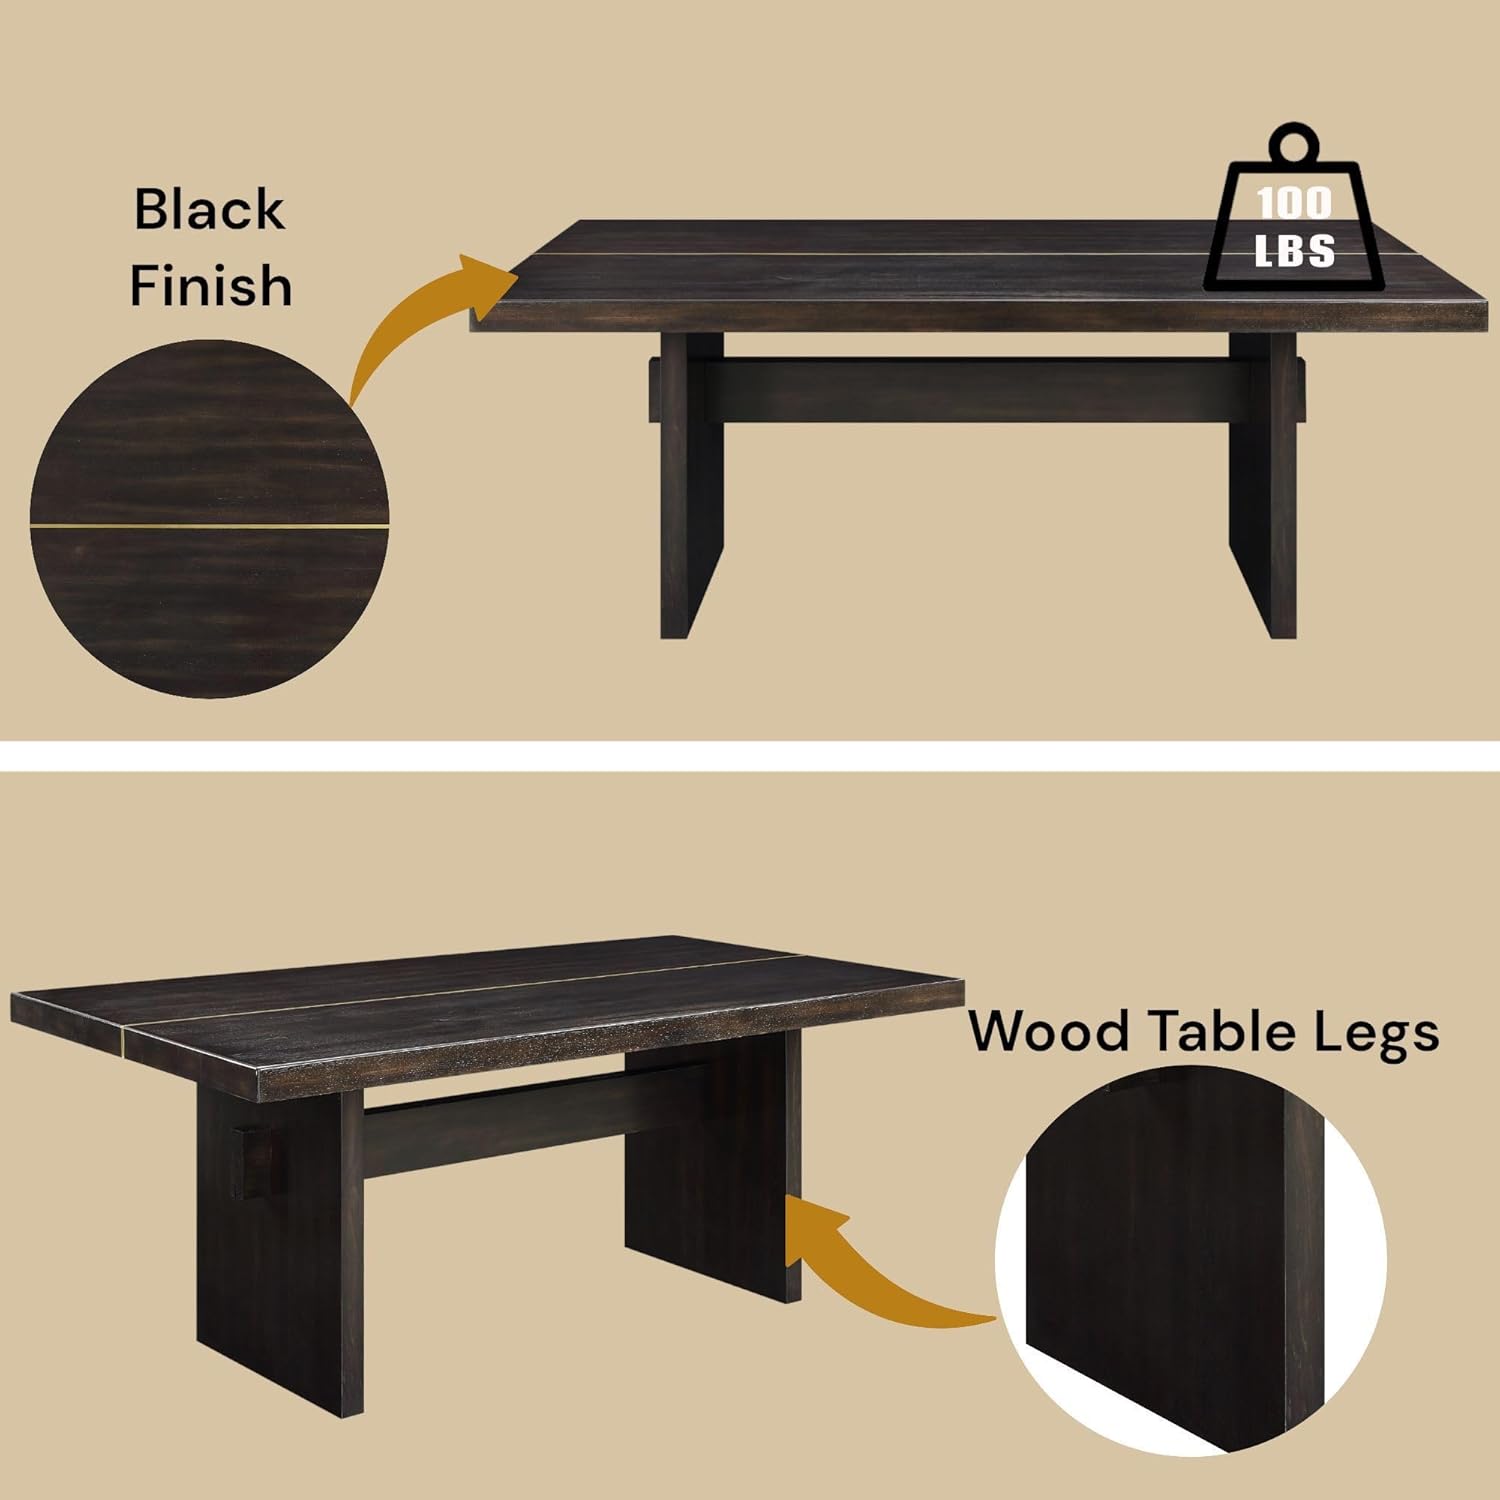
Figure 4.1: Illustration of the dining table's black finish, 100 lbs weight limit, and solid wood table legs, important details for assembly and use.

Figure 4.2: Details of the dining chair construction, including padded seat and back cushion, metal legs, and black chenille fabric with a black finish.
5. Operating and Usage
This dining set is designed for indoor use in a dining room environment.
- Weight Capacity: The dining table has a weight limit of 100 lbs. Each side dining chair has a weight capacity of 220 lbs. Do not exceed these limits.
- Placement: Position the dining set away from direct sunlight, heat sources, and excessive moisture to prevent warping, fading, or damage to the finish.
- Movement: When moving the table or chairs, always lift them rather than dragging them to prevent damage to the legs or floor.
6. Maintenance
Proper care and maintenance will help preserve the appearance and extend the life of your dining set.
- Cleaning the Table: Wipe the table surface with a soft, damp cloth. Avoid abrasive cleaners or harsh chemicals that can damage the finish. Dry immediately with a clean cloth.
- Cleaning Chairs: For the chenille fabric, spot clean with a mild upholstery cleaner as needed. Test on an inconspicuous area first. For the metal and wood parts, wipe with a soft, damp cloth.
- Spills: Blot spills immediately with a clean, dry cloth to prevent staining.
- Protection: Use placemats and coasters to protect the table surface from heat, moisture, and scratches.
- Hardware Check: Periodically check and tighten all assembly hardware to ensure stability.

Figure 6.1: Close-up of the dining tabletop surface, showing the espresso finish and gold accent line, which requires careful cleaning.

Figure 6.2: Detailed view of the black chenille fabric used on the chairs, illustrating its texture and requiring specific cleaning methods.
7. Troubleshooting
If you encounter any issues with your dining set, refer to the following common problems and solutions:
| Problem | Possible Cause | Solution |
|---|---|---|
| Table/Chair is wobbly | Loose hardware; uneven floor. | Check and tighten all bolts and screws. Ensure the furniture is on a level surface. Use furniture pads if necessary. |
| Scratches on surface | Sharp objects; abrasive cleaning. | Use furniture polish or touch-up pens for minor scratches. Prevent future scratches by using placemats and coasters. |
| Stains on chair fabric | Spills not cleaned promptly. | Spot clean with a mild upholstery cleaner. For stubborn stains, consult a professional upholstery cleaner. |
8. Specifications
Detailed product specifications for the Gold Rustic Espresso 7-Piece Dining Room Set RD614.
- Model: RD614
- Brand: Generic
- Set Includes: 1 Rectangular Dining Table, 6 Side Dining Chairs
- Color: Black, Espresso (with Gold accents)
- Assembly Required: Yes
Dining Table Specifications:
- Overall Dimensions: 80" W x 40" D x 31" H
- Weight Limit: 100 lbs
- Material: Wood (Espresso finish with gold accent)
- Shape: Rectangular

Figure 8.1: Visual representation of the dining table dimensions: 80 inches wide, 40 inches deep, and 31 inches high.
Side Dining Chair Specifications:
- Overall Dimensions: 23" D x 23" W x 31" H
- Weight Capacity: 220 lbs
- Seat Width: 19"
- Seat Depth: 19"
- Seat Height: 19"
- Armrest Height: 28"
- Back Height: 12"
- Foam Density: D22 D25
- Material: Black Chenille fabric, Metal legs, Padded seat and back cushion
9. Warranty and Support
For warranty information or customer support, please refer to the documentation included with your purchase or contact the retailer where the product was acquired. Keep your proof of purchase for any warranty claims.


