FICEMETOI 5A MPPT Solar Panel Controller DC-DC Step-Down CC/CV Charging Module
FICEMETOI 5A MPPT Solar Panel Controller DC-DC Step-Down CC/CV Charging Module User Manual
Model: 5A MPPT Solar Panel Controller DC-DC Step-Down CC/CV Charging Module
1. Introduction
Thank you for choosing the FICEMETOI 5A MPPT Solar Panel Controller. This DC-DC Step-Down CC/CV Charging Module is designed to efficiently charge batteries from solar panels, providing stable voltage and current output. This manual provides essential information for the safe and effective operation of your device. Please read it thoroughly before installation and use.
2. Safety Information
- Ensure all connections are correct and secure before applying power. Incorrect wiring can damage the module or connected devices.
- Operate within the specified voltage and current limits to prevent overheating and damage.
- Keep the module away from water, moisture, and flammable materials.
- Do not attempt to disassemble or modify the module. Refer all servicing to qualified personnel.
- Always disconnect power before making or changing connections.
- This device is intended for use by individuals with basic knowledge of electronics and solar power systems.
3. Product Overview
The FICEMETOI 5A MPPT Solar Panel Controller is a versatile DC-DC step-down module featuring Maximum Power Point Tracking (MPPT) for optimal solar energy harvesting. It includes Constant Current (CC) and Constant Voltage (CV) charging modes, along with a blue LED display for monitoring key parameters.
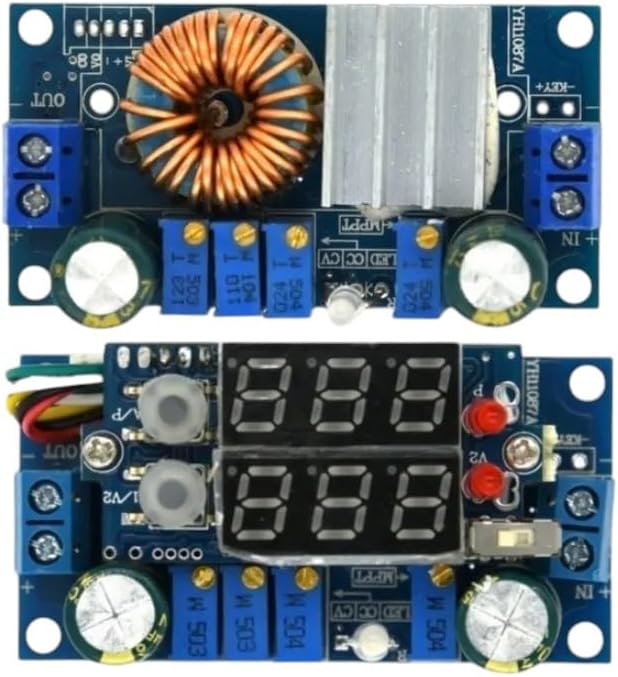
Figure 3.1: Top view of the MPPT Solar Panel Controller module. This image displays the main components including the large inductor, various capacitors, heat sink, and screw terminals for input and output connections.

Figure 3.2: Front view of the MPPT Solar Panel Controller with its integrated blue LED display. The display shows digital readings for voltage and current, and adjustment potentiometers are visible.
Key Features:
- MPPT Function: Maximizes power extraction from solar panels.
- DC-DC Step-Down: Converts higher input voltage to a lower, stable output voltage.
- CC/CV Charging: Supports Constant Current and Constant Voltage charging for various battery types.
- Blue LED Display: Real-time monitoring of input/output voltage and current.
- Adjustable Output: Output voltage and current limits are adjustable via onboard potentiometers.
4. Specifications
| Parameter | Value |
|---|---|
| Input Voltage | (Refer to product labeling for exact range, typically 6-36V) |
| Output Voltage | (Adjustable, typically 1.25-32V) |
| Output Current | (Adjustable, typically 0.05-5A) |
| MPPT Voltage Range | (Adjustable, typically 6-36V) |
| Conversion Efficiency | Up to 95% (depending on input/output conditions) |
| Display | Blue LED (Voltage, Current) |
| Operating Temperature | -40°C to +85°C |
| Dimensions | (Refer to product dimensions, typically compact) |
Note: Specific voltage and current ranges may vary slightly. Always refer to the markings on your specific module for precise values.
5. Setup and Installation
Follow these steps for proper installation of the MPPT Solar Panel Controller:
- Prepare Components: Gather your solar panel, battery, and appropriate wiring. Ensure all components are rated for the intended power levels.
- Connect Solar Panel (Input): Connect the positive (+) terminal of your solar panel to the "IN+" terminal on the controller and the negative (-) terminal of the solar panel to the "IN-" terminal. Do not connect the battery yet.
- Set MPPT Voltage:
- Connect a multimeter to the output terminals (OUT+ and OUT-).
- Adjust the MPPT potentiometer (often labeled "MPPT" or "V_MPPT") until the output voltage stabilizes at a value slightly below the solar panel's maximum power point voltage (Vmp). This is typically around 75-80% of the open-circuit voltage (Voc) for a standard 12V panel.
- Example: For a 18V Vmp solar panel, set MPPT voltage to approximately 17V.
- Set Output Voltage (CV):
- With the solar panel still connected and the MPPT voltage set, adjust the Constant Voltage (CV) potentiometer (often labeled "CV" or "V_OUT") to the desired battery charging voltage.
- Example: For a 12V lead-acid battery, set to 14.4V. For a 3.7V Li-ion battery, set to 4.2V.
- Set Output Current Limit (CC):
- Disconnect the solar panel.
- Connect a multimeter in series with the output (OUT+ and OUT-), set to current measurement mode.
- Connect a load (e.g., a resistor or another power supply set to a voltage lower than your target output voltage) to the output terminals.
- Adjust the Constant Current (CC) potentiometer (often labeled "CC" or "I_OUT") to the desired maximum charging current.
- Example: For a 5A module, you might set it to 3A for a smaller battery.
- Connect Battery (Output): Connect the positive (+) terminal of your battery to the "OUT+" terminal on the controller and the negative (-) terminal of your battery to the "OUT-" terminal.
- Reconnect Solar Panel: Reconnect the solar panel to the "IN+" and "IN-" terminals. The module should now begin charging the battery according to your set parameters.
Important: Always set the output voltage and current limits before connecting the battery to prevent overcharging or damage.
6. Operating Instructions
Once installed and configured, the MPPT controller operates largely automatically. The blue LED display provides real-time feedback:
- Voltage Display: Shows the current input or output voltage.
- Current Display: Shows the current flowing through the module.
- Display Mode Button: A small button (often labeled "KEY" or "V/A") allows you to cycle through different display modes (e.g., input voltage, output voltage, output current).
The MPPT algorithm continuously adjusts to find the optimal operating point of the solar panel, ensuring maximum power transfer to the battery.
7. Maintenance
The FICEMETOI MPPT Solar Panel Controller is designed for reliable operation with minimal maintenance. However, periodic checks can ensure optimal performance and longevity:
- Visual Inspection: Periodically check for any loose connections, damaged wires, or signs of overheating (discoloration, burnt smell).
- Cleanliness: Ensure the module and its heat sink are free from dust and debris to maintain proper cooling. Use a soft, dry cloth for cleaning.
- Environmental Conditions: Verify that the operating environment remains within the specified temperature and humidity ranges.
- Parameter Check: Occasionally verify the output voltage and current settings, especially if you notice changes in charging behavior.
8. Troubleshooting
| Problem | Possible Cause | Solution |
|---|---|---|
| No display/No output | No input power; incorrect wiring; module fault. | Check input connections and solar panel output. Verify wiring polarity. If problem persists, module may be faulty. |
| Low output voltage/current | Insufficient solar panel input; incorrect MPPT/CV/CC settings; heavy load. | Ensure adequate sunlight for solar panel. Re-adjust MPPT, CV, and CC potentiometers. Reduce load if necessary. |
| Module overheating | Excessive load current; poor ventilation; high ambient temperature. | Reduce output current. Ensure proper airflow around the module. Operate within specified temperature limits. |
| Battery not charging | Incorrect output voltage setting; faulty battery; incorrect wiring. | Verify output voltage matches battery requirements. Test battery condition. Check all battery connections. |
9. Warranty and Support
FICEMETOI products are manufactured to high standards and undergo strict quality control. While specific warranty details are not provided in this manual, please refer to your purchase documentation or contact your retailer for warranty information.
For technical support or inquiries, please contact FICEMETOI customer service through the platform where you purchased the product or visit the official FICEMETOI website for contact details.
Ask a question about this manual
Ask about setup, troubleshooting, compatibility, parts, safety, or missing instructions. Manuals+ will review the question and use this page’s manual context to help answer it.