1. Introduction
This manual provides detailed instructions for the safe and efficient operation of your Generic 48 Egg Automatic Incubator. Please read this manual thoroughly before initial use to ensure proper setup, operation, and maintenance. This incubator is designed for hatching various poultry eggs, including chicken, duck, goose, quail, and turkey eggs, featuring automatic temperature and humidity control, and automatic egg turning.

Image 1.1: The Generic 48 Egg Automatic Incubator, shown with a group of newly hatched chicks, highlighting its purpose.
2. Product Features
The Generic 48 Egg Automatic Incubator is equipped with advanced features to optimize the hatching process:
- Automatic Temperature Control: Maintains a stable internal temperature crucial for embryo development.
- Automatic Humidity Control: Features an upgraded multi-cell sink design for balanced humidity levels, visible on the display.
- Automatic Egg Turning: Gently turns eggs every two hours to prevent embryo adhesion and ensure even heating. The rotation speed is slow and may not be immediately visible.
- Integrated Humidity Display: Eliminates the need for an external hygrometer by showing real-time humidity levels.
- Built-in Egg Candler: Allows observation of egg development without requiring a separate candling device.
- Microcomputer Intelligent Control: A new-generation system for automatic temperature, humidity, egg turning, alarm, and recording functions.
- Four-Screen Display: Provides clear visibility of temperature, humidity, incubation days, and egg turning countdown.
- Efficient Heating System: Utilizes a long-life heating tube for precise temperature regulation.
- Silent Multi-Blade Fan: Ensures balanced temperature distribution throughout the incubator with minimal noise.

Image 2.1: Detailed view of the incubator's control panel, showcasing the four-screen display for temperature, humidity, and incubation data. Also visible are the internal processing chips that manage the automatic functions.
3. Components Overview
Familiarize yourself with the main components of your incubator:

Image 3.1: A side view of the Generic 48 Egg Automatic Incubator, showing its compact design and control panel.
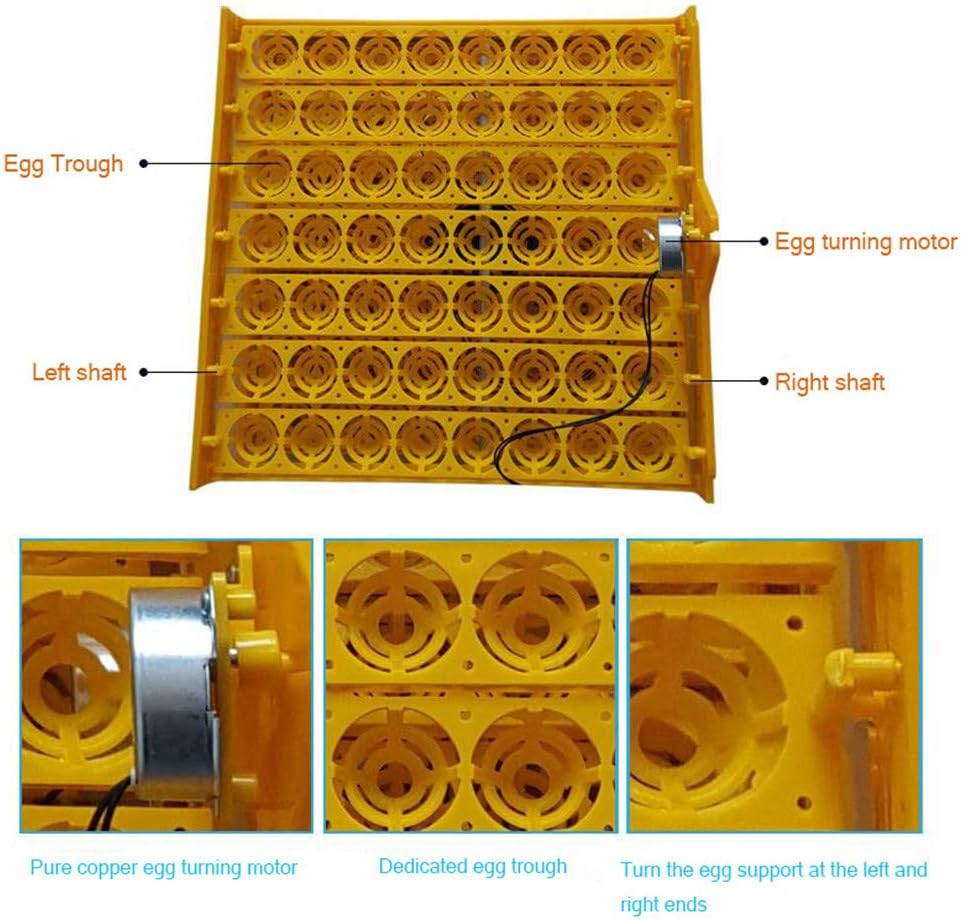
Image 3.2: The egg tray, showing individual egg troughs, the egg turning motor, and the left and right shafts responsible for rotating the eggs.
- Egg Trough: Individual compartments designed to hold eggs securely during incubation.
- Egg Turning Motor: Powers the automatic egg turning mechanism.
- Left and Right Shafts: Components that facilitate the movement of the egg supports for turning.
- Control Panel: Front-mounted panel with digital displays and control buttons for settings.
- Water Tank/Sink: Located at the bottom, used for maintaining humidity levels.
- Fan: Circulates air for even temperature distribution.
4. Setup Instructions
- Unpacking: Carefully remove all components from the packaging. Inspect for any damage.
- Placement: Place the incubator on a stable, level surface in a room with a consistent ambient temperature (ideally between 20-25°C or 68-77°F) and away from direct sunlight, drafts, or extreme temperature fluctuations.
- Water Filling: Fill the multi-cell water sink at the bottom of the incubator with distilled or demineralized water. Ensure the water level is appropriate for the desired humidity. Refer to the humidity display for guidance.
- Power Connection: Connect the power cord to the incubator and then to a suitable electrical outlet.
- Pre-heating: Turn on the incubator and allow it to run for at least 2-3 hours (preferably 24 hours) to stabilize the internal temperature and humidity before placing eggs inside. This allows you to verify settings and make any necessary adjustments.
- Egg Placement: Once stable, carefully place the fertilized eggs into the egg troughs. Ensure they are positioned correctly for the automatic turning mechanism.

Image 4.1: Top view of the incubator, illustrating the access points for adding water to the humidity reservoir without opening the main lid.
5. Operating Instructions
5.1 Initial Settings
The incubator comes with default settings suitable for chicken eggs. You may need to adjust these based on the type of eggs you are incubating. Consult a reliable guide for specific temperature and humidity requirements for different poultry species.
- Temperature: Typically ranges from 37.5°C to 38°C (99.5°F to 100.4°F) for most poultry.
- Humidity: Generally 50-60% for the first 18 days, increasing to 65-75% during the last 3 days (lockdown).
5.2 Control Panel Functions
The control panel features a four-screen display and several buttons for operation:
- Temperature Display: Shows the current internal temperature.
- Humidity Display: Shows the current internal humidity percentage.
- Incubation Days Counter: Tracks the number of days since incubation began.
- Egg Turning Countdown: Indicates the time until the next automatic egg turn.
- Setting Buttons: Used to adjust target temperature, humidity, and other parameters. Refer to the specific button labels on your unit for precise functions (e.g., SET, +, -).
5.3 Automatic Egg Turning
The incubator automatically turns eggs every two hours. This process is slow and designed to mimic natural turning. You can manually initiate an egg turn if needed by pressing the designated button on the control panel (refer to your unit's specific button layout).
5.4 Monitoring and Adjustments
- Temperature: Regularly check the temperature display. If adjustments are needed, use the setting buttons. Small adjustments are recommended to avoid shocking the embryos.
- Humidity: Monitor the humidity display. Add water to the external filling ports as needed to maintain the desired level. During lockdown (last 3 days), increase humidity by adding more water.
- Egg Candling: Use the built-in egg candler to periodically check the development of the embryos. This helps identify infertile eggs or those that have stopped developing.
6. Maintenance
- Cleaning: After each hatch, thoroughly clean the incubator. Disconnect from power before cleaning. Use a mild disinfectant solution to wipe down all surfaces, egg trays, and the water sink. Ensure all parts are completely dry before reassembly or storage.
- Water Quality: Always use distilled or demineralized water to prevent mineral buildup in the water sink and on heating elements, which can affect humidity control and incubator lifespan.
- Storage: When not in use, store the incubator in a clean, dry place, away from direct sunlight and extreme temperatures.
7. Troubleshooting
| Problem | Possible Cause | Solution |
|---|---|---|
| Temperature fluctuations | Unstable room temperature, incubator lid not sealed properly, fan obstruction. | Move incubator to a stable environment. Ensure lid is securely closed. Check fan for obstructions and clean if necessary. |
| Humidity too low | Insufficient water in the sink, dry ambient air. | Add more water to the water sink. Consider placing a damp sponge near the incubator (outside) if ambient air is very dry. |
| Humidity too high | Too much water in the sink, humid ambient air. | Reduce water in the sink. Ensure proper ventilation in the room. |
| Eggs not turning | Egg turning motor disconnected or jammed, eggs improperly placed. | Check motor connection. Ensure eggs are correctly seated in troughs and not obstructing movement. Manually initiate a turn to check functionality. |
| No display/Power issue | Power cord loose, power outlet fault, unit switch off. | Check power cord connection. Test outlet with another device. Ensure the incubator's power switch is in the 'ON' position. |
8. Specifications
- Model: 48 Egg Incubator
- Capacity: 48 standard chicken eggs (capacity may vary for different egg sizes)
- Power Supply: Not specified in provided data
- Temperature Control Range: Not specified in provided data
- Humidity Display Range: Not specified in provided data
- Automatic Egg Turning: Yes, every 2 hours
- Display: Four-screen digital display (Temperature, Humidity, Incubation Days, Egg Turn Countdown)
- Manufacturer: YINWUMAOSI
- ASIN: B0F53FYMP8
9. Important Safety Information
- Always disconnect the incubator from the power supply before cleaning or performing any maintenance.
- Do not immerse the incubator in water or any other liquid.
- Keep the incubator out of reach of children and pets.
- Ensure proper ventilation around the incubator to prevent overheating.
- Do not operate the incubator if the power cord or plug is damaged.
- Use only distilled or demineralized water for humidity to prevent mineral buildup and ensure optimal performance.