1. Introduction
This manual provides detailed instructions for the safe and efficient operation of your Generic 56-Egg Automatic Incubator. This device is designed for incubating various poultry eggs, including chicken, duck, goose, quail, and other birds, featuring automatic egg turning, precise temperature control, and humidity monitoring.
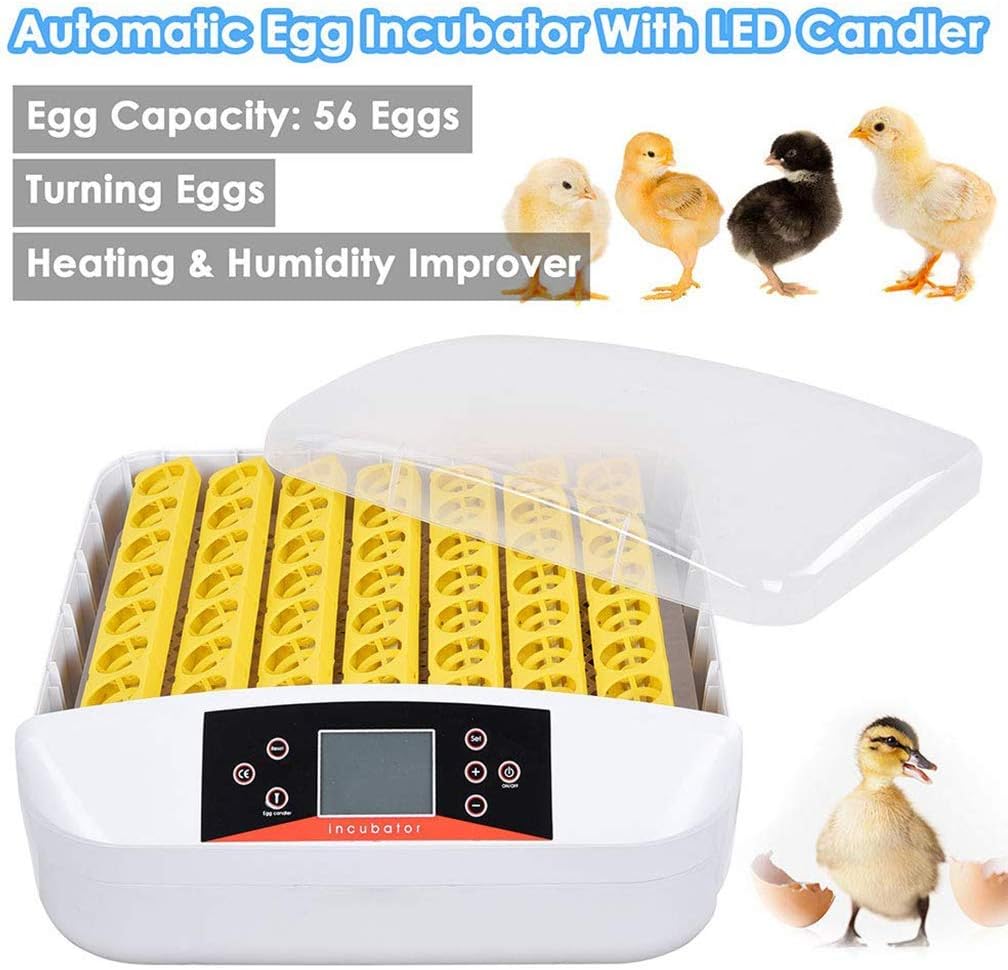
Image 1.1: The Generic 56-Egg Automatic Incubator, shown with various poultry chicks and a duckling, highlighting its versatility.
2. Safety Instructions
- Read all instructions before using the incubator.
- Ensure the incubator is placed on a stable, level surface away from direct sunlight, drafts, or extreme temperature fluctuations.
- Do not operate the incubator with a damaged cord or plug. If the cord is damaged, it must be replaced by the manufacturer or a qualified service agent.
- Keep the incubator away from water or other liquids. Do not immerse the unit in water.
- Unplug the incubator from the power outlet before cleaning or performing any maintenance.
- This appliance is not intended for use by persons (including children) with reduced physical, sensory, or mental capabilities, or lack of experience and knowledge, unless they have been given supervision or instruction concerning use of the appliance by a person responsible for their safety.
- Children should be supervised to ensure that they do not play with the appliance.
3. Package Contents
Upon unpacking, please verify that all components are present and undamaged:
- 1x Automatic Egg Incubator
- 1x Power Cord
- 1x Instruction Manual (this document)
4. Product Overview and Components
Familiarize yourself with the main parts of your incubator before operation.
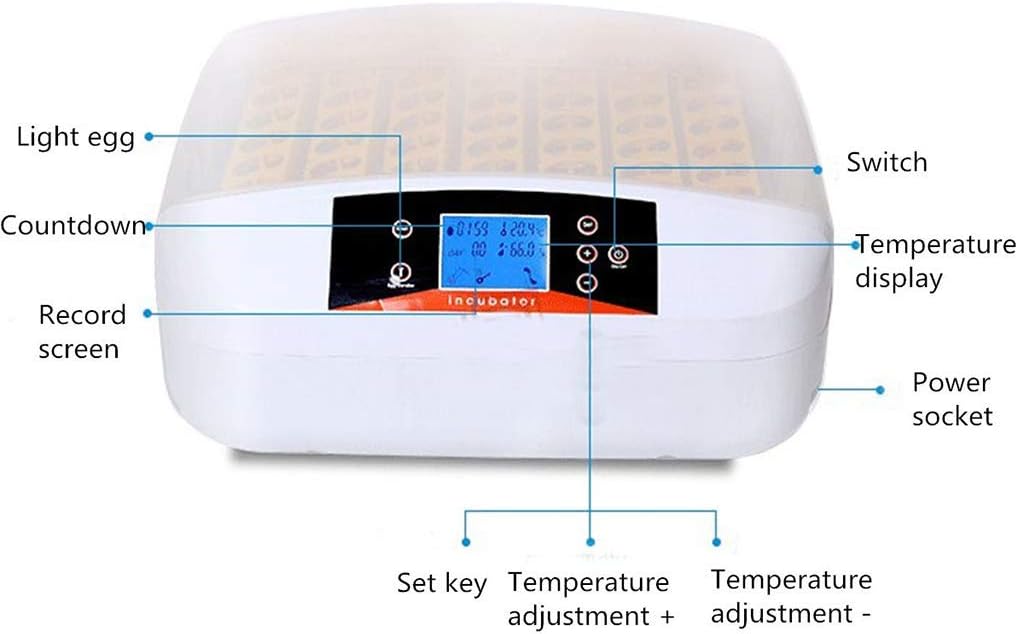
Image 4.1: Front view of the incubator control panel with labeled components.
- Light Egg (LED Candler): Button to activate the built-in LED candler for egg inspection.
- Countdown: Displays the remaining time until the next automatic egg turn.
- Record Screen: Main digital display showing temperature, humidity, and incubation day.
- Set Key: Used to enter settings mode and confirm selections.
- Temperature Adjustment + / -: Buttons to increase or decrease the set temperature.
- Power Socket: Connection point for the power cord.
- Switch: Power on/off button.
- Temperature Display: Shows the current internal temperature.

Image 4.2: Detailed view of the ultra-high-power motor responsible for automatic egg turning and the multi-function openwork egg trays.
5. Setup
- Placement: Place the incubator on a flat, stable surface in a room with a consistent ambient temperature (ideally between 20°C and 25°C). Avoid areas with direct sunlight, drafts, or significant temperature fluctuations.
- Power Connection: Connect the power cord to the power socket on the incubator and then plug it into a standard 110V electrical outlet.
- Pre-heating: Turn on the incubator using the 'Switch' button. Allow the incubator to run for at least 30 minutes to an hour without eggs to stabilize the internal temperature and humidity. This also allows you to verify the display and controls are functioning correctly.
- Water Filling for Humidity: Locate the water channels at the bottom of the incubator. Carefully add warm water (distilled water is recommended to prevent mineral buildup) into these channels. Do not overfill. Maintain appropriate humidity levels throughout the incubation period by regularly checking and refilling the water channels.
- Egg Placement: Once the incubator has stabilized, carefully place up to 56 eggs into the egg trays. Ensure eggs are clean and free from cracks. For optimal turning, place eggs with the larger end slightly elevated.
6. Operating Instructions
6.1 Powering On and Initial Settings
- After setup, press the 'Switch' button to power on the incubator. The 'Record Screen' will illuminate, displaying the current temperature, humidity, and incubation day.
- To adjust the target temperature, press the 'Set Key'. The temperature display will flash. Use the 'Temperature Adjustment +' and '-' buttons to set your desired temperature (range: 20°C to 40°C). Press 'Set Key' again to confirm.
- The incubator will automatically begin heating to the set temperature.
6.2 Automatic Egg Turning
The incubator is equipped with an automatic egg turning mechanism to ensure even heat distribution and prevent the embryo from sticking to the shell.
- The motor automatically turns the eggs for 10 seconds every 2 hours.
- The 'Countdown' display shows the time remaining until the next turn.

Image 6.2.1: Illustration of the automatic egg turning function, where the motor rotates the egg trays.
6.3 Humidity Control
Maintaining proper humidity is crucial for successful hatching. The incubator monitors internal humidity.
- Monitor the humidity level on the 'Record Screen'.
- Adjust humidity by adding or removing water from the water channels at the bottom of the incubator. Refer to specific egg type requirements for optimal humidity ranges.
- The incubator features an intelligent temperature and humidity alarm system. If either parameter exceeds or falls below preset thresholds, an alarm will activate.
6.4 Using the LED Candler
The built-in LED candler allows you to inspect the development of the embryo without disturbing the eggs excessively.
- Press the 'Light Egg' button to activate the LED candler.
- Carefully place an egg over the light source to observe the internal contents.
- Turn off the candler when not in use to conserve energy.
7. Maintenance
7.1 Cleaning
- Always unplug the incubator before cleaning.
- Wipe down all surfaces with a damp cloth and a mild disinfectant solution after each hatch.
- Ensure all parts are completely dry before storing or reusing the incubator.
- Do not use abrasive cleaners or immerse electrical components in water.
7.2 Storage
- Store the incubator in a clean, dry place away from direct sunlight and extreme temperatures.
- Keep it out of reach of children and pets.
8. Troubleshooting
| Problem | Possible Cause | Solution |
|---|---|---|
| Incubator does not power on. | No power supply; loose connection; power switch off. | Check power cord connection; ensure outlet is functional; press the 'Switch' button. |
| Temperature/Humidity alarm sounds. | Temperature or humidity outside set range. | Adjust temperature using '+'/' -' buttons; add water for humidity or ventilate if too high. Check ambient room conditions. |
| Eggs are not turning automatically. | Motor malfunction; obstruction in egg trays. | Check for any obstructions; ensure the motor is connected. If problem persists, contact support. |
| Inconsistent temperature readings. | Poor room insulation; incubator placed in drafty area. | Relocate incubator to a more stable environment; ensure lid is properly sealed. |
9. Specifications
| Feature | Specification |
|---|---|
| Product Name | Egg Incubator |
| Egg Capacity | 56 pcs |
| Input Voltage | 110V |
| Weight | 8 kg |
| Power | 80W |
| Adjustable Temperature Range | 20°C ~ 40°C (68°F ~ 104°F) |
| Dimensions (L x W x H) | 45.5 cm x 50 cm x 18 cm (17.91'' x 19.69'' x 7.09'') |
| Usable Range | Chicken, Duck, Goose, Quail, Pigeon, Birds, etc. |
10. Warranty and Support
For any questions, concerns, or warranty inquiries regarding your Generic 56-Egg Automatic Incubator, please contact the seller directly through the platform where the purchase was made. They will be able to provide assistance and support.