VEVOR 5FT-2D-5K-H
VEVOR 5FT Sliding Barn Door Hardware Kit User Manual
Model: 5FT-2D-5K-H
1. Introduction
This user manual provides detailed instructions for the installation, operation, and maintenance of your VEVOR 5FT Sliding Barn Door Hardware Kit. This kit is designed to provide a durable, smooth, and quiet sliding solution for single barn doors, enhancing the aesthetic and functionality of your space.
The VEVOR 5FT Sliding Barn Door Hardware Kit is constructed from heavy-duty carbon steel, capable of supporting doors up to 330 lbs (150 kg). Its black powder-coated finish ensures resistance to damp conditions, rust, and chipping, making it suitable for various indoor and outdoor applications.

Figure 1: VEVOR 5FT Sliding Barn Door Hardware Kit with a wooden barn door.

Figure 2: Versatile applications of the VEVOR Sliding Barn Door Hardware Kit in different settings.
2. Safety Information
Please read all instructions carefully before installation and use. Failure to follow these instructions may result in property damage or personal injury.
- Always wear appropriate safety gear, including safety glasses and gloves, during installation.
- Ensure the wall structure where the track will be mounted is strong enough to support the weight of the door and the hardware kit (up to 330 lbs / 150 kg). Reinforcement may be necessary.
- Verify all components are present and undamaged before beginning installation.
- Keep children and pets away from the work area during installation.
- Do not modify the hardware components. Use only original parts provided by VEVOR.
- Ensure the door is properly secured to the rollers and the track before use to prevent accidental detachment.
- Regularly inspect the hardware for any signs of wear, damage, or loose fasteners.
3. Package Contents
Carefully unpack the box and ensure all items listed below are present and in good condition. If any parts are missing or damaged, please contact VEVOR customer service.

Figure 3: All components included in the VEVOR 5FT Sliding Barn Door Hardware Kit.
| Quantity | Item |
|---|---|
| 1 | User Manual |
| 5 | 34# Fixed Sleeves |
| 13 | Flat Washers (Φ10 x Φ20 x 2mm) |
| 5 | M8 x 90mm Self-Tapping Screws |
| 5 | Plastic Anchors (Φ12 x 50mm) |
| 1 | M2.5 Hex Wrench |
| 2 | Stoppers |
| 1 | Floor Guide |
| 2 | POM Anti-Jump Disks |
| 2 | White Plastic Anchors (Φ6 x 30mm) |
| 4 | M10 Cap Nuts |
| 4 | 10 x 55mm Half-Thread Screws |
| 2 | Track Rails (A+B) |
| 2 | Roller Assemblies |
| 2 | M4 x 25mm Round-Head Self-Tapping Screws |
| 2 | M4 x 25mm Countersunk Self-Tapping Screws |
4. Setup and Installation
This section provides a step-by-step guide for installing your VEVOR Sliding Barn Door Hardware Kit. Ensure you have all necessary tools and components before starting.
4.1 Door Compatibility
This hardware kit is compatible with single barn doors that are 1-3/8 to 1-3/4 inches (34.92 mm ~ 44.45 mm) thick and up to 30 inches (762 mm) wide. It is suitable for wood, glass, and MDF barn doors.
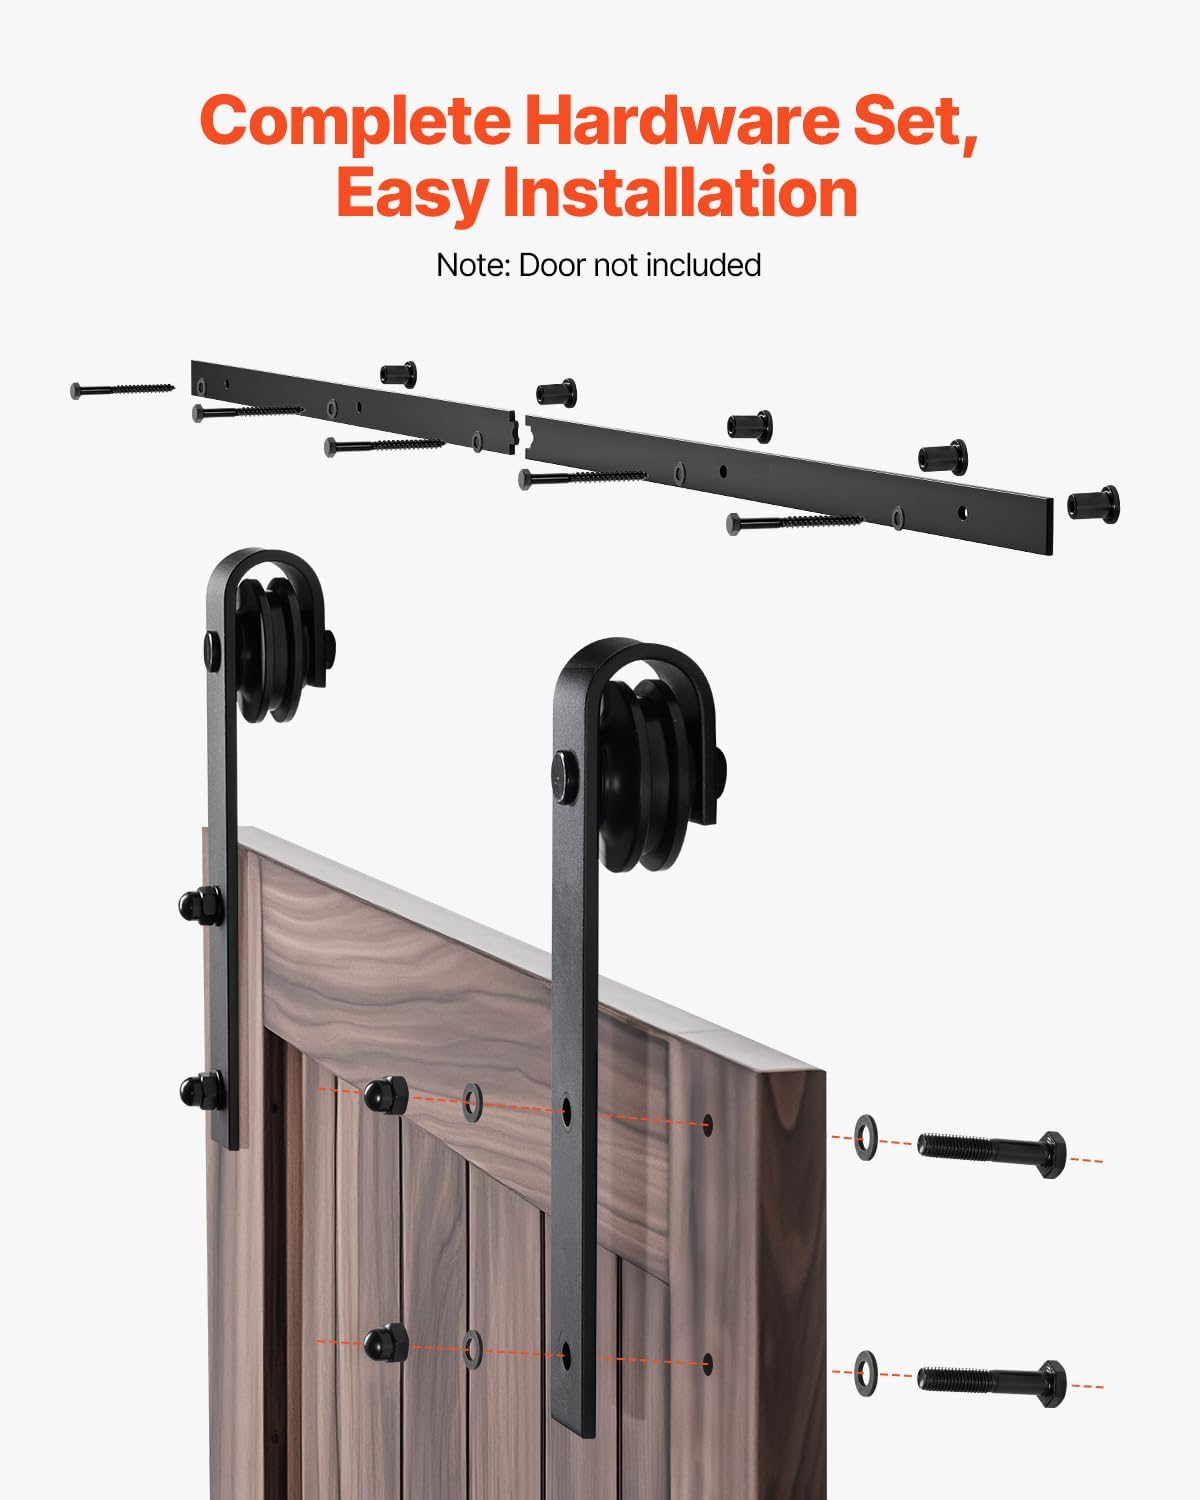
Figure 4: Door compatibility and dimensions for the VEVOR Sliding Barn Door Hardware Kit.
4.2 Installation Steps
Follow these steps for a smooth installation. Refer to Figure 5 for visual guidance.

Figure 5: Quick and Easy Installation Steps.
- Mark Stud Locations: Identify and mark the stud locations on your wall where the track will be mounted. Use a level to ensure accuracy.
- Mount Header Board (if Needed): If your wall studs do not align with the track mounting holes, or if your wall material requires it, install a header board (not included) securely to the wall studs. This provides a solid mounting surface for the track.
- Install the Track: Align the track rails (A+B) and secure them to the wall or header board using the provided M8 x 90mm self-tapping screws and fixed sleeves. Ensure the track is perfectly level.
- Attach the Rollers: Attach the J-shape roller assemblies to the top edge of your barn door using the M10 cap nuts and 10 x 55mm half-thread screws. Ensure they are securely fastened and aligned.
- Secure the Anti-Jump Disks: Install the POM anti-jump disks on the top edge of the door, above the rollers, using the M4 x 25mm round-head self-tapping screws. These prevent the door from lifting off the track.
- Fix the Stoppers: Slide the stoppers onto the track from both ends. Adjust their positions to control the door's travel distance and tighten them securely with the M2.5 hex wrench.
- Install the Floor Guide: Position the floor guide at the bottom of the door opening to prevent the door from swinging out. Secure it to the floor using the M4 x 25mm countersunk self-tapping screws and white plastic anchors.
- Lift & Place the Door onto the Track: With assistance, carefully lift the door and hook the roller wheels onto the track. Ensure the anti-jump disks are positioned correctly above the track.
5. Operating Instructions
Once installed, the VEVOR Sliding Barn Door Hardware Kit provides a smooth and quiet operation. Simply push or pull the door along the track to open or close it. The high-density thermoplastic wheels and excellent bearings ensure minimal friction and noise.

Figure 6: The J-shape rollers are designed for butter-smooth and silent sliding.
6. Maintenance
To ensure the longevity and optimal performance of your VEVOR Sliding Barn Door Hardware Kit, follow these simple maintenance guidelines:
- Cleaning: Wipe down the track and rollers periodically with a soft, damp cloth to remove dust and debris. Avoid abrasive cleaners that could damage the powder-coated finish.
- Lubrication: The bearings in the rollers are designed for smooth operation and typically do not require lubrication. However, if you notice any stiffness or squeaking over time, a small amount of silicone-based lubricant can be applied to the roller axles.
- Fastener Check: Periodically check all screws and bolts (especially those securing the track to the wall and the rollers to the door) to ensure they remain tight. Re-tighten if necessary.
- Corrosion Resistance: The black powder-coated finish is designed to resist damp conditions and corrosion. While it is maintenance-free in this regard, avoid prolonged exposure to harsh chemicals or extreme moisture.

Figure 7: The VEVOR kit features a corrosion-resistant, rustproof, and maintenance-free black powder-coated finish.

Figure 8: The hardware is stable and rust-resistant, designed to withstand various outdoor conditions.
7. Troubleshooting
If you encounter any issues with your VEVOR Sliding Barn Door Hardware Kit, refer to the following common problems and their solutions:
| Problem | Possible Cause | Solution |
|---|---|---|
| Door does not slide smoothly. | Track is not level; debris on track; loose rollers; damaged bearings. | Check track level and adjust if necessary. Clean track thoroughly. Tighten roller fasteners. Inspect rollers for damage and replace if needed. |
| Squeaking or grinding noise during operation. | Lack of lubrication in rollers; debris in bearings; loose components. | Apply a small amount of silicone-based lubricant to roller axles. Clean rollers and track. Check and tighten all fasteners. |
| Door wobbles or feels unstable. | Loose track mounting; improper installation of anti-jump disks or floor guide. | Ensure track is securely mounted to wall/header board. Verify anti-jump disks are properly installed and tightened. Check floor guide installation. |
| Door comes off the track. | Anti-jump disks not installed or improperly positioned; severe impact. | Ensure anti-jump disks are installed correctly and positioned directly above the track. Avoid forceful impacts on the door. |
8. Specifications
Below are the technical specifications for the VEVOR 5FT Sliding Barn Door Hardware Kit:
| Attribute | Detail |
|---|---|
| Brand | VEVOR |
| Model Number | 5FT-2D-5K-H |
| Main Material | Carbon Steel |
| Color | Black |
| Style | J-shape |
| Track Length | 5 Feet (59.06 inches / 1500 mm) |
| Track Thickness | 0.24 inches / 6 mm |
| Max Weight Capacity | 330 lbs / 150 kg |
| Compatible Door Thickness | 1-3/8 to 1-3/4 inches (34.92 mm ~ 44.45 mm) |
| Compatible Door Max Width | 30 inches / 762 mm |
| Item Weight | 12.24 pounds / 5.55 kg |
| Product Dimensions | 59.06 x 1.57 x 0.24 inches |
| Assembly Required | Yes |
| UPC | 197988669173 |

Figure 9: The hardware kit is designed to support up to 330 lbs (150 kg).
9. Warranty and Support
For warranty information, technical support, or to purchase replacement parts, please refer to the official VEVOR website or contact VEVOR customer service directly. Keep your purchase receipt and model number (5FT-2D-5K-H) handy for faster service.
You can visit the VEVOR store online at VEVOR Official Store.
Ask a question about this manual
Ask about setup, troubleshooting, compatibility, parts, safety, or missing instructions. Manuals+ will review the question and use this page’s manual context to help answer it.