Gevi DCMF0-BK0A1
Gevi 10-Cup Grind & Brew Coffee Maker
Model: DCMF0-BK0A1
User Instruction Manual
Introduction
Thank you for choosing the Gevi 10-Cup Grind & Brew Coffee Maker. This appliance is designed to provide fresh, delicious coffee with the convenience of a built-in burr grinder and a programmable touchscreen interface. Please read this manual thoroughly before operating your new coffee maker to ensure safe and optimal performance. Keep this manual for future reference.

Image: The Gevi 10-Cup Grind & Brew Coffee Maker, showcasing its sleek design and a freshly brewed cup of coffee.
Important Safeguards
When using electrical appliances, basic safety precautions should always be followed to reduce the risk of fire, electric shock, and/or injury to persons, including the following:
- Read all instructions before using the appliance.
- Do not touch hot surfaces. Use handles or knobs.
- To protect against fire, electric shock, and injury to persons, do not immerse cord, plugs, or appliance in water or other liquid.
- Close supervision is necessary when any appliance is used by or near children.
- Unplug from outlet when not in use and before cleaning. Allow to cool before putting on or taking off parts, and before cleaning the appliance.
- Do not operate any appliance with a damaged cord or plug, or after the appliance malfunctions or has been damaged in any manner.
- The use of accessory attachments not recommended by the appliance manufacturer may result in fire, electric shock, or injury to persons.
- Do not use outdoors.
- Do not let cord hang over edge of table or counter, or touch hot surfaces.
- Do not place on or near a hot gas or electric burner, or in a heated oven.
- Always attach plug to appliance first, then plug cord into the wall outlet. To disconnect, turn any control to 'off', then remove plug from wall outlet.
- Do not use appliance for other than intended use.
- Scalding may occur if the lid is removed during the brewing cycle.
Product Components
The Gevi 10-Cup Grind & Brew Coffee Maker comes with the following components:
- 1 x Drip Coffee Maker Unit
- 1 x Glass Coffee Carafe
- 1 x Scoop
- 1 x Permanent Filter
- 1 x Manual (this document)
- 1 x Filter Ring
- 1 x Removable Filter Holder
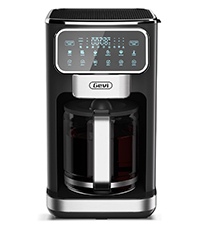
Image: All included accessories laid out, including the glass carafe, scoop, permanent filter, and manual.
Setup
1. Unpacking and Initial Cleaning
- Carefully remove all packaging materials and labels from the coffee maker.
- Wash the glass carafe, permanent filter, and filter holder in warm, soapy water. Rinse thoroughly and dry.
- Wipe the exterior of the coffee maker with a damp cloth.
2. First Use Cycle
Before brewing coffee for the first time, run a full brewing cycle with only water to clean the internal components.
- Fill the removable water tank with fresh water up to the 'MAX' line.
- Place the permanent filter in the filter holder, then insert the filter holder into the coffee maker.
- Place the empty glass carafe on the warming plate.
- Plug the coffee maker into a standard electrical outlet.
- Select a brew cycle (e.g., 'Classic' for 10 cups) and start the brewing process without coffee beans or grounds.
- Once the cycle is complete, discard the hot water and rinse the carafe.

Image: A hand removing the transparent water tank from the side of the Gevi coffee maker, illustrating its removability for easy filling and cleaning.
Operating Instructions
1. Touchscreen Overview
The Gevi coffee maker features an intuitive LED touchscreen for all settings and controls.

Image: A close-up view of the Gevi coffee maker's LED touchscreen, displaying various brewing options and settings.
2. Brewing Coffee (Whole Beans or Pre-Ground)
- Fill Water Tank: Remove the water tank and fill it with fresh, cold water to your desired cup level (4-10 cups). Reinsert the tank securely.
- Add Coffee:
- For Whole Beans: Open the bean hopper lid and add whole coffee beans. Do not overfill.
- For Pre-Ground Coffee: Place the permanent filter into the filter holder. Add your desired amount of pre-ground coffee to the filter.
- Place Carafe: Ensure the glass carafe is correctly positioned on the warming plate.
- Select Settings: Use the touchscreen to select your desired brew strength (CLASSIC, INTENSE, RICH, ICE) and cup quantity (4-10 cups).
- Start Brewing: Press the 'Brew' button to begin the brewing process.

Image: An illustrative diagram demonstrating the two methods of adding coffee: whole beans to the top grinder hopper or pre-ground coffee directly into the filter basket.

Image: A visual guide illustrating the step-by-step process of brewing coffee, from adding water and coffee to selecting settings and enjoying the final brew.
3. Brewing Styles
The coffee maker offers four distinct brewing styles:
- CLASSIC: A balanced and traditional coffee flavor.
- INTENSE: A stronger, bolder coffee experience.
- RICH: A full-bodied and robust flavor profile.
- ICE: Optimized for brewing over ice, producing a refreshing iced coffee.

Image: Three glasses of coffee, each labeled to represent the Classic, Intense, and Rich brewing options available.
4. Adjustable Cup Quantity
You can select to brew between 4 to 10 cups of coffee using the touchscreen controls.

Image: The glass carafe with clear markings indicating fill levels for 4, 6, 8, and 10 cups of coffee.
5. Delay Brew Function
Program the coffee maker to start brewing at a later time, up to 24 hours in advance.
- Prepare the coffee maker with water and coffee as described above.
- Press the 'Delay Brew' button on the touchscreen.
- Adjust the desired start time using the '+' and '-' buttons.
- Confirm your selection. The coffee maker will start brewing automatically at the set time.

Image: The Gevi coffee maker displaying a programmed delay brew time on its digital screen, ready to start brewing automatically.
6. Keep Warm Function
The warming plate automatically keeps your coffee hot after brewing. You can adjust the keep-warm duration from 60 to 240 minutes.
- After a brew cycle, the keep-warm function activates automatically.
- To adjust the duration, press the 'Keep Warm' button on the touchscreen.
- Use the '+' and '-' buttons to set the desired time.

Image: A hand interacting with the touchscreen to adjust the 'Keep Warm' timer setting on the Gevi coffee maker.
Maintenance and Cleaning
Regular cleaning ensures optimal performance and extends the life of your coffee maker.
1. Daily Cleaning
- Carafe and Filter: After each use, discard used coffee grounds. Wash the glass carafe, permanent filter, and filter holder in warm, soapy water. Rinse thoroughly and dry. These parts are also top-rack dishwasher safe.
- Bean Hopper: The bean hopper is removable for easy cleaning. Remove any remaining beans and wash with warm, soapy water. Ensure it is completely dry before reattaching.
- Water Tank: The removable water tank can be washed with warm, soapy water and rinsed.
- Exterior: Wipe the exterior surfaces of the coffee maker with a soft, damp cloth. Do not use abrasive cleaners or scouring pads.
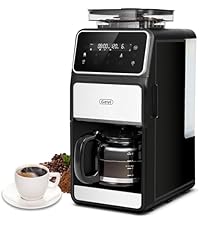
Image: A hand demonstrating the removal of the bean hopper from the top of the coffee maker for cleaning.

Image: A hand holding the reusable permanent filter and filter basket, highlighting their ease of removal for cleaning.
2. Descaling
Mineral deposits (limescale) can build up in your coffee maker over time, affecting performance and coffee taste. Descale your coffee maker every 2-3 months, or more frequently if you have hard water.
- Fill the water tank with a mixture of white vinegar and water (1:2 ratio).
- Place the empty carafe on the warming plate.
- Start a brew cycle without coffee grounds.
- After half the mixture has brewed, turn off the coffee maker and let it sit for 15-20 minutes to allow the solution to work.
- Turn the coffee maker back on and let the remaining mixture brew through.
- Discard the vinegar solution and run 2-3 cycles with fresh water only to rinse thoroughly.
Troubleshooting
If you encounter issues with your Gevi coffee maker, refer to the following common problems and solutions:
| Problem | Possible Cause | Solution |
|---|---|---|
| Coffee does not brew. | No water in tank, power not connected, brew cycle not started. | Ensure water tank is filled, plug in appliance, press 'Brew' button. |
| Coffee is too weak. | Insufficient coffee grounds, coarse grind setting, incorrect brew strength. | Add more coffee, adjust grinder to a finer setting, select 'Intense' or 'Rich' brew strength. |
| Coffee overflows from filter. | Too much coffee grounds, filter clogged, carafe not properly placed. | Reduce coffee amount, clean filter, ensure carafe is centered. |
| Grinder not working. | No beans in hopper, hopper lid not closed, blockage. | Fill bean hopper, ensure lid is securely closed, clean grinder for blockages. |
| Unusual noise during operation. | Water pump working, grinder operating, loose component. | Normal operation includes pump and grinder sounds. If excessive, check for loose parts or contact support. |
If the problem persists after attempting these solutions, please contact Gevi Customer Support.
Specifications
| Brand | Gevi |
| Model Name | Drip Coffee Machine |
| Model Number | DCMF0-BK0A1 |
| Color | Black |
| Product Dimensions | 10.7"D x 7.9"W x 17.8"H |
| Item Weight | 4.7 pounds |
| Special Features | Keep Warm, Permanent Filter, Programmable, Touch Screen |
| Coffee Maker Type | Drip Coffee Machine |
| Style | Touchscreen |
| Operation Mode | Fully Automatic |
| Voltage | 120 Volts |
| Coffee Input Type | Whole Bean |
| Unit Count | 1.0 Count |
| UPC | 767791887592 |

Image: The Gevi coffee maker with its key dimensions (depth, width, height) clearly indicated for reference.
Warranty and Customer Support
Every Gevi product purchased through official or authorized channels includes a 12-month warranty and lifetime technical support.
If you encounter any problems when using your Gevi coffee machine, please feel free to contact us through the official Gevi website or your point of purchase for assistance.
For more information, visit the Gevi Store on Amazon.
Ask a question about this manual
Ask about setup, troubleshooting, compatibility, parts, safety, or missing instructions. Manuals+ will review the question and use this page’s manual context to help answer it.