
1. Important Safety Instructions
- Read all instructions before using the incubator.
- Ensure the incubator is placed on a stable, level surface.
- Do not operate the incubator with a damaged cord or plug.
- Keep the incubator away from direct sunlight, drafts, and extreme temperature fluctuations.
- Unplug the incubator from the power outlet before cleaning or performing maintenance.
- Do not immerse the electrical components in water or other liquids.
- This appliance is not intended for use by persons (including children) with reduced physical, sensory, or mental capabilities, or lack of experience and knowledge, unless they have been given supervision or instruction concerning use of the appliance by a person responsible for their safety.
2. Product Overview
The Generic 320 Egg Digital Poultry Incubator is designed for efficient and automatic hatching of various poultry eggs. It features automatic egg turning, an LED electronic display for temperature and humidity, and a built-in egg candler.
2.1 Components List
- 1 x Incubator Unit
- 1 x Power Cable
- 1 x English Manual (This document)
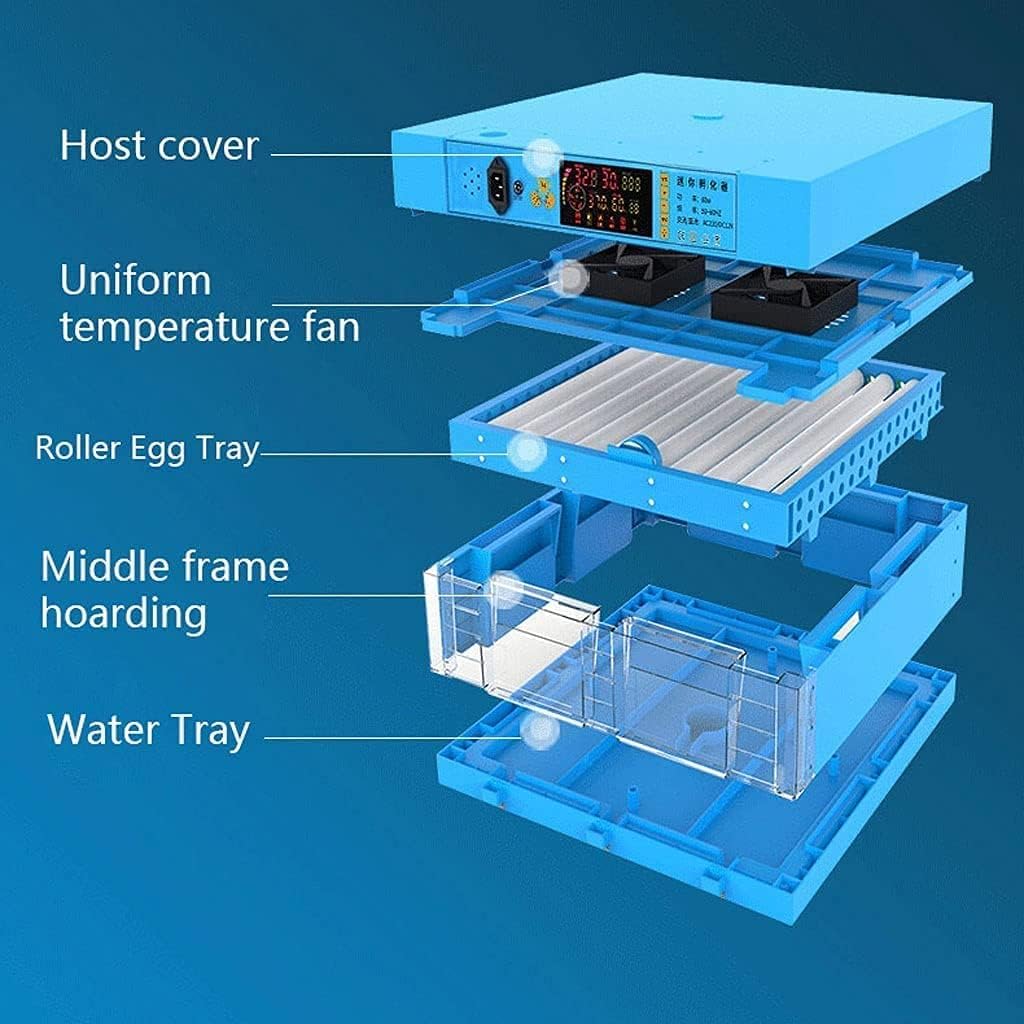
Image 2.1: Exploded view showing the host cover, uniform temperature fan, roller egg tray, middle frame hoarding, and water tray.

Image 2.2: Front view of the assembled 320 egg digital incubator, displaying the control panel and multiple egg trays.
3. Setup
3.1 Assembly
- Carefully unpack all components from the packaging.
- Place the water tray at the bottom of the incubator base.
- Install the middle frame hoarding above the water tray.
- Position the roller egg trays onto the designated supports.
- Place the uniform temperature fan unit on top of the egg trays.
- Secure the host cover (top unit with control panel) onto the main body.
- Ensure all connections are firm and secure.
3.2 Placement Considerations
- Place the incubator in a room with a stable ambient temperature, ideally between 20℃ and 25℃ (68℉ and 77℉).
- Avoid locations with direct sunlight, drafts, or significant temperature fluctuations.
- If the room temperature is consistently below 24℃ (75℉), it is recommended to use an insulating foam box around the incubator to maintain stable internal temperatures.

Image 3.1: The incubator enclosed within a white foam box, illustrating recommended insulation for lower ambient room temperatures.
4. Operating Instructions
4.1 Initial Setup and Power On
- Connect the power cable to the incubator and then to a 110V power outlet.
- The LED electronic display will illuminate, showing the current temperature, humidity, and incubation day.
- Allow the incubator to run for at least 2-3 hours empty to stabilize the internal temperature and humidity before placing eggs.
4.2 Temperature and Humidity Settings
- The incubator features an automatic thermostat control. Refer to the control panel for specific temperature adjustment buttons (usually marked with '+' and '-' or 'SET').
- The recommended hatching temperature range is 20℃ to 40℃ (68℉ to 104℉). Consult specific guidelines for the type of poultry you are hatching.
- Humidity is primarily controlled by adding water to the water tray. Ensure the water tray always contains water.
- For even humidity distribution, water can be added through the external water inlet without opening the incubator.

Image 4.1: Illustration of the incubator's ventilation system with double fans and four air ducts, ensuring uniform temperature. It also shows the external water inlet for easy humidity control.
4.3 Egg Placement and Turning
- Select fresh, fertilized eggs within 3-7 days of laying for optimal hatching rates.
- Carefully place the eggs onto the roller egg trays. The incubator can accommodate various egg sizes without needing to adjust roller pitch.
- The incubator features 360° automatic egg turning, ensuring even heating and development of the embryo. This function operates automatically once the incubator is powered on.
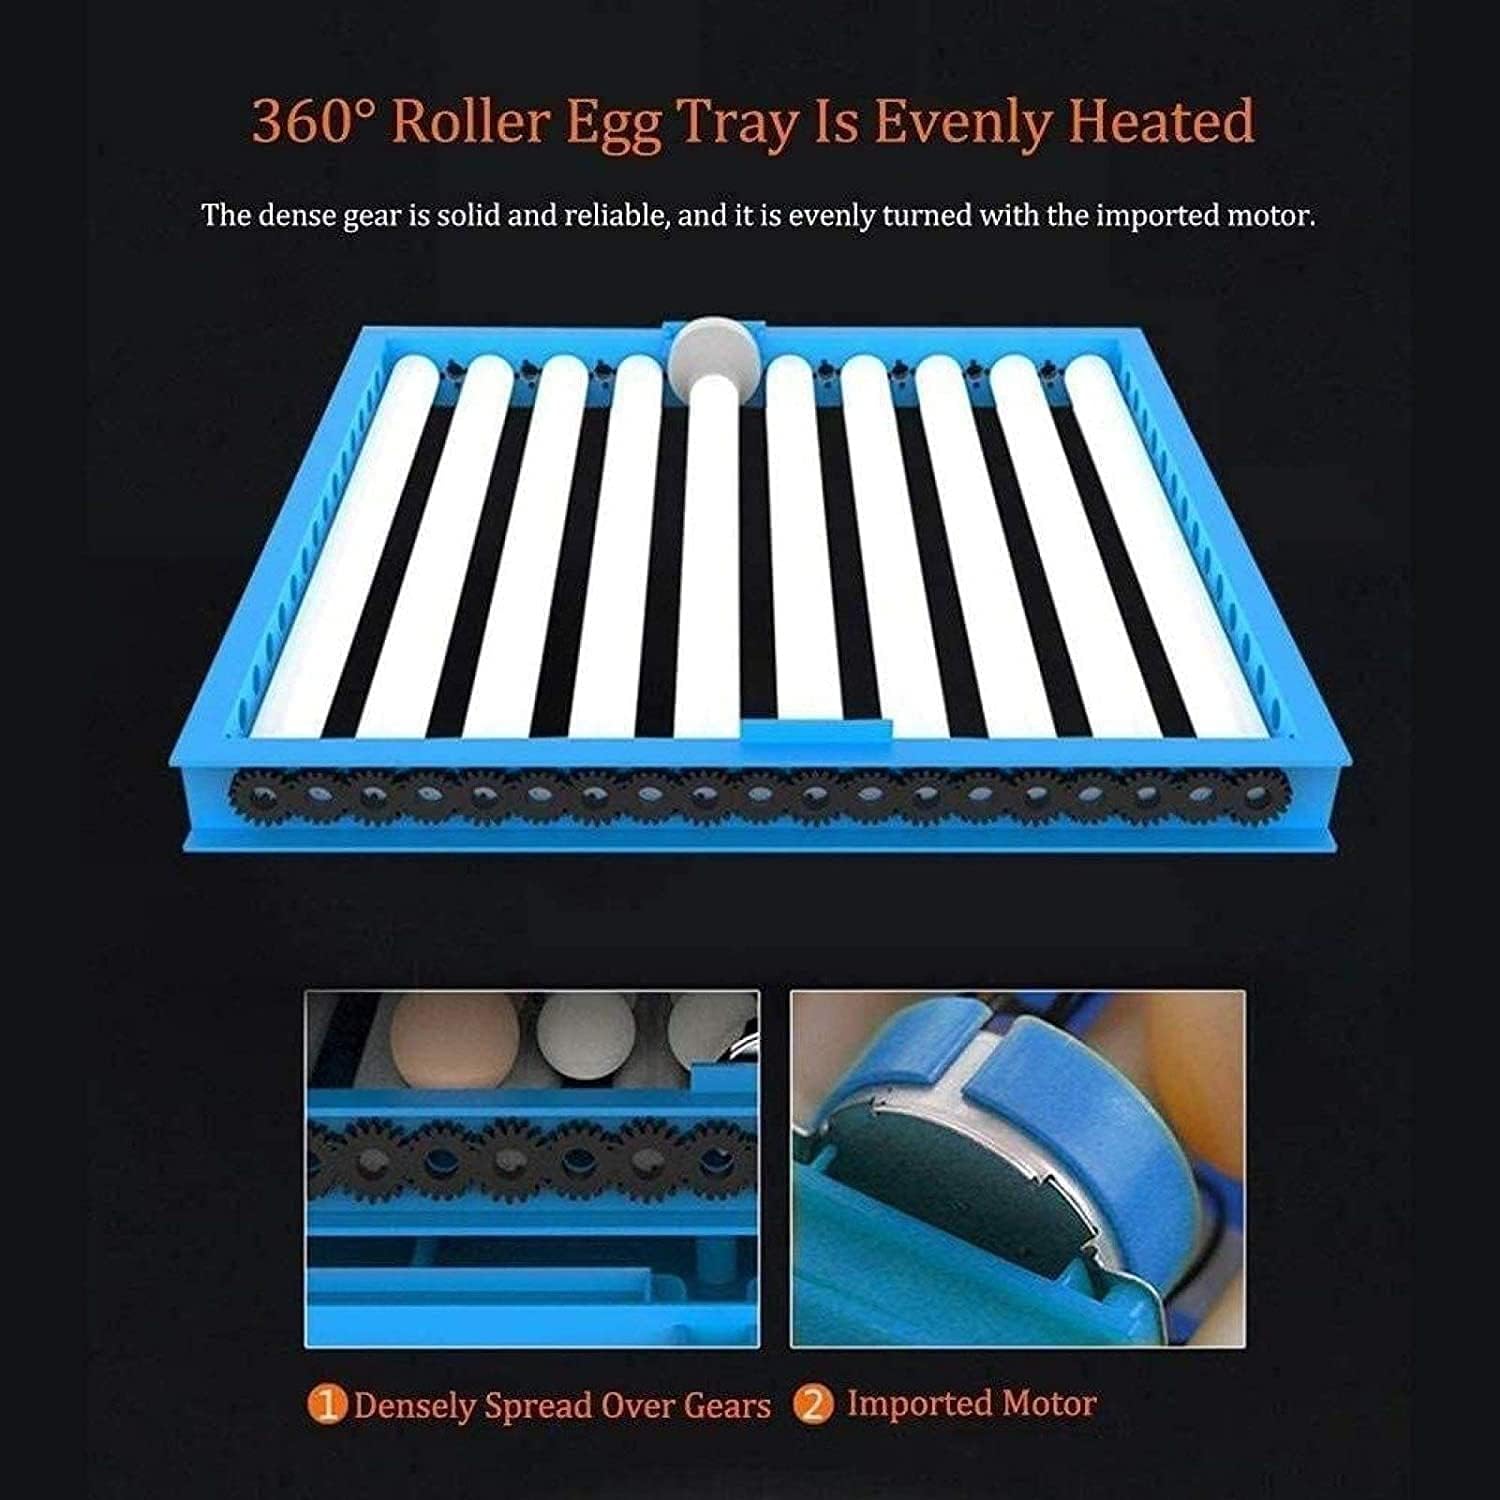
Image 4.2: Detailed view of the roller egg tray, highlighting the dense gears and imported motor responsible for the 360° automatic egg turning, ensuring even heating.

Image 4.3: The incubator filled with different types of eggs, including chicken, duck, goose, and quail, showcasing its versatility and capacity.
4.4 Egg Candling
- The incubator includes a built-in LED egg candler.
- To use, gently lift an egg and place it over the candling light source on the control panel.
- Observe the interior of the egg to check for embryo development and viability. This helps in removing infertile or non-developing eggs.
5. Maintenance
5.1 Cleaning
- Always unplug the incubator before cleaning.
- Remove all eggs and egg trays.
- Wipe down all surfaces with a damp cloth and a mild disinfectant solution. Avoid harsh chemicals.
- Clean the water tray thoroughly to prevent mold or bacterial growth.
- Ensure all components are completely dry before reassembling or plugging in the incubator.
5.2 Storage
- When not in use, clean the incubator thoroughly and ensure it is completely dry.
- Store the incubator in a cool, dry place, away from direct sunlight and extreme temperatures.
- Keep it covered to prevent dust accumulation.
6. Troubleshooting
| Problem | Possible Cause | Solution |
|---|---|---|
| Temperature fluctuations | Unstable room temperature, incubator placed in drafty area. | Move incubator to a stable environment. Use an insulating foam box if ambient temperature is low. |
| Humidity too low | Insufficient water in the water tray. | Add water to the water tray. Ensure it is always filled. |
| Eggs not turning | Egg turning motor malfunction or obstruction. | Check for any obstructions in the egg turning mechanism. If motor is faulty, contact support. |
| Display not working | Power issue, loose connection. | Check power cable connection. Ensure power outlet is functional. |
7. Specifications
| Feature | Specification |
|---|---|
| Model | 320 Egg Digital Incubator |
| Capacity (Chicken Eggs) | 320 eggs |
| Capacity (Duck Eggs) | 213 eggs |
| Capacity (Goose Eggs) | 160 eggs |
| Capacity (Pigeon Eggs) | 480 eggs |
| Capacity (Quail Eggs) | 800 eggs |
| Weight | 16 kg |
| Dimensions (L x W x H) | 53 x 53 x 70 cm (20.8 x 20.8 x 27.5 inches) |
| Hatching Temperature Range | 20℃ ~ 40℃ (68℉ ~ 104℉) |
| Voltage | 110V |
| Power | 80W-120W |
| Frequency | 50/60Hz |
| Material | PVC and ABS |
8. Warranty and Support
This product is covered by a standard manufacturer's warranty against defects in materials and workmanship. Please retain your proof of purchase for warranty claims.
For technical support, troubleshooting assistance, or warranty inquiries, please contact your retailer or the manufacturer directly. Contact information can typically be found on the product packaging or the retailer's website.


