1. Product Overview
This manual provides essential instructions for the safe and efficient operation, maintenance, and troubleshooting of your Generic Fully Automatic Synchronous Industrial Sewing Machine. Designed for industrial applications, this machine is ideal for sewing medium to thick fabrics, including luggage and leather materials.

Figure 1: Fully assembled Generic Fully Automatic Synchronous Industrial Sewing Machine.
2. Setup and Assembly
Carefully unpack all components and ensure all parts are present before beginning assembly. The machine consists of the main machine head, a table stand, and a pedal with a pull rod.
- Assemble the Table Stand: Follow the instructions provided with the table stand to securely assemble its components. Ensure all bolts are tightened.
- Mount the Machine Head: Carefully place the sewing machine head onto the designated area of the assembled table stand. Secure it using the provided fasteners.
- Connect the Pedal and Pull Rod: Attach the pedal and pull rod mechanism to the table stand and the machine head as illustrated. Ensure smooth operation of the pedal.
- Power Connection: Connect the machine to a 220V power supply. Ensure the power switch is in the 'OFF' position before plugging in.
- Initial Oil Fill: Locate the oil reservoir and fill it with the recommended sewing machine oil. This machine features an automatic oil supply system, but initial filling is crucial. Refer to the 'Maintenance' section for oil level checks.

Figure 2: Key components and features of the sewing machine.
3. Operating Instructions
Familiarize yourself with the control panel and machine functions before beginning any sewing tasks.
3.1 Control Panel and Functions
The operation panel is equipped with various function buttons to control, lock, and adjust sewing parameters. The machine also features a voice broadcast function to clearly convey each step and button action.
- Power On/Off: Use the designated On/Off key to power the machine.
- Stitch Length Adjustment: Adjust the stitch length using the controls on the operation panel.
- Needle Position: Utilize the 1/2 needle and 1 needle functions for precise needle positioning.
- Reverse Stitch: The backstitch trinity function allows for easy reverse stitching to secure seams.
- Automatic Thread Trimmer: This feature automatically trims threads at the end of a seam.
- Automatic Needle Stop: The needle automatically stops in the desired position (up or down) when sewing is paused or finished.
- Automatic Thread Clamp: Ensures consistent thread tension and prevents tangling.
3.2 Sewing Process
- Thread the Machine: Follow the threading path indicated on the machine, ensuring the thread passes through all tension discs and guides correctly.
- Wind the Bobbin: Use the automatic winder to prepare bobbins with thread. Place the bobbin on the winder spindle, guide the thread, and engage the winder.
- Insert Bobbin: Place the wound bobbin into the bobbin case according to the machine's instructions.
- Adjust Presser Foot Height: The presser foot height can be adjusted between 5mm and 13mm to accommodate different fabric thicknesses.
- Select Stitch Settings: Use the operation panel to select desired stitch type, length, and other parameters.
- Begin Sewing: Place your fabric under the presser foot, lower the presser foot, and gently press the foot pedal to start sewing.

Figure 3: Detailed views of the operation panel, presser foot, and handwheel.
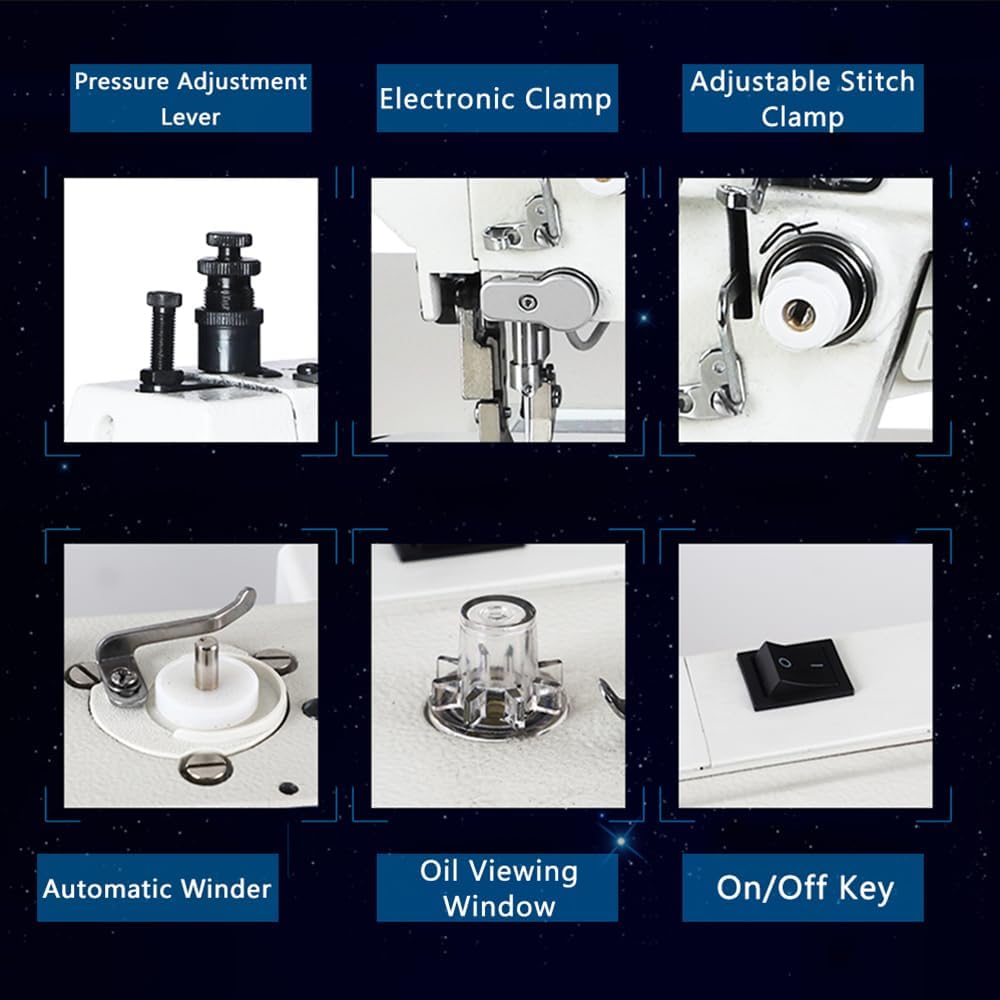
Figure 4: Key adjustment and control components.
4. Maintenance
Regular maintenance ensures the longevity and optimal performance of your sewing machine.
- Oil Level Check: Periodically check the oil level through the oil viewing window. The machine has an automatic oil supply system, but ensuring adequate oil is present is vital. Refill as necessary with recommended sewing machine oil.
- Cleaning: Regularly clean dust and lint from the bobbin area, feed dogs, and needle plate. The coated surface of the machine head is designed for easy cleaning. Use a soft brush or cloth.
- Needle Replacement: Replace needles frequently, especially when sewing thick or dense materials, to prevent skipped stitches and thread breakage.
- Thread Path Inspection: Ensure the thread path is clear of any obstructions or frayed threads that could affect tension.
5. Troubleshooting
This section addresses common issues you might encounter. For problems not listed here, please contact customer support.
| Problem | Possible Cause | Solution |
|---|---|---|
| Machine does not power on | Power cord not connected; Power switch off; No power from outlet | Check power cord connection; Ensure power switch is on; Test outlet with another device |
| Skipped stitches | Incorrect needle size/type; Bent or dull needle; Incorrect threading; Low thread tension | Use correct needle for fabric; Replace needle; Re-thread machine; Adjust thread tension |
| Thread breakage | High thread tension; Poor quality thread; Burrs on needle plate/hook; Incorrect threading | Reduce thread tension; Use good quality thread; Inspect and clean machine; Re-thread machine |
| Uneven stitches | Incorrect tension settings; Improper fabric feeding; Dull needle | Adjust upper and bobbin tension; Ensure fabric is fed smoothly; Replace needle |
6. Specifications
- Needle Length: 7mm
- Speed: 2200 stitches/min
- Presser Foot Height: 5mm - 13mm
- Voltage: 220V
- Power: 750W
- Oil Supply: Automatic oil supply
- Suitable Fabrics: Medium-thick to thick materials (e.g., luggage, leather, cushions, mattresses, bags, sofas, leather clothes, woolen coats)
7. Warranty and Support
Warranty information for this product was not provided in the available documentation. For details regarding warranty coverage, terms, and conditions, please refer to the purchase documentation or contact the seller directly.
For technical support, spare parts, or any other inquiries, please contact the manufacturer or your authorized dealer. Keep your purchase receipt and product model information handy when seeking support.


