Aoxun 10 x 12 Gray
Aoxun Hardtop Gazebo 10x12 User Manual
Model: 10 x 12 Gray | Brand: Aoxun
Introduction
This manual provides comprehensive instructions for the assembly, operation, maintenance, and troubleshooting of your Aoxun Hardtop Gazebo. Designed with a durable aluminum frame and a double galvanized steel roof, this 10x12 foot gazebo offers a robust and elegant outdoor living space, complete with breathable netting and privacy curtains. Please read this manual thoroughly before beginning assembly or use to ensure safe and proper installation and long-term enjoyment of your product.

Figure 1: Aoxun 10x12 Hardtop Gazebo in a backyard setting.
Safety Information
- Always follow all assembly instructions carefully.
- Ensure all bolts and fasteners are securely tightened before use.
- Do not hang heavy objects from the gazebo frame or roof.
- In extreme weather conditions (heavy snow, strong winds), it is recommended to clear snow from the roof and secure or remove curtains/netting to prevent damage.
- This gazebo is designed for outdoor use only.
- Keep children and pets away from the assembly area during installation.
Parts List
Before beginning assembly, verify that all parts are present and undamaged. Refer to the included hardware pack and component diagrams for identification. If any parts are missing or damaged, contact customer support immediately.
| Component | Description | Quantity |
|---|---|---|
| Aluminum Frame Posts | Main vertical support columns. | 4 |
| Roof Panels | Galvanized steel panels forming the double roof. | Varies by model |
| Roof Frame Beams | Horizontal supports for the roof structure. | Varies by model |
| Netting Panels | Breathable mesh panels with zippers. | 4 |
| Privacy Curtains | Opaque fabric curtains with tie-backs. | 4 |
| Hardware Kit | Includes bolts, screws, washers, and tools. | 1 set |
| Expansion Bolts | For securing the gazebo to the ground. | 4 |
Setup and Assembly
Assembly typically requires 3-4 people and takes approximately 2-4 hours. It is highly recommended to sort and organize all parts before beginning. Do not fully tighten all screws until the entire structure is assembled, as this allows for necessary adjustments.
- Site Preparation: Choose a level area for installation. Ensure adequate clearance around the gazebo for assembly and future use.
- Unpacking and Sorting: Carefully unpack all boxes. Identify and sort all components according to the parts list.
- Frame Assembly: Assemble the main aluminum frame posts and connecting beams. Ensure all connections are loosely fitted initially.
- Roof Structure Assembly: Attach the roof frame beams to the main frame.
- Roof Panel Installation: Install the galvanized steel roof panels. Pay close attention to the orientation of the panels to ensure proper water drainage. Some panels may require careful alignment and gentle force to fit into place.

Figure 2: Detail of the galvanized steel double roof, highlighting its features.

Figure 3: Comparison of galvanized steel roof with polycarbonate roof.
- Curtain and Netting Installation: Attach the netting and privacy curtains to the dual track system. Ensure they slide smoothly.

Figure 4: Detachable curtains and netting offering panoramic view, mosquito protection, and privacy.

Figure 5: Dual track design for smooth operation of curtains and netting.
- Final Tightening and Anchoring: Once all components are in place and aligned, progressively tighten all bolts. Use the provided expansion bolts to securely anchor the gazebo to the ground for maximum stability and wind resistance.

Figure 6: Extremely sturdy aluminum frame with secure anchoring bracket.
Operating Instructions
Curtains and Netting
The gazebo features a dual track system allowing independent operation of the breathable netting and privacy curtains. Simply slide them along the tracks to open or close. Use the integrated zippers on the netting for seamless closure. The curtains include binding belts to secure them when open.
Roof Drainage System
The double galvanized steel roof is designed with an efficient drainage system to prevent water accumulation and keep the pavilion in excellent condition during rain. Water is channeled away from the main structure.
Video 1: Demonstration of the Hardtop Gazebo's drainage system, showing how water is efficiently managed on the roof.
Decorating Hooks
The gazebo roof structure includes J-hooks and U-hooks, allowing you to hang lightweight decorations such as lights or fans to enhance your outdoor space.

Figure 7: J-hooks and U-hooks for decorating the gazebo top.
Maintenance
- Cleaning: Clean the aluminum frame and steel roof with mild soap and water. Rinse thoroughly and dry to prevent water spots. The fabric curtains and netting can be spot cleaned or hand washed with mild detergent.
- Fastener Check: Periodically inspect all bolts and screws to ensure they remain tight. Re-tighten as necessary.
- Seasonal Care:
- Snow: The roof is designed to hold up to 7-inch thick snow. However, in areas with heavy snowfall, it is recommended to regularly clear accumulated snow to prevent excessive load.
- Wind: The sturdy aluminum frame provides good wind resistance (up to grade 7, 31-38 mph). In high wind conditions, ensure curtains and netting are securely tied back or removed to minimize wind resistance.
- Rain: The efficient drainage system manages rainwater. Ensure gutters and drainage paths are clear of debris.
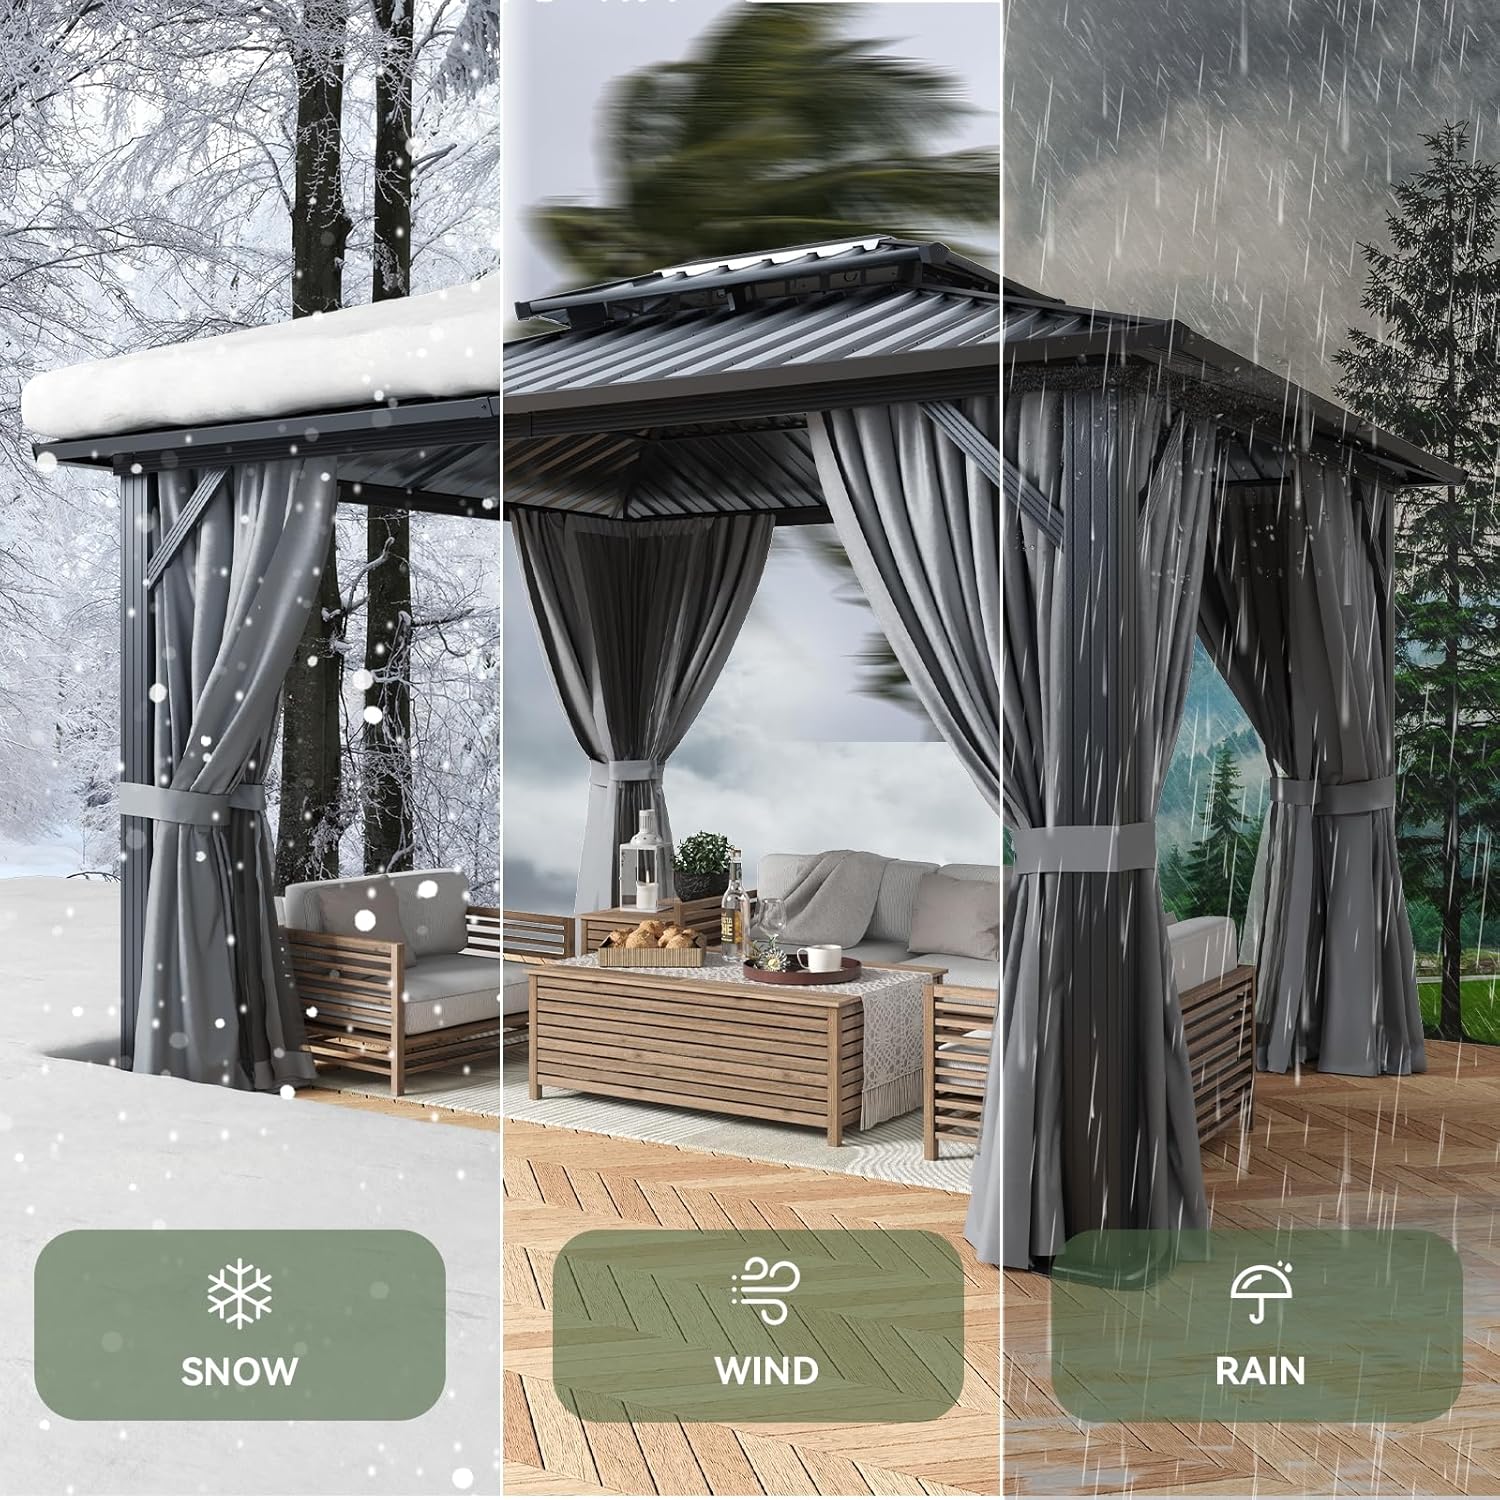
Figure 8: Gazebo performance in snow, wind, and rain.
Troubleshooting
| Problem | Possible Cause | Solution |
|---|---|---|
| Difficulty aligning roof panels during assembly. | Screws tightened too early; panels not oriented correctly. | Ensure all frame connections are loose until roof panels are in place. Verify panel orientation according to instructions. Gentle force may be needed. |
| Water leakage from the roof. | Roof panels installed upside down or not properly sealed. | Re-check roof panel installation and orientation. Ensure all panel seams are correctly overlapped and secured. |
| Curtains/netting not sliding smoothly. | Debris in tracks; tracks misaligned. | Clean tracks of any dirt or obstructions. Check track alignment and adjust if necessary. |
| Gazebo feels unstable or wobbly. | Not properly anchored; loose fasteners. | Ensure all frame bolts are fully tightened. Verify that the gazebo is securely anchored to the ground using the provided expansion bolts. |
Specifications
- Brand: Aoxun
- Model: 10 x 12 Gray
- Material: Aluminum (Frame), Galvanized Steel (Roof)
- Product Dimensions: 144"L x 120"W x 116.5"H (10'L x 12'W x 9.7'H)
- Floor Area: 120 Square Feet
- Item Weight: 60 pounds
- Water Resistance Level: Waterproof
- UV Protection: 50
- Occupancy: 6-8 people
- Maximum Wind Resistant Grade: 7 (31-38 mph)
- Snow Load Capacity: Roof holds up to 7-inch thick snow
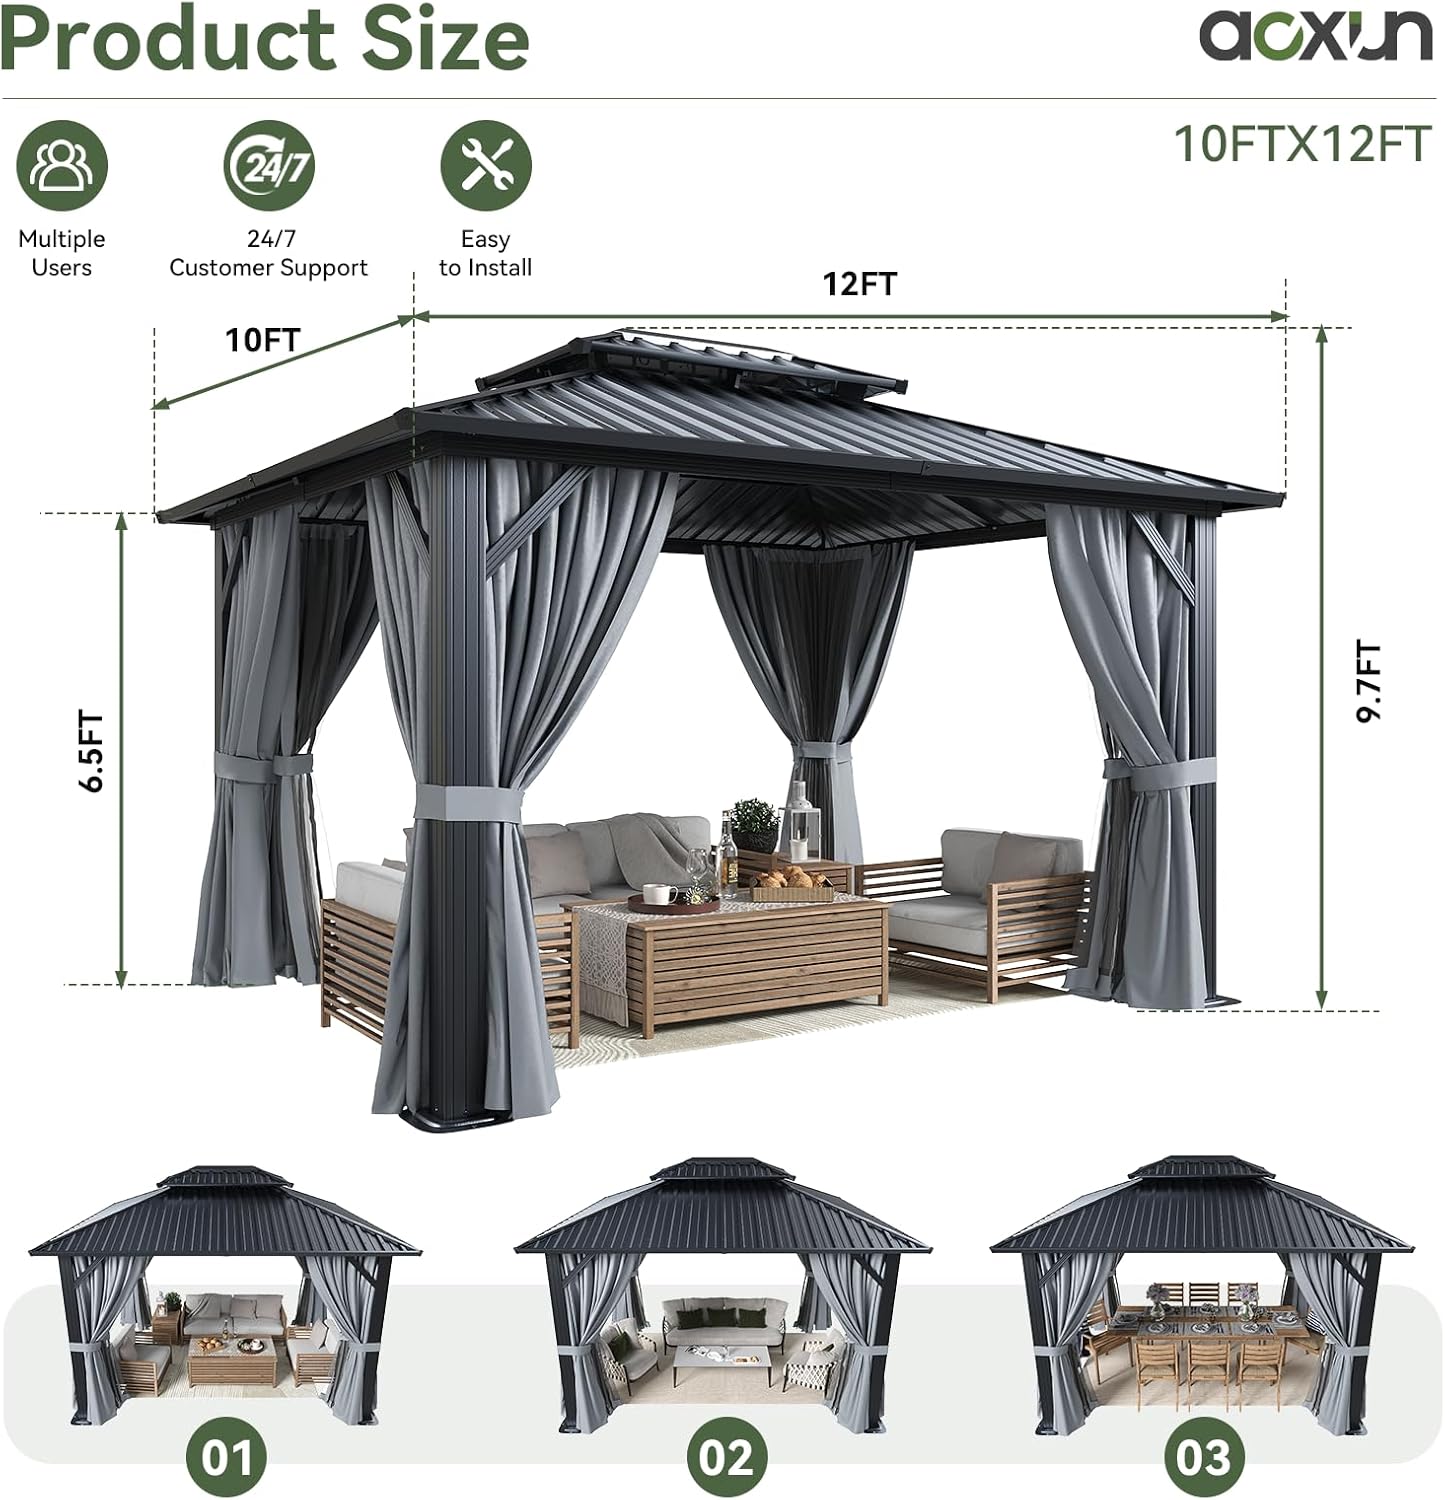
Figure 9: Product dimensions and key features.
Warranty and Support
Aoxun Outdoor Gazebos are backed by a 1-year warranty from the date of purchase. This warranty covers manufacturing defects and ensures your peace of mind.
For any questions, concerns, or assistance with assembly, parts, or warranty claims, please do not hesitate to contact Aoxun customer service. We are dedicated to providing excellent customer service and ensuring your satisfaction.
Contact Information: Please refer to the contact details provided on the product packaging or the official Aoxun website for the most up-to-date customer support information.
Note: Keep your purchase receipt as proof of purchase for warranty claims.
Ask a question about this manual
Ask about setup, troubleshooting, compatibility, parts, safety, or missing instructions. Manuals+ will review the question and use this page’s manual context to help answer it.