Introduction
Thank you for purchasing the P1Harmony Official Light Stick ver.2. This manual provides detailed instructions for the proper setup, operation, and care of your light stick. Please read this manual thoroughly before use to ensure optimal performance and longevity of your product.
Product Components
The P1Harmony Official Light Stick ver.2 package includes the following items:
- Out Box
- Light Stick
- Strap
- Photocard Set
- Manual

Figure 1: All included components of the P1Harmony Official Light Stick ver.2 package.
Setup: Battery Installation
The light stick requires 3 AAA batteries (not included). Please follow these steps to install the batteries correctly:
- Turn and remove the battery cover located at the bottom of the light stick.
- An internal battery socket will slide out.
- Carefully check the direction of the battery socket and the polarity (+/-) of the 3 AAA batteries.
- Insert the batteries according to the indicated polarity.
- Slide the battery socket back into the light stick and secure the battery cover by turning it until it clicks into place.
Caution: Ensure batteries are inserted with correct polarity. Incorrect installation may damage the device. Do not mix old and new batteries or different types of batteries.
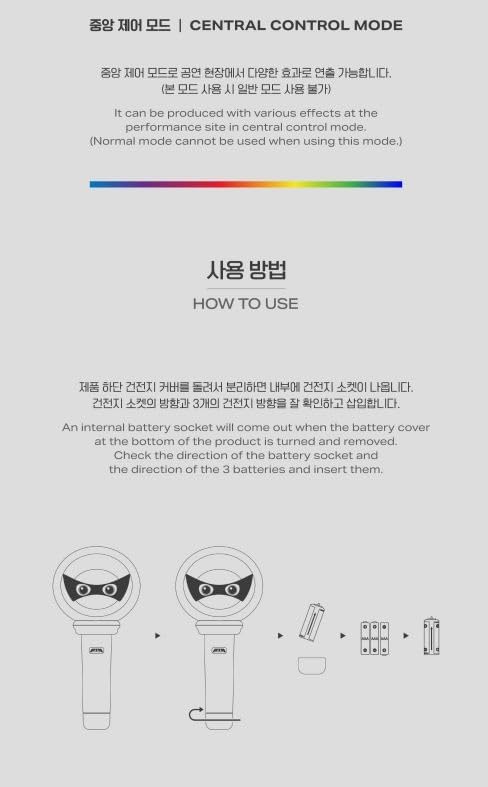
Figure 2: Steps for battery installation.
Operating Instructions
Normal Mode
To operate the light stick in Normal Mode, press the power button. Each press will cycle through the following LED modes:
- WHITE ON: The light stick illuminates with a steady white light.
- P1ece Mode: The light stick displays a special P1ece lighting effect.
- OFF: The light stick turns off.

Figure 3: Normal Mode light effects.
Central Control Mode
The P1Harmony Official Light Stick ver.2 supports Central Control Mode. This mode allows the light stick to be controlled remotely at performance venues to create various synchronized lighting effects. When in Central Control Mode, Normal Mode functions are temporarily disabled.
For specific instructions on activating and using Central Control Mode at events, please refer to event-specific guidelines provided by the organizers.
Customization
The P1Harmony Official Light Stick ver.2 is designed to be customizable with dedicated accessories. These accessories are sold separately and allow you to personalize your light stick.
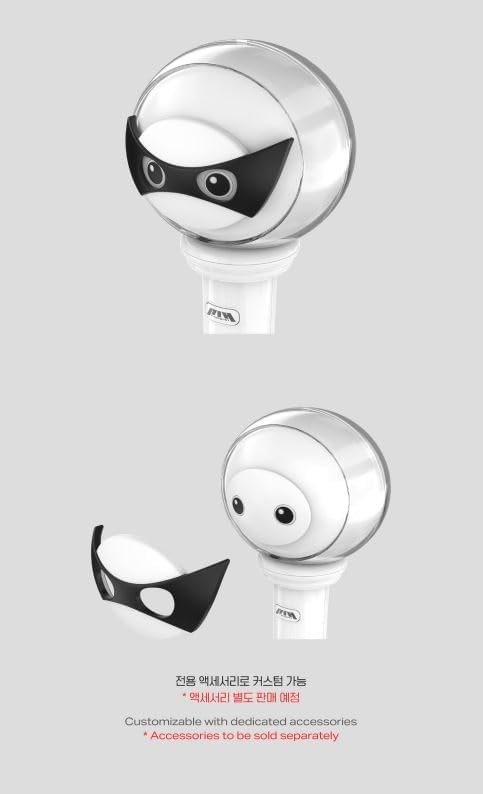
Figure 4: Customization with dedicated accessories (sold separately).
Specifications
| Feature | Detail |
|---|---|
| Brand | Generic |
| Model Name | P1Harmony |
| Item Model Number | P1Harmony_LIGHTSTICK |
| Material | Acrylic, Plexiglass |
| Light Source Type | Light Emitting Diode (LED) |
| Power Source | 3 x AAA Batteries (not included) |
| Product Dimensions | 4.1"L x 8.8"W x 4.5"H |
| Item Weight | 11.2 ounces |
| Manufacturer | FNC ENTERTAINMENT |
Maintenance
- Clean the light stick with a soft, dry cloth. Do not use abrasive cleaners or solvents.
- Avoid exposing the light stick to extreme temperatures, direct sunlight, or high humidity.
- Remove batteries if the light stick will not be used for an extended period to prevent leakage.
- Store the light stick in its original packaging or a protective case when not in use.
Troubleshooting
- Light stick does not turn on:
- Ensure batteries are installed correctly with the proper polarity.
- Replace with new AAA batteries.
- Check if the battery compartment is securely closed.
- Light is dim or flickers:
- Batteries may be low. Replace with new AAA batteries.
- Light stick does not respond in Central Control Mode:
- Ensure you are within the designated range of the central control system at the event.
- Verify that the light stick is not in Normal Mode.
If you experience persistent issues not covered here, please contact customer support.
Warranty and Support
This product comes with a standard manufacturer's warranty. Please retain your proof of purchase for warranty claims. For technical support, inquiries, or warranty service, please refer to the contact information provided by your retailer or the official P1Harmony merchandise distributor.
The outer case is designed to protect the inclusions inside. Damages to the outer box are not considered a reason for return or exchange. For accurate verification of product defects and omissions, please record an unboxing video immediately upon delivery.