1. Introduction
The Mbeysaq VT-831 is a lightweight and portable aluminum alloy tripod designed for photography, outdoor use, live streaming, and mirrorless cameras. It features a 4-section leg design, a 1/4 inch universal interface for broad compatibility, and a maximum load bearing capacity of approximately 3kg. This manual provides instructions for proper setup, operation, and maintenance to ensure optimal performance and longevity of your tripod.
2. Package Contents
- 1 x VT-831 Tripod
- 1 x Carrying Bag
- 1 x Instruction Manual
3. Product Features
- Anodic Oxidation Process: Ensures a smooth, wear-resistant, and anti-scratch surface.
- 1/4 Inch Universal Interface: Provides high compatibility for various cameras and devices, allowing for convenient installation.
- 4-Section Leg Pipe: Features a pull clasp design for easy and quick opening and closing of leg sections.
- Non-Slip Rubber Foot Pads: Located at the bottom of each leg for enhanced stability and scratch protection on diverse terrains.
- 90° Flip Horizontal and Vertical Double-Shoot Design: Allows for versatile shooting angles and orientations.
4. Setup Instructions
4.1 Unpacking and Initial Inspection
Carefully remove the tripod and all accessories from the carrying bag. Inspect all components for any signs of damage during transit. If any parts are missing or damaged, please contact customer support.
4.2 Extending the Tripod Legs
- Place the tripod on a flat, stable surface.
- Release the leg section pull clasps on each leg.
- Extend each leg section to the desired height. The tripod features 4 sections for adjustable height.
- Securely close the pull clasps on each leg section to lock them in place. Ensure all clasps are fully engaged before mounting equipment.
- Adjust the leg spread for optimal stability. The leg brace provides additional support.

Figure 1: The VT-831 Tripod fully extended, showing its four-section legs and stable base.
4.3 Attaching Your Camera or Device
- Locate the quick release plate on the tripod head.
- If not already detached, release the quick release plate from the tripod head by operating its locking mechanism.
- Attach your camera or device to the quick release plate using the 1/4 inch screw. Ensure it is securely tightened.
- Slide the quick release plate with your camera/device back into the tripod head.
- Engage the quick release plate locking mechanism to firmly secure your equipment. Verify that the camera is stable and cannot easily detach.

Figure 2: A camera mounted on the tripod, illustrating the 1/4 inch universal interface for secure attachment.
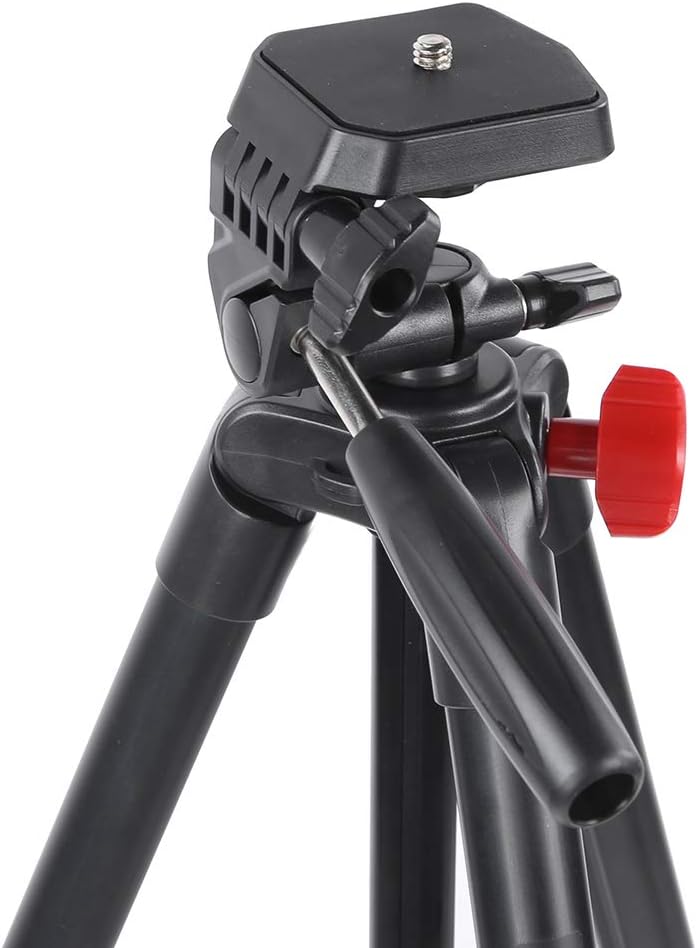
Figure 3: Detailed view of the tripod head, highlighting the quick release plate mechanism.
5. Operating Instructions
5.1 Adjusting Tripod Height and Angle
- Leg Section Adjustment: To change the height of the tripod, release the pull clasps on each leg section, extend or retract the legs to the desired length, and then firmly close the clasps to lock them.
- Center Axis Adjustment: The tripod features a middle tube (center axis) that can be raised for additional height. Loosen the center axis lock, extend the axis, and then tighten the lock to secure it.
- Head Tilt Control: Use the handle-type tilt control to adjust the vertical angle of your camera. Loosen the control, set the desired tilt, and then tighten to lock.
- Pan Adjustment: The 360° lock knob allows for horizontal panning. Loosen this knob to rotate the camera horizontally, then tighten to secure the position.
- 90° Vertical/Horizontal Double-Shoot: For switching between horizontal and vertical shooting orientations, utilize the 90° vertical and horizontal double shot lock knob. Loosen it, adjust the camera's orientation, and then tighten to lock.

Figure 4: Detailed view of the tripod head controls, including the 1/4 inch screw, 90° vertical/horizontal lock knob, handle-type tilt control, and 360° lock knob.

Figure 5: A composite image illustrating key components such as the tripod head, quick release plate, adjustment handle, leg locks, and non-slip foot pads.
6. Maintenance
6.1 Cleaning
- Wipe the tripod with a soft, dry cloth after each use to remove dust and dirt.
- For stubborn dirt, use a slightly damp cloth with mild soap, then wipe dry immediately.
- Avoid using harsh chemicals or abrasive cleaners, as these can damage the anodic oxidation finish.
- Keep the leg clasps and head mechanisms free from sand or debris to ensure smooth operation.
6.2 Storage
- Store the tripod in its carrying bag when not in use to protect it from dust and scratches.
- Keep the tripod in a cool, dry place, away from direct sunlight and extreme temperatures.
- Ensure all leg sections are fully retracted and clasps are closed before storing.

Figure 6: The tripod in its folded configuration, demonstrating its compact size for storage and transport.
7. Troubleshooting
- Tripod Instability: Ensure all leg sections are fully extended and their clasps are securely locked. Verify that the quick release plate is firmly attached to both the camera and the tripod head. Adjust leg spread for a wider, more stable base.
- Difficulty Adjusting Legs/Head: Check for any debris or obstructions in the leg clasps or head mechanisms. Ensure all locking knobs are sufficiently loosened before attempting adjustments. Do not force any parts.
- Camera Not Attaching Securely: Confirm that the 1/4 inch screw on the quick release plate is properly aligned and tightened into your camera's tripod mount. Ensure the quick release plate is fully seated and locked into the tripod head.
8. Specifications
| Item Type | 4 Sections Tripod |
| Model | VT-831 |
| Material | Aluminum Alloy |
| Weight | Approx. 652g (1.44 pounds) |
| Sections | 4 sections |
| Quick Release Plate | Yes |
| Extension Height | Approx. 1342mm (52.8in) |
| Height (Axis Not Raised) | Approx. 1105mm (43.5in) |
| Open Height (Minimum) | Approx. 395mm (15.6in) |
| Folded Height | Approx. 410mm (16.1in) |
| Middle Tube Length | Approx. 270mm (10.6in) |
| Load Bearing | About 3kg |
| Package Dimensions | 16.54 x 3.54 x 3.54 inches |
9. Warranty and Support
For warranty information, technical support, or any inquiries regarding your Mbeysaq VT-831 tripod, please refer to the contact information provided with your purchase or visit the official Mbeysaq brand store online. Keep your proof of purchase for warranty claims.
Mbeysaq Store: Visit Mbeysaq Store on Amazon