Introduction
This manual provides detailed instructions for the installation, operation, and maintenance of your Zunfly W3 Pro 4-Channel Dash Cam. Please read this manual thoroughly before using the device to ensure proper functionality and safety.
Safety Information
- Ensure the dash cam is securely mounted and does not obstruct the driver's view or interfere with vehicle controls.
- Do not operate the device or access settings while driving. Adjustments should only be made when the vehicle is safely parked.
- Use only the provided power cable and accessories to prevent damage or fire.
- Avoid exposing the device to extreme temperatures, direct sunlight for prolonged periods, or moisture.
- Keep the lens clean for optimal recording quality.
- Regularly back up important footage and format the SD card to maintain performance.
Package Contents
Verify that all items are present in your package:
- 1 x Zunfly W3 Pro 4-Channel Dash Cam
- 1 x 64GB SD Card
- 1 x Suction Cup Bracket
- 1 x 3M Adhesive Bracket
- 1 x 3M Adhesive
- 2 x Electrostatic Sticker
- 1 x TYPE-C Car Charger
- 1 x TYPE-C Data Cable
- 1 x Crowbar (for cable routing)
- 1 x User Manual
- Cable Clips
- 1 x Rear Camera

This image displays the main dash cam unit, the rear camera, the 64GB SD card, suction cup mount, car charger, data cable, and other installation tools and accessories included in the package.
Product Overview
The Zunfly W3 Pro is a 4-channel dash cam system designed to record video from multiple perspectives around your vehicle. It features a 2K front camera and three 1080P cameras for interior and rear monitoring.
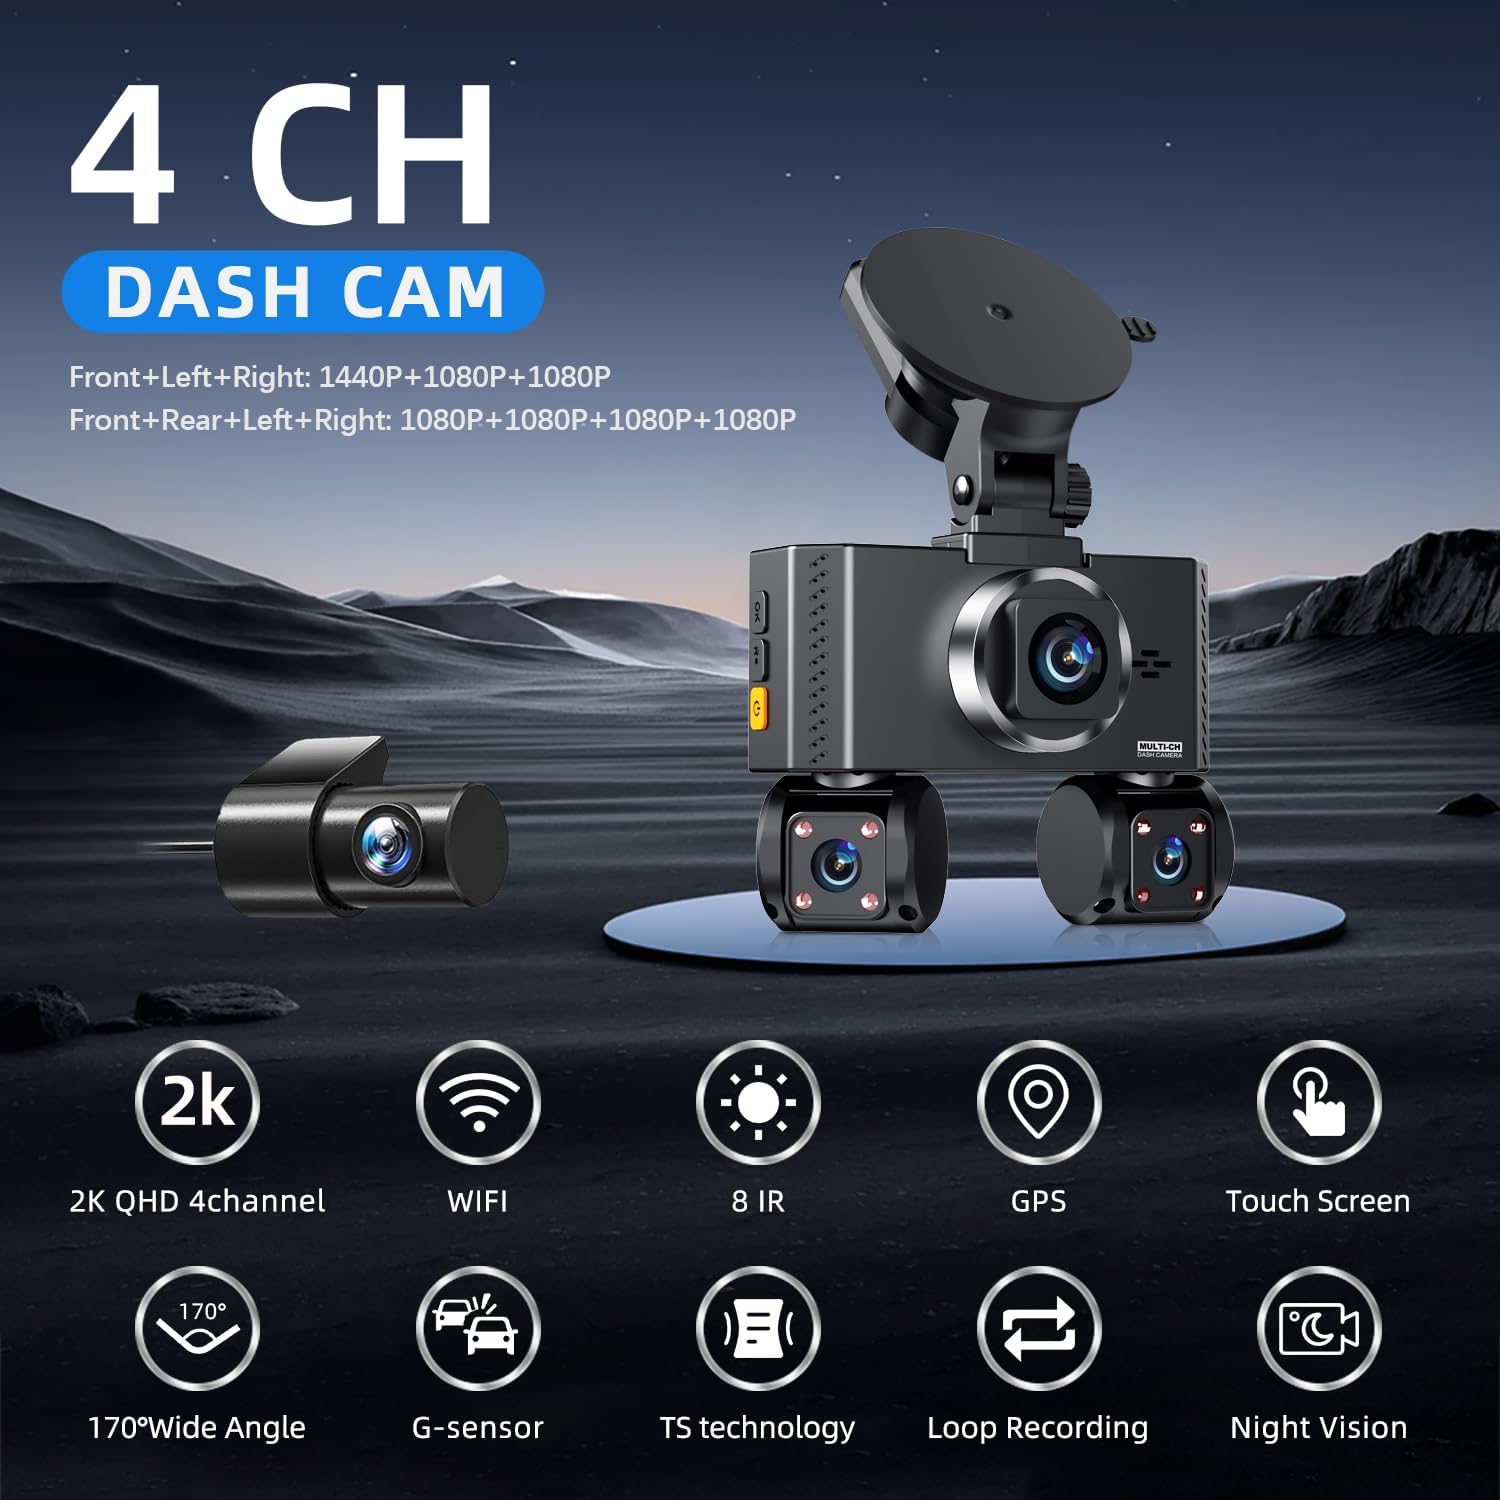
This image highlights key features of the dash cam, including 2K QHD 4-channel recording, WiFi connectivity, 8 IR night vision, built-in GPS, touch screen control, 170° wide angle, G-sensor, TS technology, loop recording, and night vision capabilities.
Key Components:
- Main Unit: Houses the front camera, touch screen display, and controls.
- Interior Cameras: Two adjustable 1080P cameras integrated into the main unit for cabin monitoring.
- Rear Camera: A separate 1080P camera for mounting at the rear of the vehicle.
- GPS Module: Integrated for location and speed data recording.
- Micro SD Card Slot: For storage of recorded footage.
Setup
1. Mounting the Dash Cam
- Clean the windshield area where the dash cam will be mounted.
- Attach the suction cup bracket to the main unit.
- Press the suction cup firmly against the windshield and secure it by rotating the locking mechanism. Ensure the dash cam does not obstruct your view.
- Adjust the angle of the main unit and the two interior cameras to cover desired areas.
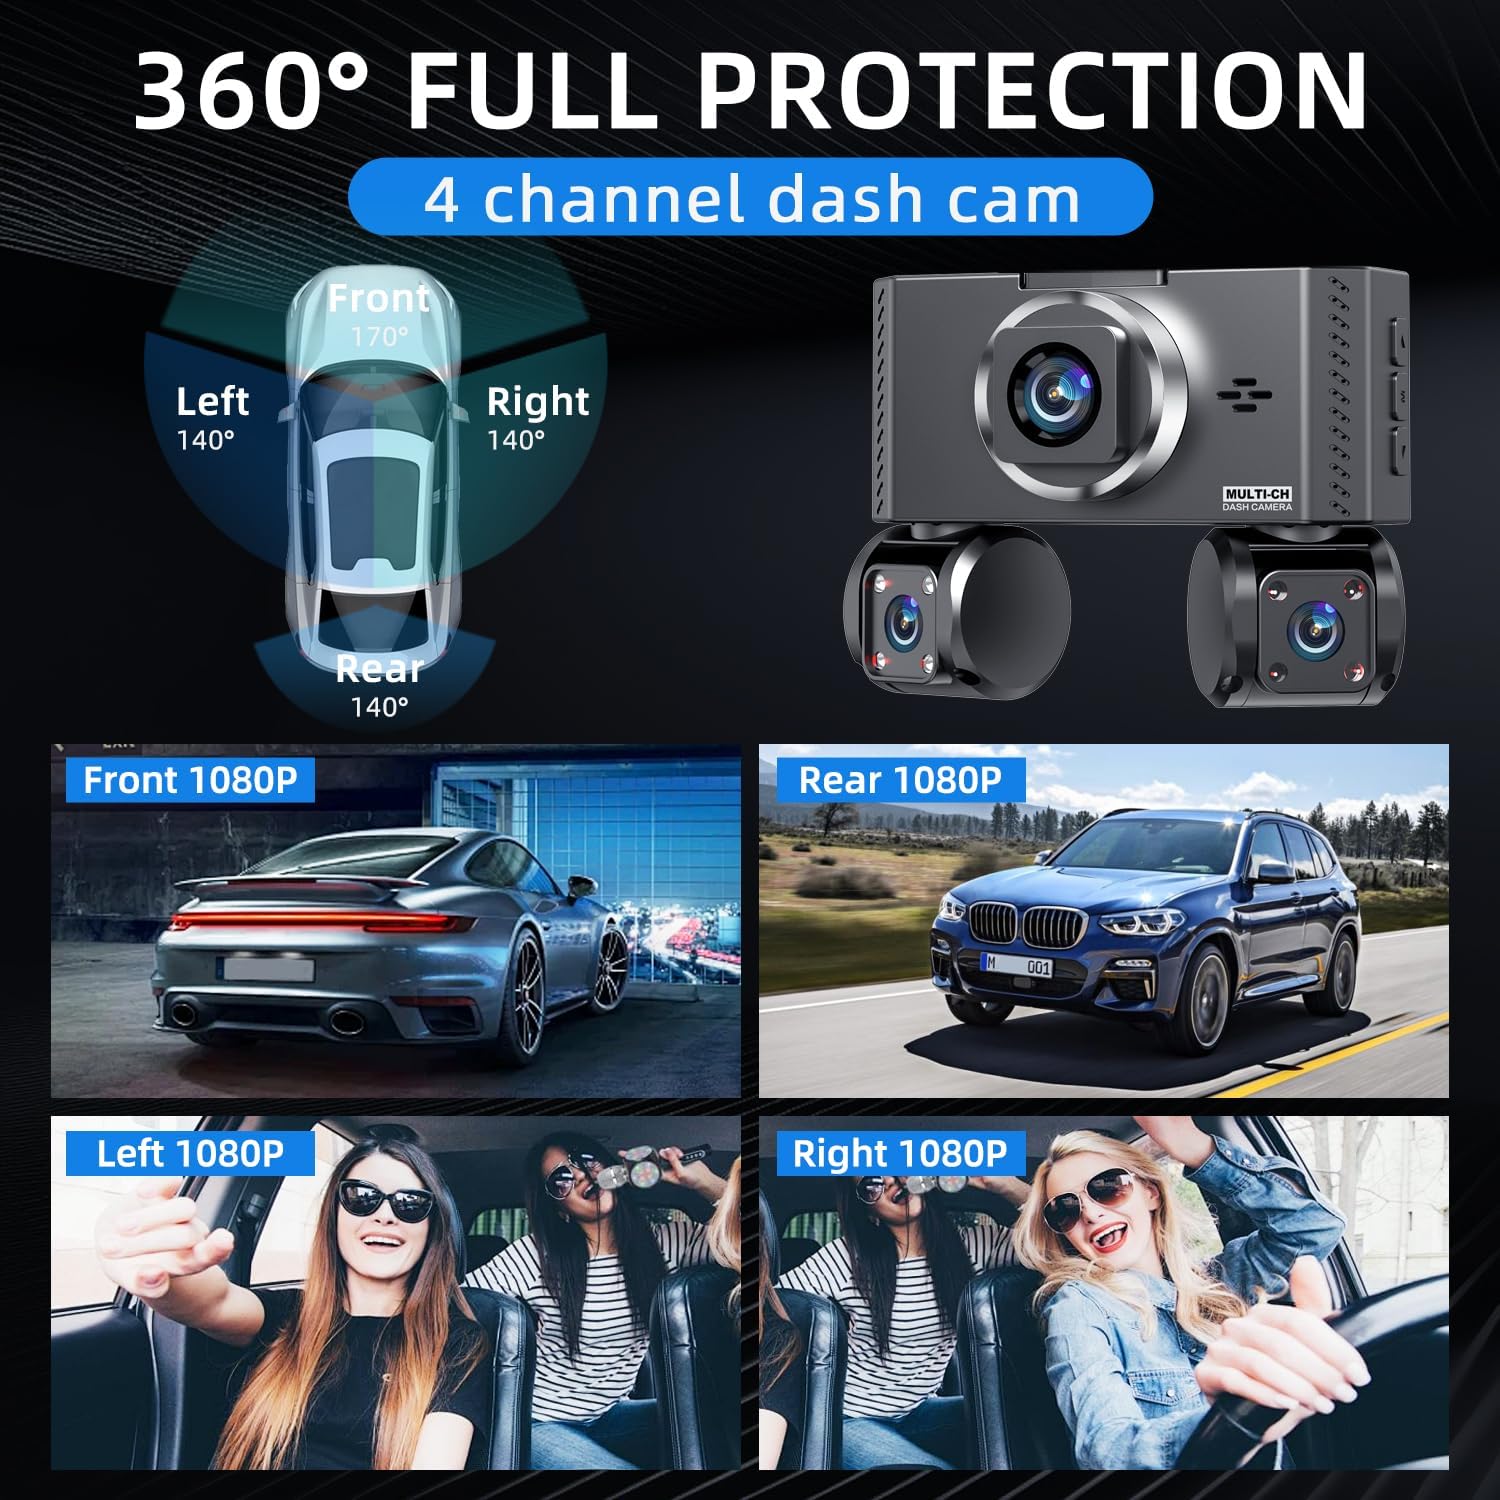
This diagram shows the wide-angle coverage of the Zunfly W3 Pro, with the front camera providing 170° view, and the left, right, and rear cameras each providing 140° views, ensuring comprehensive surveillance around the vehicle.
2. Connecting Power
- Connect the TYPE-C car charger to the dash cam's power input.
- Plug the car charger into your vehicle's 12V power outlet (cigarette lighter socket).
- Route the power cable neatly along the windshield edge and dashboard using the provided cable clips and crowbar to avoid obstruction.
3. Installing the Rear Camera
- Identify a suitable location for the rear camera, typically on the rear windshield, ensuring a clear view.
- Clean the mounting surface. Use the 3M adhesive bracket to secure the rear camera.
- Connect the rear camera cable to the main dash cam unit.
- Route the rear camera cable discreetly along the vehicle's headliner and pillars to the main unit.
4. Inserting the SD Card
- Ensure the dash cam is powered off.
- Insert the provided 64GB Micro SD card into the designated slot on the main unit until it clicks into place.
- It is recommended to format the SD card through the dash cam's settings menu before initial use.

This image highlights the inclusion of a 64GB Micro SD card, emphasizing its faster speed (up to 100MB/sec), longer service life (5500 write and erase cycles), and reliable non-volatile storage technology.
Operating Instructions
1. Powering On/Off
- The dash cam will automatically power on and begin recording when the vehicle's ignition is turned on.
- It will automatically power off when the ignition is turned off.
2. Touch Screen Interface
The 3.16-inch IPS touch screen allows for intuitive control and navigation through settings and playback.

This image displays the touch screen functionality, allowing users to access settings such as parking monitoring, lapse recording, time zone, IR LED, product information, file browsing, movie mode, movie clip time, LCD power save, clock settings, date format, microphone, and flicker settings.
3. Recording Modes
- Loop Recording: The dash cam continuously records video in segments. When the SD card is full, the oldest unlocked footage is automatically overwritten.
- Emergency Recording (G-Sensor): The built-in G-sensor detects sudden impacts or collisions. In such events, the current video segment is automatically locked and saved to prevent it from being overwritten, providing critical evidence.
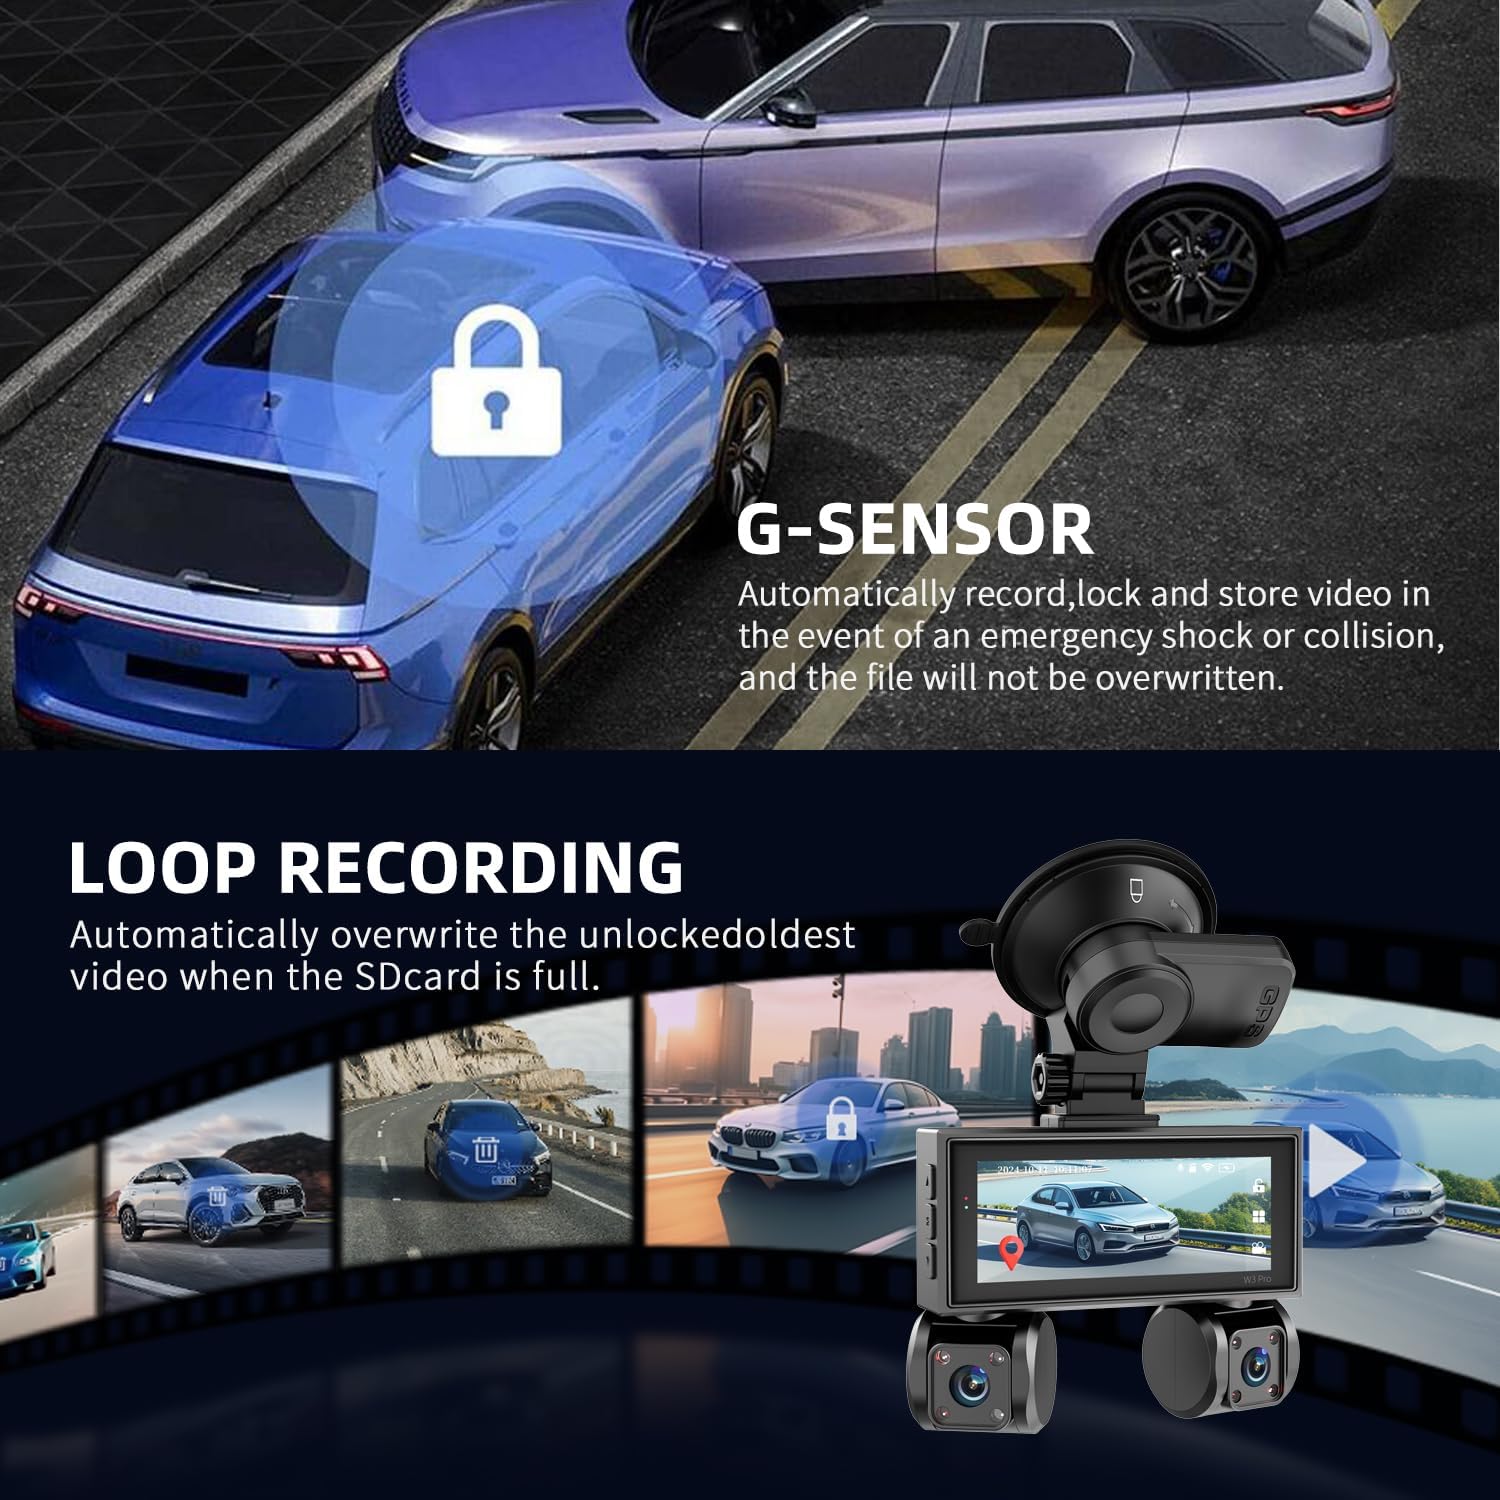
This image visually explains the G-Sensor's function in automatically locking video during impacts and the loop recording feature that optimizes storage by overwriting older, unlocked files when the SD card is full.
4. Parking Monitoring
When the vehicle is parked, the dash cam can switch to an energy-efficient surveillance mode. Motion detection triggers recording of suspicious activity around your vehicle. This feature requires a separately purchased hardwire kit for continuous power.

This image depicts the dash cam's ability to guard your car even when parked, showing scenarios of potential theft or collision, and noting that a hardwire kit is needed for this function.
5. GPS Functionality
The built-in GPS module records your vehicle's location and speed, embedding this data directly into the footage. This information can be crucial for insurance claims or legal disputes.
6. Wi-Fi and App Control
The dash cam features 5GHz Wi-Fi for faster video transfers to your smartphone via a dedicated app. The app allows you to remotely adjust settings, view live footage, download, and share recorded clips.
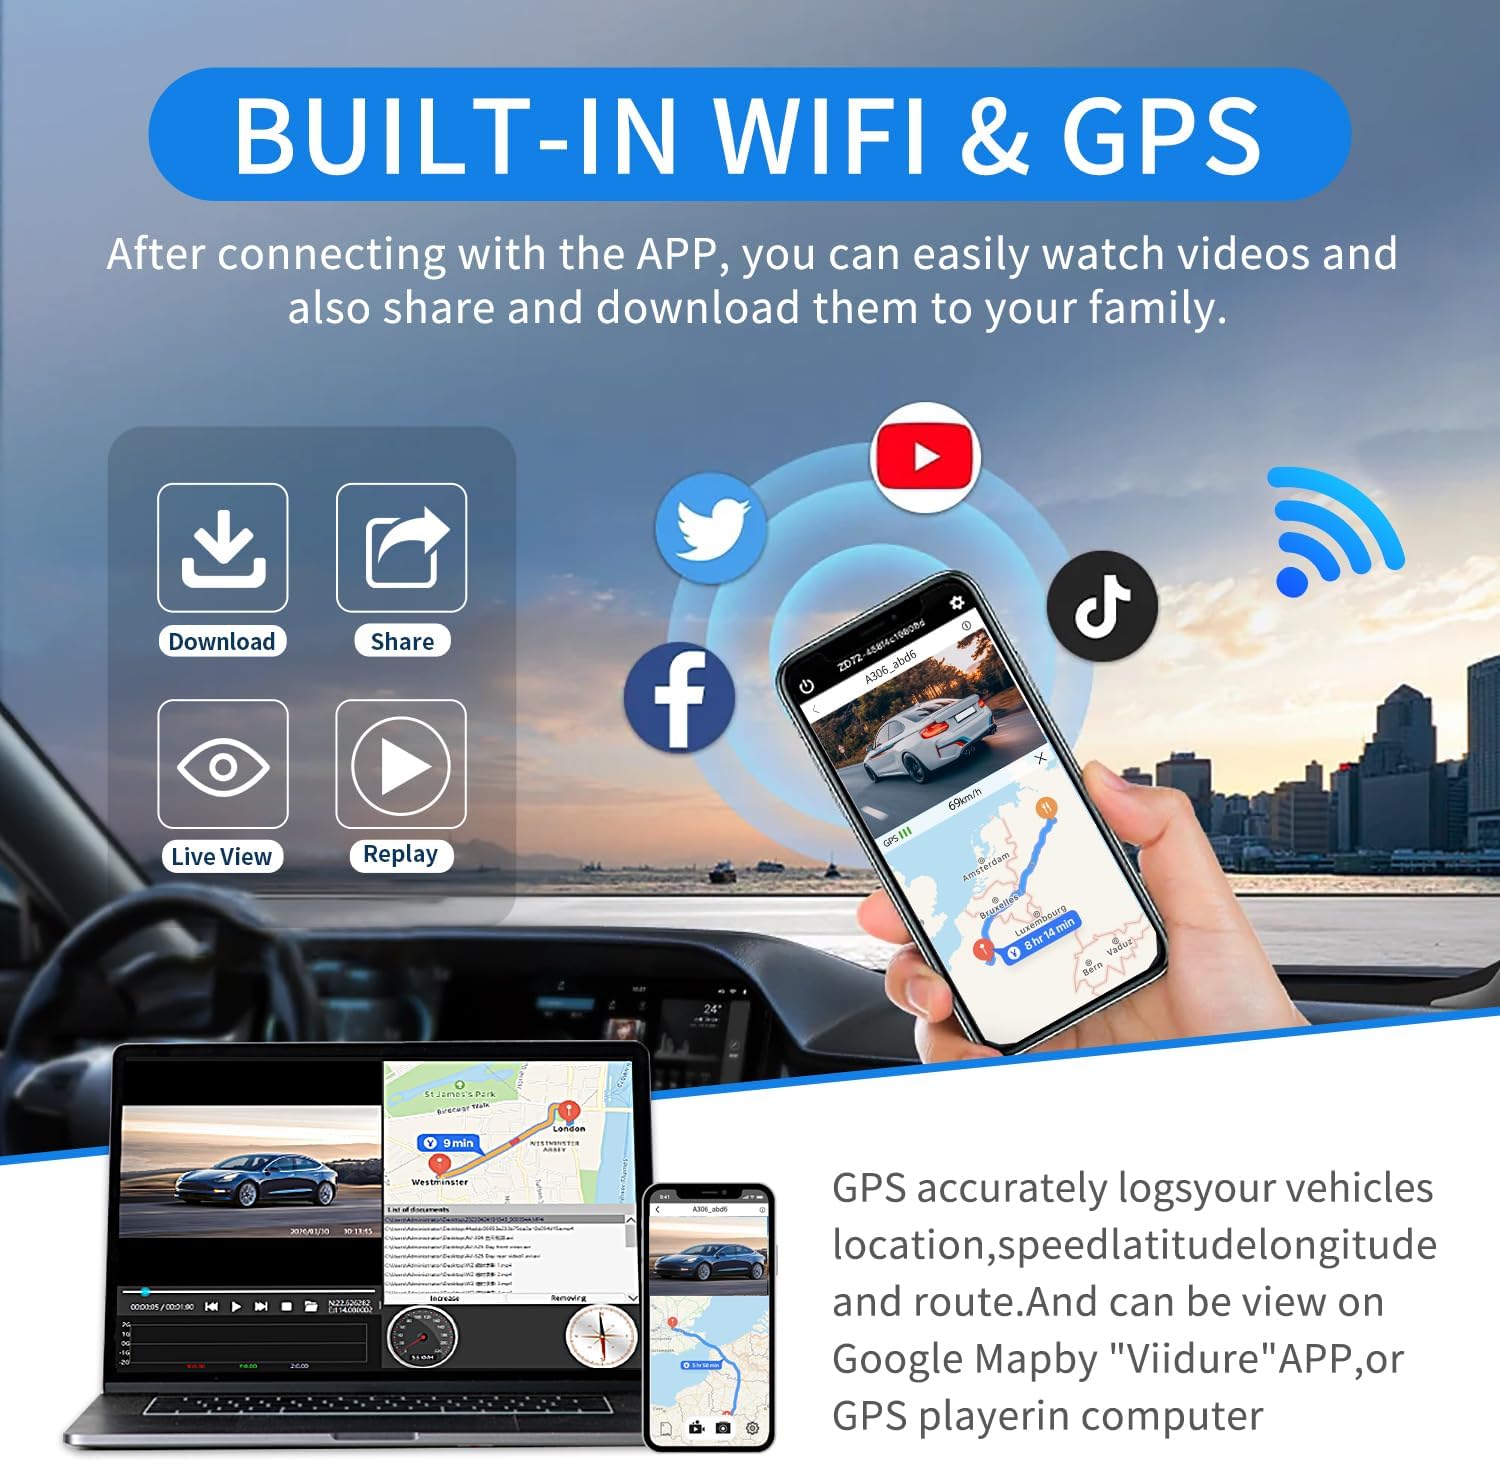
This image illustrates how the dash cam's built-in WiFi allows for easy video download, sharing, live viewing, and replay via a smartphone app. It also shows GPS tracking of location, speed, latitude, longitude, and route, viewable on Google Maps via the "Viidure" app or a GPS player on a computer.
7. Night Vision
Equipped with an F/1.8 aperture, 6-layer lens array, and 8 IR lights, the dash cam enhances night vision capabilities, capturing clear footage in low-light conditions. WDR (Wide Dynamic Range) technology further improves clarity by balancing exposure in varying light environments.

This image demonstrates the dash cam's Super Night Vision with F2.0 aperture, 6-layer lens, 8 IR lights, and 170° wide angle. It also shows a comparison of video clarity in bright, dark, and WDR-enabled conditions, emphasizing the improved detail capture.
Maintenance
1. Formatting the SD Card
- Regularly format the Micro SD card (e.g., once a month) to prevent data corruption and ensure optimal recording performance.
- To format, navigate to the "Settings" menu on the dash cam's touch screen and select the "Format SD Card" option.
2. Cleaning the Device
- Use a soft, dry cloth to clean the dash cam's exterior and screen.
- For lenses, use a specialized lens cleaning cloth to avoid scratches.
- Do not use chemical cleaners or abrasive materials.
Troubleshooting
| Issue | Possible Solution |
|---|---|
| Dash cam does not power on. | Check power connection to the vehicle's 12V outlet. Ensure the vehicle's ignition is on. |
| Recording stops unexpectedly. | Format the SD card. Ensure the SD card is a high-speed, branded U3 card. Check for sufficient power supply. |
| Poor video quality. | Clean the camera lenses. Ensure the protective film is removed. Adjust camera angles. |
| GPS not working. | Ensure the GPS module is properly connected and has a clear view of the sky. |
| Wi-Fi connection issues. | Restart the dash cam and your smartphone. Ensure you are within range and have the correct app installed. |
Specifications
| Feature | Detail |
|---|---|
| Model | W3 |
| Product Dimensions | 2 x 4.5 x 3 inches |
| Item Weight | 1.39 pounds |
| Front Camera Resolution | 2K (2560x1440P) |
| Interior/Rear Camera Resolution | 1080P |
| Field of View | Front: 170°, Interior/Rear: 140° each (360° total coverage) |
| Display | 3.16-inch IPS Touch Screen |
| Connectivity | 5GHz Wi-Fi, Built-in GPS |
| Special Features | Loop Recording, G-Sensor, Night Vision (8 IR lights, F/1.8 aperture, 6-layer lens), WDR, Parking Mode (requires hardwire kit), App Control |
| Included SD Card | 64GB |
Warranty and Support
The Zunfly W3 Pro Dash Cam is backed by a 1-year warranty covering manufacturing defects. For assistance, please contact Zunfly's support team through the Amazon messaging system. Step-by-step installation videos and troubleshooting guides are available in the product's digital documentation. Most inquiries receive responses within one business day.
This video provides a brief overview of the Zunfly 4-channel dash cam, demonstrating its multi-camera setup, touch screen interface, night vision, GPS, and parking monitoring features.


