1. Important Safety Information
Read all safety warnings and instructions before using this product. Failure to follow the warnings and instructions may result in electric shock, fire, and/or serious injury.
- Do not use the jump starter if the clamps or cables are damaged.
- Ensure proper polarity connection. Reverse polarity can cause damage to the device and vehicle.
- Do not jump start a frozen battery.
- Keep out of reach of children.
- Do not expose the jump starter to rain or extreme temperatures.
- Do not disassemble the unit. Refer all servicing to qualified personnel.
- Wear eye protection when operating.
2. Product Overview
The Sharmeal T47 is a versatile portable jump starter designed to provide emergency power for vehicles and charge electronic devices.
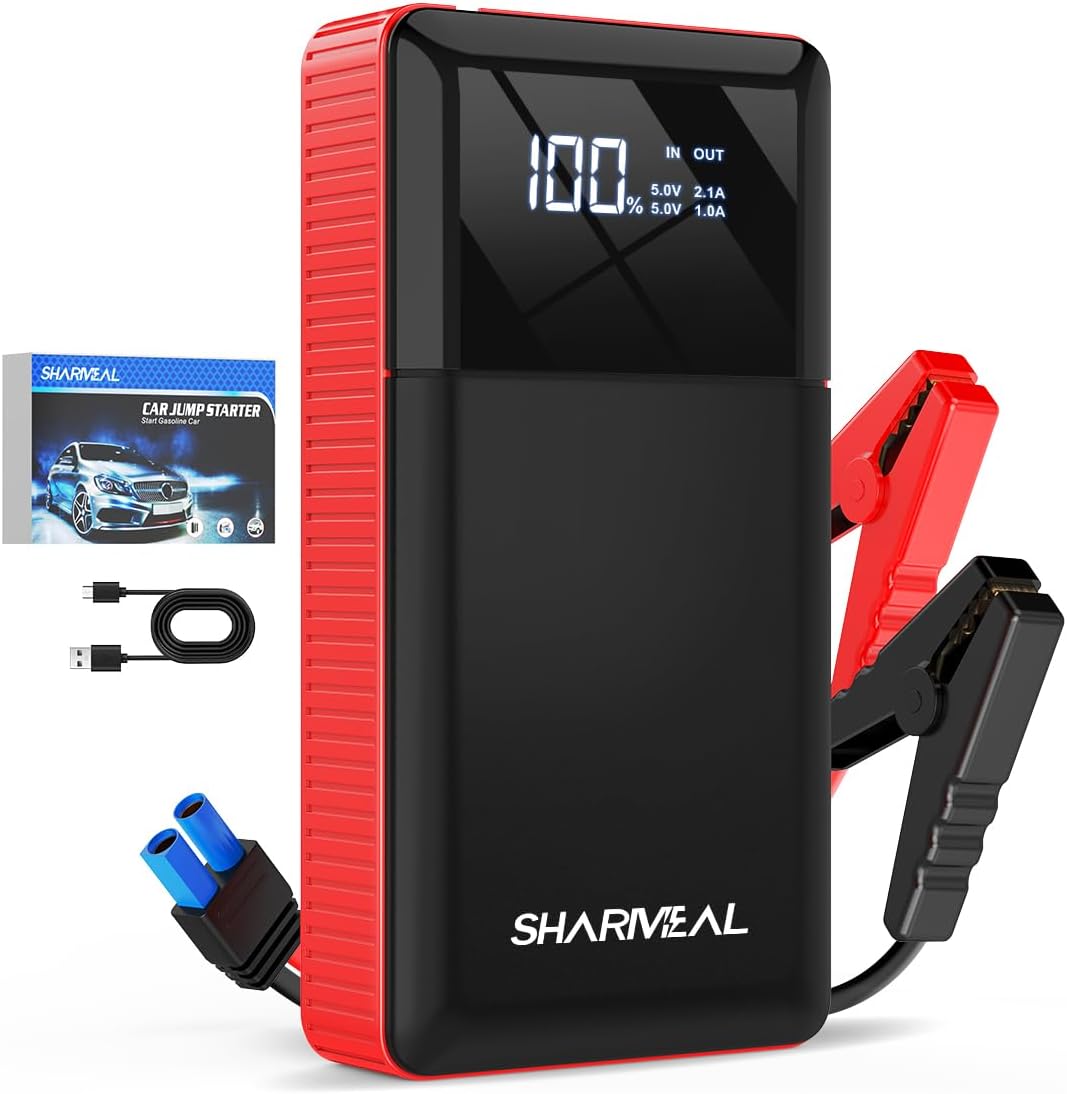
Image 2.1: Sharmeal T47 Jump Starter with included accessories. This image shows the main unit, the smart jump cables, and a USB charging cable.
2.1 Components

Image 2.2: Detailed diagram of the Sharmeal T47 Jump Starter's external features and ports.
- LED Display: Shows battery level and output status.
- USB Output (5V/2A): For charging electronic devices.
- Type-C Input (5V/2A): For charging the jump starter unit.
- LED Light (Lighting/Strobe/SOS): Multi-mode flashlight.
- Power Button: To turn the unit on/off and cycle flashlight modes.
- Jump Start Output: Port for connecting the smart jump cables.
3. Setup and Charging
3.1 Initial Charge
Before first use, fully charge the Sharmeal T47 jump starter. Connect the provided charging cable to the Type-C input port (3) on the unit and to a USB power adapter (not included). The LED display (1) will show the charging progress. A full charge is indicated by "100%" on the display.
3.2 Checking Battery Level
Press the Power Button (5) once to check the current battery level on the LED display (1).
4. Operating Instructions
4.1 Jump Starting a Vehicle
Ensure the jump starter is at least 50% charged before attempting to jump start a vehicle.

Image 4.1: Visual guide for the four-step jump starting process.
- Connect Smart Cables: Insert the blue plug of the smart jump cables into the jump start output port (6) on the Sharmeal T47 unit. Ensure a secure connection.
- Attach to Car Battery: Connect the red clamp to the positive (+) terminal of the vehicle's battery and the black clamp to the negative (-) terminal. Ensure the clamps are firmly attached to the battery terminals. The smart cable indicator light will show status.
- Start Vehicle: Enter the vehicle and start the engine. If the vehicle does not start immediately, wait 30 seconds and try again. Do not crank for more than 3 seconds per attempt.
- Remove Cables: Once the vehicle starts, immediately remove the smart jump cables from the car battery, then disconnect the blue plug from the jump starter unit.
Important: If the smart cable indicator shows an error (e.g., solid red, flashing), refer to the troubleshooting section.
4.2 Using as a Portable Power Bank
The Sharmeal T47 can charge various electronic devices via its USB output port.

Image 4.2: The Sharmeal T47 unit acting as a power bank, charging a smartphone and a tablet.
- Connect your device's USB charging cable to the USB output port (2) on the jump starter.
- The jump starter will automatically begin charging your device. The LED display will show "OUT" and the current output voltage/amperage.
- Disconnect your device once charging is complete.
4.3 Using the LED Flashlight
The integrated LED flashlight offers multiple modes for various situations.

Image 4.3: The Sharmeal T47 unit demonstrating its LED flashlight function, useful for various scenarios like outdoor camping or roadside emergencies.
- Press and hold the Power Button (5) for 3 seconds to turn on the flashlight in constant illumination mode.
- Press the Power Button (5) again to cycle through modes: Strobe > SOS > Off.
- To turn off the flashlight from any mode, press and hold the Power Button (5) for 3 seconds, or cycle through all modes until it turns off.
5. Maintenance
- Charging: Recharge the unit every 3-6 months, even if not used, to maintain battery health.
- Cleaning: Wipe the unit with a dry, soft cloth. Do not use harsh chemicals or abrasive materials.
- Storage: Store the jump starter in a cool, dry place away from direct sunlight and extreme temperatures.
- Cable Care: Inspect jump cables and clamps for damage before each use. Replace if frayed or broken.
6. Troubleshooting
| Problem | Possible Cause | Solution |
|---|---|---|
| Vehicle does not start. | Jump starter battery low. Incorrect cable connection. Vehicle battery severely discharged. | Recharge the jump starter. Check polarity (+ to +, - to -). Ensure clamps are secure. Try again after a few minutes, or consult a mechanic. |
| Smart cable indicator shows red light. | Reverse polarity. Short circuit. Over-temperature. | Disconnect and reconnect with correct polarity. Check for frayed wires or damaged clamps. Allow unit to cool down. |
| Jump starter not charging. | Charging cable or adapter faulty. Charging port damaged. | Try a different USB cable and power adapter. Contact customer support. |
| USB devices not charging. | Jump starter battery low. USB cable faulty. Device not compatible. | Recharge the jump starter. Try a different USB cable. Ensure device is compatible with 5V/2A output. |
7. Specifications
- Model: T47
- Peak Output Current: 2500 Amps
- Jump Start Output: 12V
- USB Output: 5V/2A
- Type-C Input: 5V/2A
- LED Flashlight: Yes (Constant, Strobe, SOS)
- Automotive Fit Type: Universal Fit
- Manufacturer: Foshan Xianming Intelligent Technology Co, Ltd.
8. Warranty and Support
This Sharmeal T47 Jump Starter comes with a standard manufacturer's warranty. For specific warranty details, please refer to the warranty card included in your product packaging or contact Sharmeal customer support.
For technical assistance, troubleshooting, or warranty claims, please contact Sharmeal customer service through the retailer where the product was purchased or visit the official Sharmeal website.
Manufacturer: Foshan Xianming Intelligent Technology Co, Ltd.


