1. Introduction
The NEDLATSDY H56TR Digital Controller is a versatile thermostat designed for precise temperature control in both heating and cooling applications. It features a digital display for current temperature and settings, and utilizes an NTC sensor for accurate temperature measurement. This manual provides essential information for the safe and effective installation, operation, and maintenance of your H56TR controller.
2. Safety Information
- Always disconnect power before installation, wiring, or maintenance to prevent electric shock.
- Installation should be performed by qualified personnel familiar with electrical wiring and safety standards.
- Ensure correct voltage (AC220V or DC12/24V) is applied to the controller as specified for your model. Incorrect voltage can damage the device.
- Observe correct polarity when connecting DC power supplies.
- Do not expose the controller or sensor to excessive moisture or extreme temperatures outside its operating range.
- Keep the device away from flammable materials.
3. Package Contents
Verify that all items are present in the package:
- H56TR Digital Controller Unit
- NTC Temperature Sensor Probe
- Control Circuit Board (internal component)
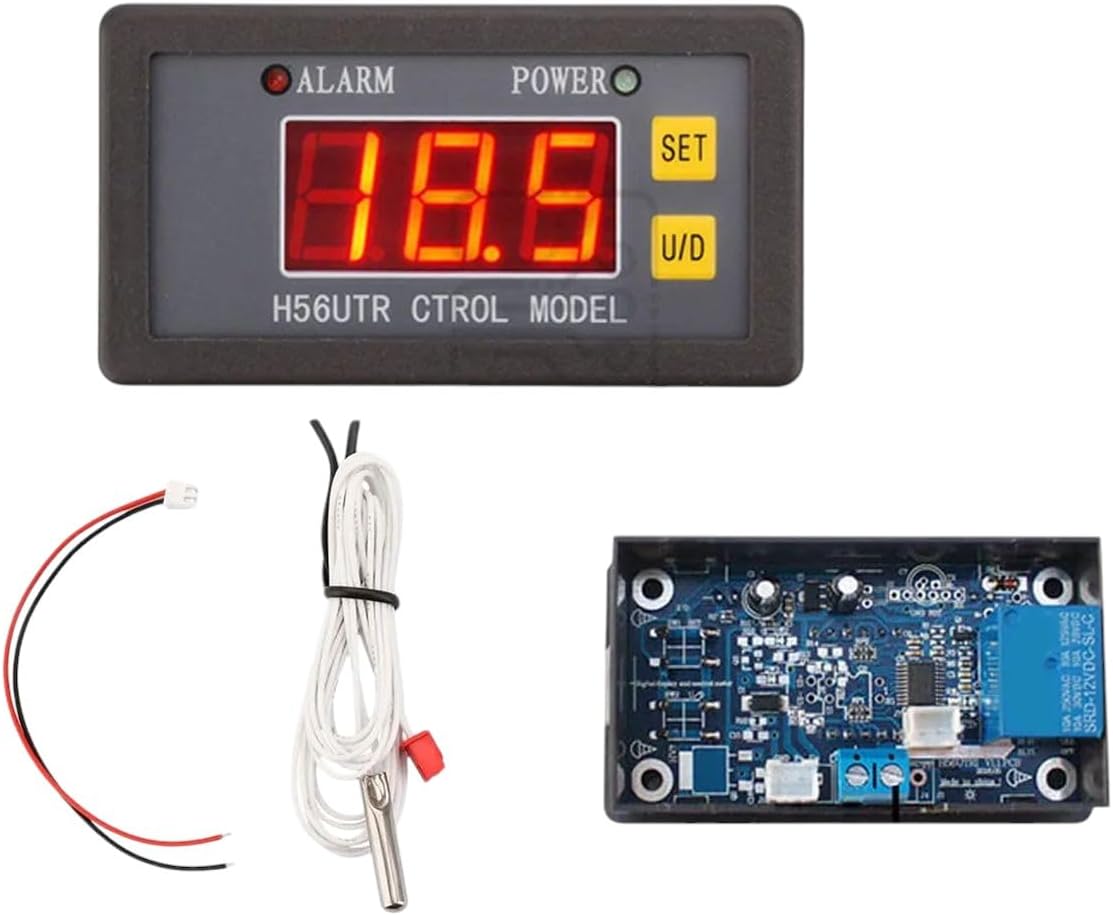
This image displays the main components of the H56TR Digital Controller system. It includes the digital display unit, an NTC temperature sensor with its wiring, and the control circuit board.
4. Product Overview
The H56TR controller consists of a main display unit and a separate control board. Key features include:
- Digital Display: Shows current temperature and various settings.
- SET Button: Used to enter and confirm parameter settings.
- U/D Buttons: Used to increase (Up) or decrease (Down) values during setting adjustments.
- ALARM Indicator: Illuminates when the temperature exceeds set limits or an error occurs.
- POWER Indicator: Illuminates when the device is powered on.
- NTC Sensor Input: Connection point for the temperature sensor.
- Relay Output: Connections for controlling external heating or cooling devices.
5. Setup and Installation
5.1. Mounting
Mount the digital display unit in a suitable panel cutout and secure it. The control board should be mounted in an enclosure, ensuring adequate ventilation and protection from environmental factors.
5.2. Wiring
Refer to the wiring diagram provided with your specific unit. The general connections are as follows:
- Power Supply: Connect the appropriate power source (AC220V or DC12/24V) to the designated power input terminals on the control board. Ensure correct voltage and polarity for DC connections.
- NTC Sensor: Connect the NTC temperature sensor probe to the sensor input terminals. The sensor is non-polar, so connection orientation does not matter.
- Load Output: Connect your heating or cooling device (e.g., heater, fan, compressor) to the relay output terminals. Ensure the load's power requirements do not exceed the relay's maximum rating.
- Display Unit Connection: Connect the display unit to the control board using the provided cable.
Important: Always double-check all wiring connections before applying power. Incorrect wiring can cause damage to the controller or connected devices.
6. Operating Instructions
6.1. Power On
Once wired correctly, apply power. The POWER indicator will illuminate, and the digital display will show the current measured temperature.
6.2. Setting the Target Temperature
- Press the SET button once. The displayed temperature will start flashing, indicating it's in setting mode.
- Use the U/D (Up/Down) buttons to adjust the target temperature to your desired value.
- Press the SET button again to confirm the setting and exit setting mode. If no button is pressed for a few seconds, the controller will automatically save the setting and return to displaying the current temperature.
6.3. Advanced Parameter Settings (Heating/Cooling Mode, Differential, Calibration)
To access advanced parameters, typically a long press of the SET button is required. This will enter a menu where you can adjust settings such as:
- Operating Mode: Select between Heating (H) or Cooling (C) mode.
- Temperature Differential (Hysteresis): Set the temperature difference between the turn-on and turn-off points for the relay.
- Temperature Calibration: Adjust the sensor reading for accuracy if needed.
- High/Low Temperature Alarms: Set thresholds for the ALARM indicator.
Consult the specific wiring diagram or quick start guide included with your product for detailed parameter codes and adjustment procedures.
7. Maintenance
- Cleaning: Wipe the display unit with a soft, dry cloth. Do not use abrasive cleaners or solvents.
- Connections: Periodically check all wiring connections to ensure they are secure and free from corrosion.
- Sensor Care: Ensure the NTC sensor probe is clean and positioned correctly for accurate temperature readings. Avoid bending or damaging the sensor cable.
- Ventilation: Ensure the control board has adequate ventilation to prevent overheating.
8. Troubleshooting
| Problem | Possible Cause | Solution |
|---|---|---|
| No display / No power | No power supply; Incorrect wiring; Blown fuse (if applicable). | Check power connections; Verify voltage and polarity; Inspect wiring for faults; Replace fuse if necessary. |
| Incorrect temperature reading | Sensor faulty or disconnected; Sensor positioned incorrectly; Calibration error. | Check sensor connection; Reposition sensor; Perform temperature calibration (refer to advanced settings). |
| Device not heating/cooling | Load not connected; Incorrect operating mode (H/C); Temperature differential too wide; Faulty relay. | Check load wiring; Verify operating mode in settings; Adjust temperature differential; Contact support if relay is suspected faulty. |
| ALARM indicator on | Temperature outside set limits; Sensor error. | Check current temperature and alarm settings; Verify sensor connection and function. |
9. Specifications
| Model: | H56TR |
| Power Supply: | AC220V or DC12/24V (depending on specific model variant) |
| Temperature Control Range: | Typically -50°C to 110°C (or -58°F to 230°F) |
| Measurement Input: | NTC Sensor |
| Output: | Relay Output (for heating/cooling load) |
| Control Accuracy: | Typically ±0.1°C |
10. Warranty and Customer Support
For warranty information, please refer to the documentation provided with your purchase or contact the manufacturer directly. NEDLATSDY is committed to providing exceptional customer support. If you encounter any issues or have questions regarding your H56TR Digital Controller, please reach out to our support team for assistance.