
EEGVUY 300a MIG/MMA/TIG 3-in-1 Inverter Welder
EEGVUY 300a MIG/MMA/TIG 3-in-1 Inverter Welder Instruction Manual
Model: 300a MIG/MMA/TIG 3-in-1
1. Introduction
This instruction manual provides essential information for the safe and efficient operation, maintenance, and troubleshooting of your EEGVUY 300a MIG/MMA/TIG 3-in-1 Inverter Welder. Please read this manual thoroughly before operating the machine to ensure proper usage and to prevent injury or damage.
2. Safety Instructions
Always prioritize safety when operating welding equipment. Failure to follow these instructions may result in serious injury or death.
- Electrical Safety: Ensure the power supply matches the machine's requirements (110V). Always connect to a grounded outlet. Do not operate in wet conditions.
- Personal Protective Equipment (PPE): Always wear a welding helmet with appropriate shade, welding gloves, protective clothing, and safety shoes.
- Fume and Gas Safety: Weld in a well-ventilated area. Welding fumes can be hazardous.
- Fire Prevention: Keep flammable materials away from the welding area. Have a fire extinguisher readily available.
- Arc Rays: Arc rays can cause eye and skin burns. Protect yourself and bystanders.
- Overheating Protection: The machine features built-in protection against overheating. Allow the machine to cool down if it shuts off automatically.

Figure 2.1: Safety and Reliability features, including protection against overheating, overload, overvoltage, and overcurrent.
3. Product Components and Features
The EEGVUY 300a Inverter Welder is a versatile 3-in-1 machine supporting MIG, MMA (Stick), and Lift TIG welding processes. It features an advanced IGBT inverter technology for stable arc performance.
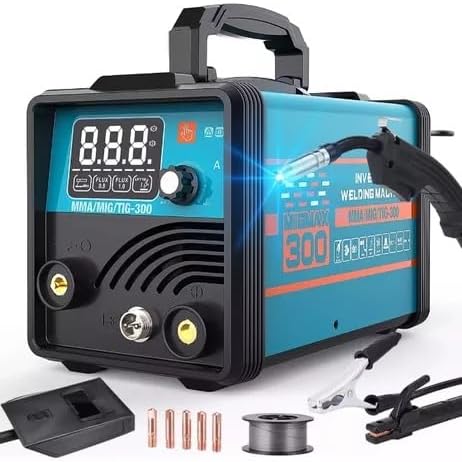
Figure 3.1: Main unit of the EEGVUY 300a Inverter Welder along with included accessories.
3.1 Package Contents
The product package includes the following items:
- 1 x 3-in-1 Inverter Welder
- 1 x Micro-wire Welding Gun (MIG Torch)
- 1 x Welding Clamp (Electrode Holder for MMA)
- 1 x Ground Cable
- 1 x 0.5 kg (1.0 mm) Welding Wire
- 1 x Welding Gloves
- 1 x Slag Hammer
- 1 x Protective Mask (Mask + Lens + Handle)
- 1 x Strap
- 6 x Contact Tips (0.8 mm - 3 pieces, 1.0 mm - 3 pieces)
- 10 x Welding Rods
- 1 x Spanish Manual (Note: This document is an English translation/manual)
3.2 Key Features
- 3-in-1 Functionality: Supports MIG (Flux-cored), MMA (Stick), and Lift TIG welding modes.
- Advanced IGBT Inverter Technology: Provides stable arc, reduced spatter, and deeper penetration.
- Synergic Adjustment: Automatic voltage and wire feed speed adjustment based on amperage or thickness selection.
- Arc Stability Features: Hot Start, Anti-Stick, and Arc Force for smoother welding and easier arc initiation.
- LCD Digital Display: Clear display of current for easy reading and precise adjustments.
- Safety Protections: Built-in protection against overheating, overvoltage, and overcurrent.
- Efficient Cooling System: Fan-based cooling system activates when needed to maintain optimal temperature.
- Portable Design: Compact size (279 x 160 x 196 mm) and lightweight (4.5 kg) with a portable folding handle.

Figure 3.2: The 3-in-1 functionality of the welder, illustrating MIG (Flux Cored), MMA, and Lift TIG welding processes.
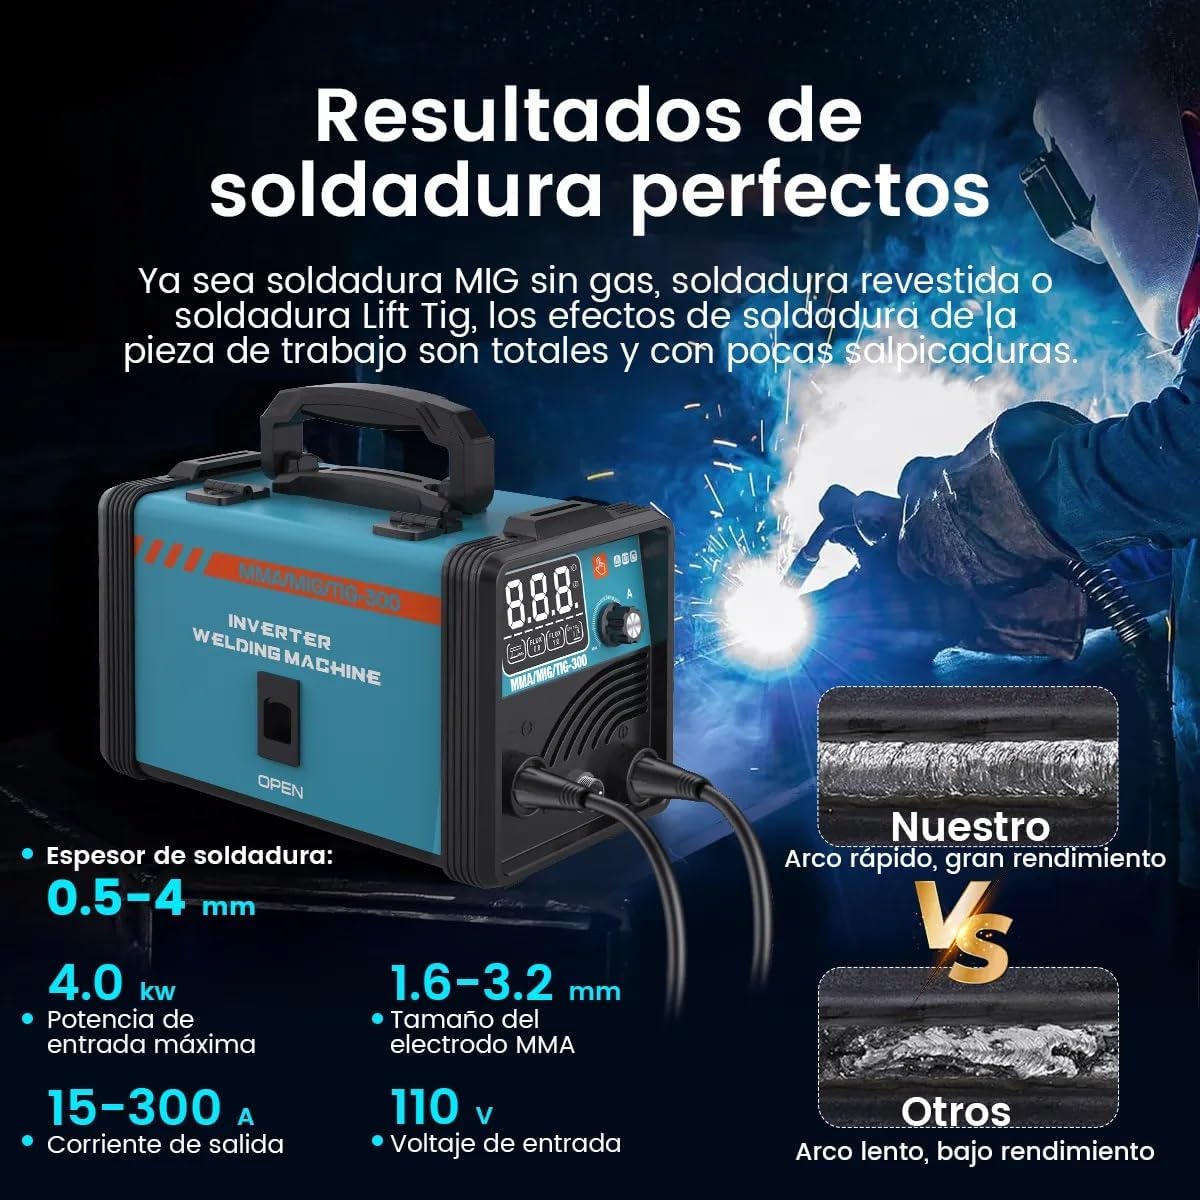
Figure 3.3: Comparison of welding results, highlighting the machine's ability to produce clean welds with minimal spatter.

Figure 3.4: Illustration of the advanced IGBT inverter technology, which ensures a stable arc and efficient welding.
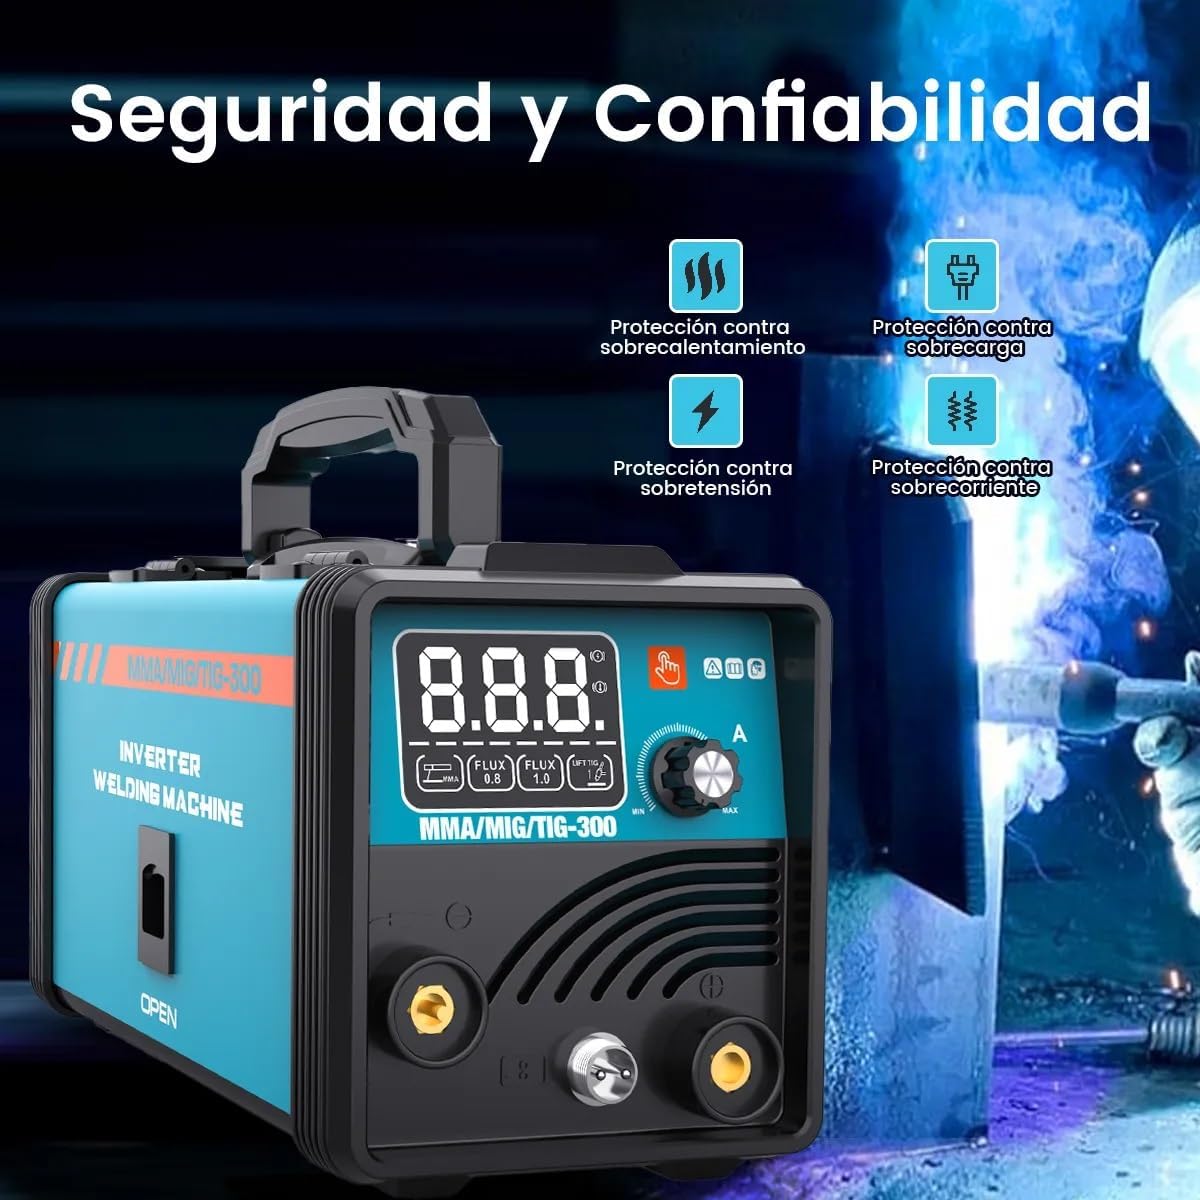
Figure 3.5: The large LCD digital display, providing clear and easy-to-read current settings for various welding modes.
4. Technical Specifications
Detailed technical specifications for the EEGVUY 300a Inverter Welder:
| Parameter | Value |
|---|---|
| Model | 300a MIG/MMA/TIG |
| Welding Gun Model (TIG) | WP-17 (Note: TIG torch not included) |
| Type | MIG+MMA+TIG |
| Rated Output Power | 4.0 KW |
| Rated Input Voltage | 110V |
| Rated Output Voltage | 20V |
| Rated Output Current | 15-300A |
| MMA Current Range | 20-300A |
| MIG Current Range (0.8mm) | 35-300A |
| MIG Current Range (1.0mm) | 50-300A |
| TIG Current Range | 15-300A |
| Duty Cycle | 65% |
| Power Factor | 0.95 |
| Protection Level | IP21S |
| Efficiency | 85% |
| Wire Feed Speed Range | 0.5-13 m/min |
| Applicable Electrode Models (MMA) | E6013, E7018, E6011, E6010, E308 |
| Welding Wire Diameter (MIG) | 0.8/1.0 mm |
| Applicable Welding Rod Size (MMA) | 1.6-3.2 mm |
| Dimensions (L x W x H) | 279 x 160 x 196 mm |
| Weight | 4.5 kg |

Figure 4.1: Connection diagrams for Flux-cored, MMA, and Lift TIG welding modes. Note that the TIG torch is not included.
5. Setup and Installation
Before operating the welder, ensure proper setup and connection of all components.
5.1 Power Connection
- Connect the power cord to a grounded 110V power outlet.
- Ensure the power switch on the back of the machine is in the OFF position before connecting.
5.2 Welding Mode Setup
The machine supports MIG, MMA, and Lift TIG. Select the desired mode using the control panel.
5.2.1 MIG (Flux-Cored) Setup
- Install the welding wire spool (0.8mm or 1.0mm) into the wire feeder compartment. Ensure the wire is properly seated and tensioned.
- Connect the MIG torch cable to the positive (+) terminal of the machine.
- Connect the ground clamp cable to the negative (-) terminal of the machine and attach the clamp securely to the workpiece.
- Select "FLUX" mode on the control panel and choose the appropriate wire diameter (0.8 or 1.0).

Figure 5.1: Proper installation of a 1kg welding wire spool for MIG welding.
5.2.2 MMA (Stick) Setup
- Connect the electrode holder cable to the positive (+) terminal of the machine.
- Connect the ground clamp cable to the negative (-) terminal of the machine and attach the clamp securely to the workpiece.
- Insert the appropriate welding rod (1.6-3.2mm) into the electrode holder.
- Select "MMA" mode on the control panel.
5.2.3 Lift TIG Setup (TIG Torch not included)
- Connect the TIG torch cable to the negative (-) terminal of the machine.
- Connect the ground clamp cable to the positive (+) terminal of the machine and attach the clamp securely to the workpiece.
- Ensure a suitable tungsten electrode is installed in the TIG torch.
- Select "Lift TIG" mode on the control panel.
- Note: An additional Lift TIG torch must be purchased separately as it is not included in the product package.
6. Operating Instructions
Follow these steps for safe and effective operation of your welder.
6.1 Pre-Operation Checklist
- Ensure all connections are secure and correct for the chosen welding mode.
- Verify the workpiece is clean and properly grounded.
- Wear all required Personal Protective Equipment (PPE).
- Ensure adequate ventilation in the welding area.
6.2 Powering On and Setting Parameters
- Turn on the power switch located on the back of the machine.
- The LCD digital display will illuminate.
- Use the control knob to adjust the welding current (amperage) according to the material thickness and welding process. The display will show the current setting.
- For MIG mode, the synergic function will automatically adjust voltage and wire feed speed.
6.3 Welding Process
6.3.1 MMA (Stick) Welding
- Strike the electrode against the workpiece to initiate the arc. The Hot Start feature assists with easy arc ignition.
- Maintain a consistent arc length and travel speed.
- The Anti-Stick feature prevents the electrode from sticking to the workpiece.
- The Arc Force feature provides a powerful arc for deeper penetration.
6.3.2 MIG (Flux-Cored) Welding
- Position the MIG torch nozzle close to the workpiece.
- Press the trigger on the MIG torch to start the wire feed and arc.
- Maintain a consistent travel speed and torch angle.
6.3.3 Lift TIG Welding
- Gently touch the tungsten electrode to the workpiece and then lift it slightly to initiate the arc.
- Maintain a small arc gap and feed filler rod manually if required.
6.4 Post-Operation
- Turn off the power switch on the machine.
- Disconnect the power cord from the outlet.
- Allow the machine to cool down. The cooling fan may continue to run for a short period.
- Clean the welding area and store the machine and accessories in a dry, safe place.
7. Maintenance
Regular maintenance ensures the longevity and optimal performance of your welder.
- Cleaning: Regularly clean the machine's exterior with a dry cloth. Use compressed air to blow out dust from the ventilation openings. Ensure the machine is unplugged before cleaning.
- Cable Inspection: Periodically inspect all cables (power, welding, ground) for any signs of damage, cuts, or fraying. Replace damaged cables immediately.
- MIG Torch Maintenance: Clean the MIG torch nozzle and contact tip regularly. Replace contact tips when worn to ensure good wire feeding and arc stability.
- Electrode Holder/Ground Clamp: Ensure these components are clean and make good electrical contact.
- Storage: Store the welder in a dry, dust-free environment when not in use.

Figure 7.1: The 360-degree cooling technology, which contributes to energy saving and intelligent fan control for efficient heat dissipation.
8. Troubleshooting
This section provides solutions to common issues you might encounter.
| Problem | Possible Cause | Solution |
|---|---|---|
| No Power | Power cord unplugged, circuit breaker tripped, machine switch off. | Check power cord connection, reset circuit breaker, turn machine switch ON. |
| No Arc | Poor ground connection, incorrect welding mode selected, worn contact tip (MIG), incorrect electrode (MMA/TIG). | Ensure ground clamp is secure, select correct mode, replace contact tip, use appropriate electrode. |
| Machine Overheats / Shuts Off | Exceeded duty cycle, poor ventilation, internal fault. | Allow machine to cool down, ensure proper ventilation, contact support if issue persists. |
| Poor Weld Quality | Incorrect current settings, improper technique, contaminated workpiece, wrong wire/electrode. | Adjust current, practice technique, clean workpiece, use correct consumables. |
| Wire Feeding Issues (MIG) | Tangled wire, worn contact tip, incorrect tension, clogged liner. | Untangle wire, replace contact tip, adjust tension, clean/replace liner. |
9. Warranty and Support
For warranty information and technical support, please refer to the purchase documentation or contact EEGVUY customer service. Keep your proof of purchase for warranty claims.
Customer Service: Refer to the contact information provided with your product or on the official EEGVUY website.
Protection Plans: Additional protection plans may be available for purchase. Please check with your retailer for details.
10. Application Areas
The EEGVUY 300a Inverter Welder is suitable for a wide range of applications, including:
- Automotive Modification
- Home Repair and DIY Projects
- Square Pipe Welding
- General Maintenance and Fabrication

Figure 10.1: Various application scenarios for the EEGVUY 300a Inverter Welder.
Related Documents - 300a MIG/MMA/TIG 3-in-1 Inverter Welder
 |
TRUPER CAB-300A Arc Welder Instruction Manual & Safety Guide Comprehensive user manual and safety instructions for the TRUPER CAB-300A arc welding machine. Learn proper setup, operation, and essential safety precautions to prevent electrical shock and accidents. |
 |
Sealey POWERMIG300i 300A Professional Gas/Gasless MIG/MMA/TIG Inverter Welder User Manual Comprehensive user manual for the Sealey POWERMIG300i 300A professional inverter welder. Covers safety instructions, operation, specifications, troubleshooting, and maintenance for MIG, MAG, TIG, and MMA welding processes. |
 |
GITANK 300A Quick Start Guide - Bluetooth Car Audio Receiver Get started quickly with the GITANK 300A, a Bluetooth music receiver for your car. This guide covers setup, compatibility, working modes, and frequently asked questions for seamless audio streaming. |
 |
HOBBYWING SEPS 300A Anti-Spark Module User Manual User manual for the HOBBYWING SEPS 300A Anti-Spark Module. Learn about its features, specifications, and connection modes for safe power management in electronic devices. |
 |
Aishang Interactive HY-300A Smart Projector User Manual and Guide Comprehensive user manual and quick installation guide for the Aishang Interactive HY-300A Smart Projector. This document details projector features, structure, remote control functions, application settings, connectivity options like Miracast and Airplay, safety instructions, and FCC compliance information. |
 |
Bellanca Viking 300A Operations Manual: Pilot's Guide and Aircraft Systems This operations manual provides detailed information on the Bellanca Viking 300A aircraft, covering its systems, specifications, operating procedures, and maintenance. Essential for pilots and aircraft owners. |
Ask a question about this manual
Ask about setup, troubleshooting, compatibility, parts, safety, or missing instructions. Manuals+ will review the question and use this page’s manual context to help answer it.