Kiinsehtoq ZQ02109
Kiinsehtoq 300W Moving Head Stage Light RGBW User Manual
Model: ZQ02109
1. Introduction
This manual provides essential information for the safe and efficient operation of your Kiinsehtoq 300W Moving Head Stage Light RGBW. Please read this manual thoroughly before installation and use to ensure proper function and to prevent damage to the unit or injury to personnel. Keep this manual for future reference.
2. Safety Precautions
Always observe the following safety guidelines to reduce the risk of electrical shock, fire, or personal injury:
- Power Supply: Ensure the power supply voltage matches the unit's requirements. Disconnect from power before servicing.
- Grounding: Always connect the unit to a grounded power outlet.
- Moisture: Do not expose the unit to rain or moisture. Do not operate in wet environments.
- Ventilation: Ensure adequate ventilation. Do not block ventilation openings.
- Heat: Avoid operating the unit near heat sources. The housing can become hot during operation.
- Mounting: Securely mount the unit using appropriate hardware. Always use a safety cable when suspending the unit.
- Direct Eye Exposure: Avoid direct eye exposure to the light source.
- Servicing: Refer all servicing to qualified personnel.
3. Package Contents
Verify that all items listed below are included in your package:
- 1x Kiinsehtoq 300W Moving Head Stage Light
- 1x Power Cord
- 1x Hook Accessory
- 1x Instruction Manual (this document)
4. Product Features Overview
The Kiinsehtoq 300W Moving Head Stage Light offers advanced lighting capabilities for various events:
- Dynamic Colors: Features 7 powerful 25W RGBW LEDs for 16.7 million+ color combinations and 30 full-color auxiliary LEDs for layered effects.
- Versatile Effects: Includes Beam, Wash, Vortex, Kaleidoscope, Beam Zoom (4°-45°), Strobe (1-25Hz), Linear Dimming, and Single-Pixel Control.
- Precise Movement: 540° horizontal (Pan) and 250° vertical (Tilt) range with 16-bit precision gears and auto error correction.
- Intuitive Control: 1.7" LCD panel for easy navigation, supporting sound-activated, auto-programmed, and DMX512 modes.
- Durable Design: IP20 aluminum housing suitable for ambient temperatures from -20℃ to 40℃.

Image 4.1: Overview of key features including Beam & Wash, 16.7M+ Colors, Linear CCT, Vortex Effect, Kaleidoscope Effect, and Single Point Control.
5. Component Identification
Familiarize yourself with the different parts of your moving head light:
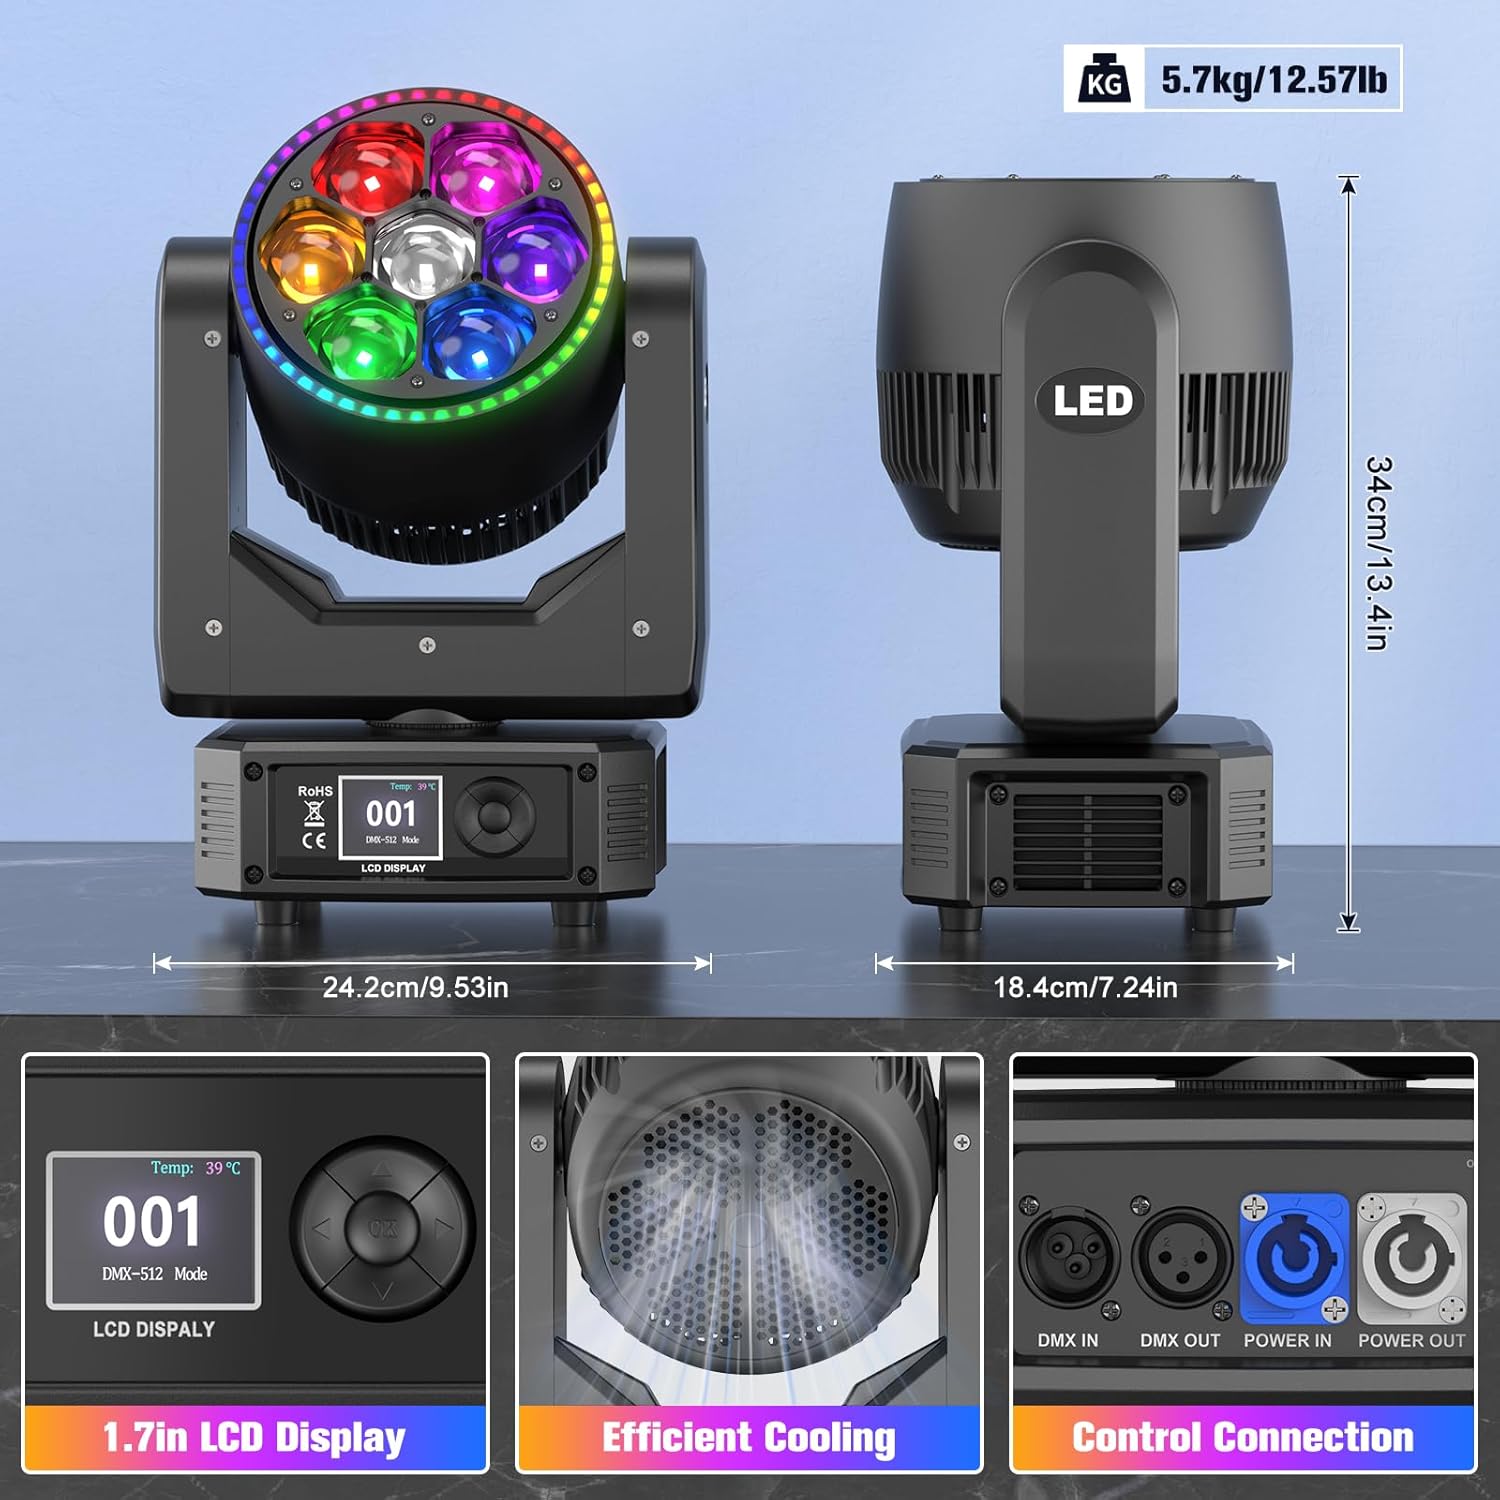
Image 5.1: Rear panel connections and display. This image highlights the 1.7-inch LCD display, efficient cooling system, DMX IN/OUT ports, Power IN/OUT ports, and the main power switch with fuse.
- Main LED Array: 7x 25W RGBW LEDs for primary illumination.
- Auxiliary LED Strip: 30 full-color LEDs surrounding the main array for additional effects.
- LCD Display: 1.7-inch screen for menu navigation and settings.
- Control Buttons: For navigating the LCD menu.
- DMX IN/OUT: 3-pin XLR connectors for DMX512 control.
- Power IN/OUT: PowerCon compatible connectors for power input and daisy-chaining.
- Mounting Bracket: For secure installation.
- Cooling System: Integrated fan and vents for heat dissipation.
6. Setup and Installation
6.1 Mounting
The fixture can be mounted in various positions (floor, truss, wall) using the provided hook accessory. Always ensure the mounting surface or truss is capable of supporting the fixture's weight (approximately 15.07 lbs / 5.7 kg) and use a safety cable.
- Attach the hook accessory securely to the mounting bracket of the light.
- Fasten the hook to a truss or suitable mounting point.
- Always attach a safety cable (not included) to the designated safety cable attachment point on the fixture and around the truss or mounting structure.

Image 6.1: Illustrates the extensive pan (X: 540°) and tilt (Y: 250°) movement capabilities, including stepless 360° rotation of the LED head.
6.2 Power Connection
Connect the provided power cord to the Power IN port on the rear of the fixture and then to a grounded power outlet. Multiple units can be daisy-chained using the Power OUT port to Power IN port connections, ensuring the total current draw does not exceed the circuit's capacity.
6.3 DMX Connection
For DMX512 control, connect a DMX controller to the DMX IN port of the first fixture using a 3-pin XLR cable. Daisy-chain additional fixtures by connecting the DMX OUT of the first fixture to the DMX IN of the next, and so on. Terminate the last fixture in the chain with a DMX terminator (not included) to prevent signal reflection.
7. Operation Modes
7.1 LCD Display Navigation
The 1.7-inch LCD display and control buttons allow you to access and adjust the fixture's settings. Use the MENU button to cycle through main options, and the UP/DOWN buttons to navigate within a menu. Press ENTER/OK to confirm selections.
7.2 DMX Mode
In DMX mode, the fixture is controlled by an external DMX512 controller. Set the DMX address for each fixture using the LCD display. Refer to the DMX channel chart (typically provided in a separate DMX protocol sheet or appendix) for specific channel functions.
- Channel Modes: The fixture supports multiple DMX channel modes (e.g., 30, 42, or 58 channels). Select the desired mode via the LCD display to match your controller's setup.
- Addressing: Each fixture requires a unique DMX start address.
7.3 Sound-Activated Mode
The fixture can react to ambient sound. Select "Sound Mode" from the LCD menu. The built-in microphone will detect sound, and the light will synchronize its effects to the beat of the music.
7.4 Auto Mode
The fixture has pre-programmed internal shows. Select "Auto Mode" from the LCD menu to cycle through these automatic programs. Speed and other parameters may be adjustable within this mode.
7.5 Master/Slave Mode
For synchronized operation of multiple units without a DMX controller, configure one unit as the "Master" and others as "Slave."
- Connect the DMX OUT of the Master unit to the DMX IN of the first Slave unit, and continue daisy-chaining.
- Set the Master unit to either "Sound Mode" or "Auto Mode."
- Set all other units to "Slave Mode" via their LCD displays.
- The Slave units will now mirror the Master unit's operation.
8. Advanced Features
8.1 Color Mixing and Effects
The RGBW LEDs allow for a vast spectrum of colors. The auxiliary LEDs add depth and dynamic layered effects. Utilize DMX control for precise color selection and effect activation, including Vortex, Kaleidoscope, and Strobe.

Image 8.1: Demonstrates the extensive color palette and smooth transitions achievable with the 16.7 million color mixing capability, including various beam and wash effects.
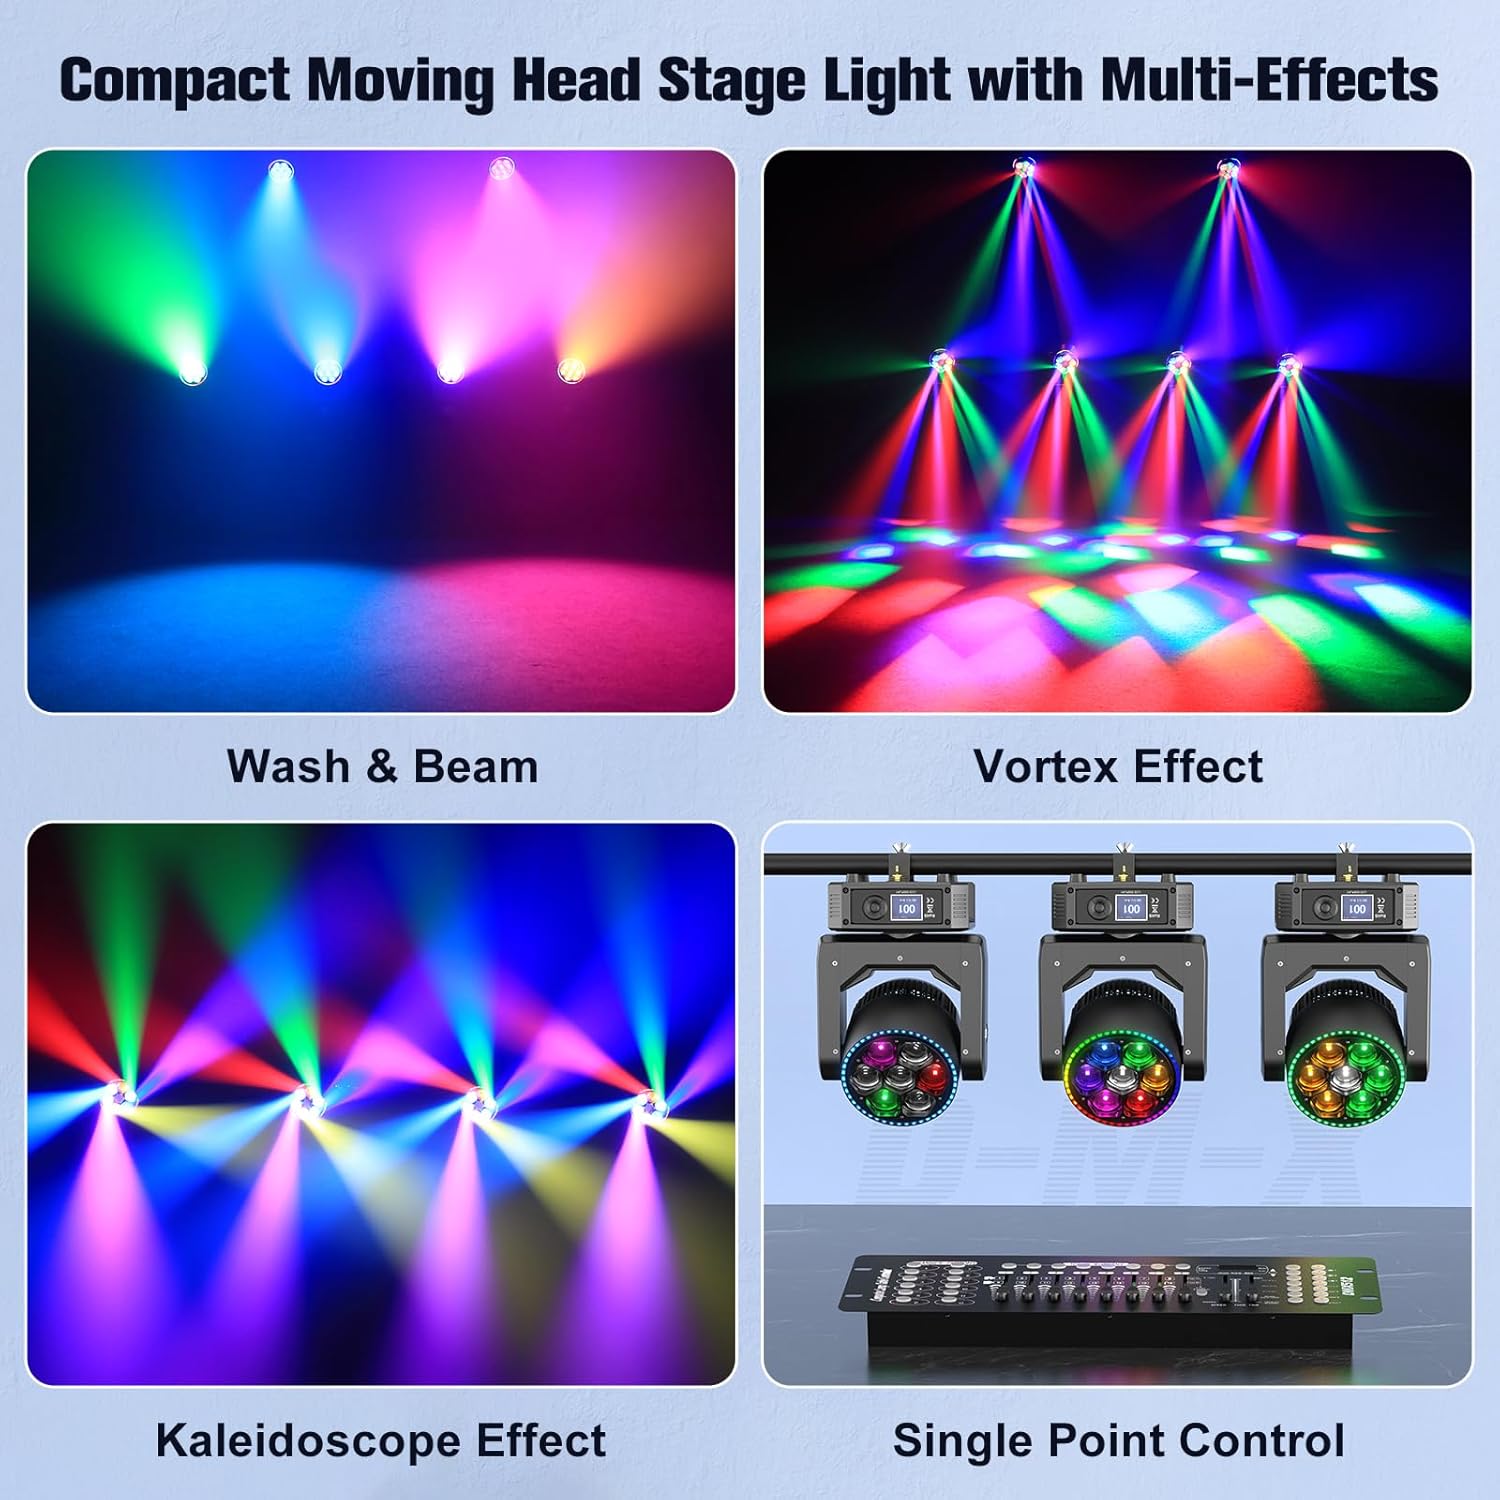
Image 8.2: Visual representation of the Wash & Beam, Vortex Effect, Kaleidoscope Effect, and Single Point Control features in action.
8.2 Motorized Zoom and Beam Angle
The fixture features a motorized zoom function, allowing adjustment of the beam angle from a narrow 4° spotlight effect to a wide 45° wash effect. This can be controlled via DMX or through the internal menu settings.

Image 8.3: Illustrates the adjustable beam angle, showing a focused 4° spotlight effect and a broader 45° wash effect.
9. Maintenance
Regular maintenance ensures optimal performance and extends the lifespan of your fixture.
- Cleaning: Periodically clean the lenses and exterior housing with a soft, lint-free cloth. Do not use abrasive cleaners.
- Ventilation: Ensure ventilation openings are free from dust and debris. Use compressed air to clear vents if necessary.
- Inspection: Regularly inspect power cables, DMX cables, and mounting hardware for any signs of wear or damage. Replace damaged components immediately.
- Storage: When not in use, store the fixture in a dry, dust-free environment, preferably in its original packaging or a protective case.
10. Troubleshooting
| Problem | Possible Cause | Solution |
|---|---|---|
| No power | Power cable disconnected, faulty outlet, blown fuse. | Check power connections, try a different outlet, replace fuse (refer to component identification for fuse location). |
| No DMX control | Incorrect DMX address, faulty DMX cable, no DMX signal, missing terminator. | Verify DMX address, check DMX cable connections, ensure DMX controller is active, add DMX terminator to the last fixture. |
| Fixture not moving/responding | Motor lock, DMX signal issue, internal error. | Check DMX signal. Power cycle the unit. If issue persists, contact customer support. |
| Lights flickering or inconsistent | Unstable power, DMX signal interference, internal component issue. | Ensure stable power supply. Check DMX cables for damage. Try a different DMX channel mode. |
11. Technical Specifications
| Specification | Detail |
|---|---|
| Model Number | ZQ02109 |
| Light Source | 7x 25W RGBW LEDs + 30 Auxiliary RGB LEDs |
| Power Consumption | 300 Watts |
| Color Mixing | 16.7 Million Colors (RGBW) |
| Beam Angle | 4° - 45° (Motorized Zoom) |
| Pan Movement | 540° (16-bit precision) |
| Tilt Movement | 250° (16-bit precision) |
| Control Modes | DMX512, Sound-Activated, Auto, Master/Slave |
| DMX Channels | 30, 42, or 58 channels (selectable) |
| Display | 1.7-inch LCD |
| Housing Material | Acrylonitrile Butadiene Styrene (ABS) |
| IP Rating | IP20 |
| Operating Temperature | -20℃ to 40℃ |
| Product Dimensions | 7.2"L x 13.4"W x 9.5"H (18.3cm L x 34cm W x 24.1cm H) |
| Item Weight | 15.07 lbs (6.83 kg) |
| Manufacturer | Shenzhen Zhuoqiong Technology Co., Ltd. |
12. Warranty and Support
12.1 Warranty Information
Please refer to the warranty card included with your purchase or contact your retailer for specific warranty terms and conditions. Keep your proof of purchase for warranty claims.
12.2 Customer Support
For technical assistance, troubleshooting, or service inquiries, please contact your authorized dealer or visit the official Kiinsehtoq website for support resources.
Manufacturer: Shenzhen Zhuoqiong Technology Co., Ltd.
Ask a question about this manual
Ask about setup, troubleshooting, compatibility, parts, safety, or missing instructions. Manuals+ will review the question and use this page’s manual context to help answer it.