
Outsunny 846-167V40BK
Outsunny Gas BBQ 3+1 Burner Grill Instruction Manual
Model: 846-167V40BK | Brand: Outsunny
1. Introduction
Thank you for choosing the Outsunny Gas BBQ 3+1 Burner Grill. This manual provides essential information for the safe assembly, operation, maintenance, and troubleshooting of your new gas grill. Please read all instructions carefully before use and retain this manual for future reference.

Image 1.1: The Outsunny Gas BBQ 3+1 Burner Grill in use at an outdoor gathering.
2. Safety Information
WARNING: Failure to follow these instructions could result in fire, explosion, or burn hazard, which could cause property damage, personal injury, or death.
- This appliance is for outdoor use only. Do not operate indoors.
- Read all instructions before assembling and using the appliance.
- Keep children and pets away from the grill at all times.
- Ensure the grill is placed on a stable, level surface.
- Do not store or use gasoline or other flammable liquids or vapors in the vicinity of this or any other appliance.
- Always check for gas leaks before each use. Refer to the "Gas Leak Test" section.
- Do not obstruct the flow of combustion and ventilation air.
- Always wear protective gloves when handling hot components.
- Disconnect the gas cylinder when the grill is not in use.
3. Package Contents
Before assembly, ensure all parts are present and undamaged. If any parts are missing or damaged, do not attempt to assemble or operate the grill. Contact customer support immediately.
- Gas BBQ Unit
- Hose
- Grill Grate
- Warming Rack
- Regulator
- Assembly Hardware (screws, nuts, etc.)
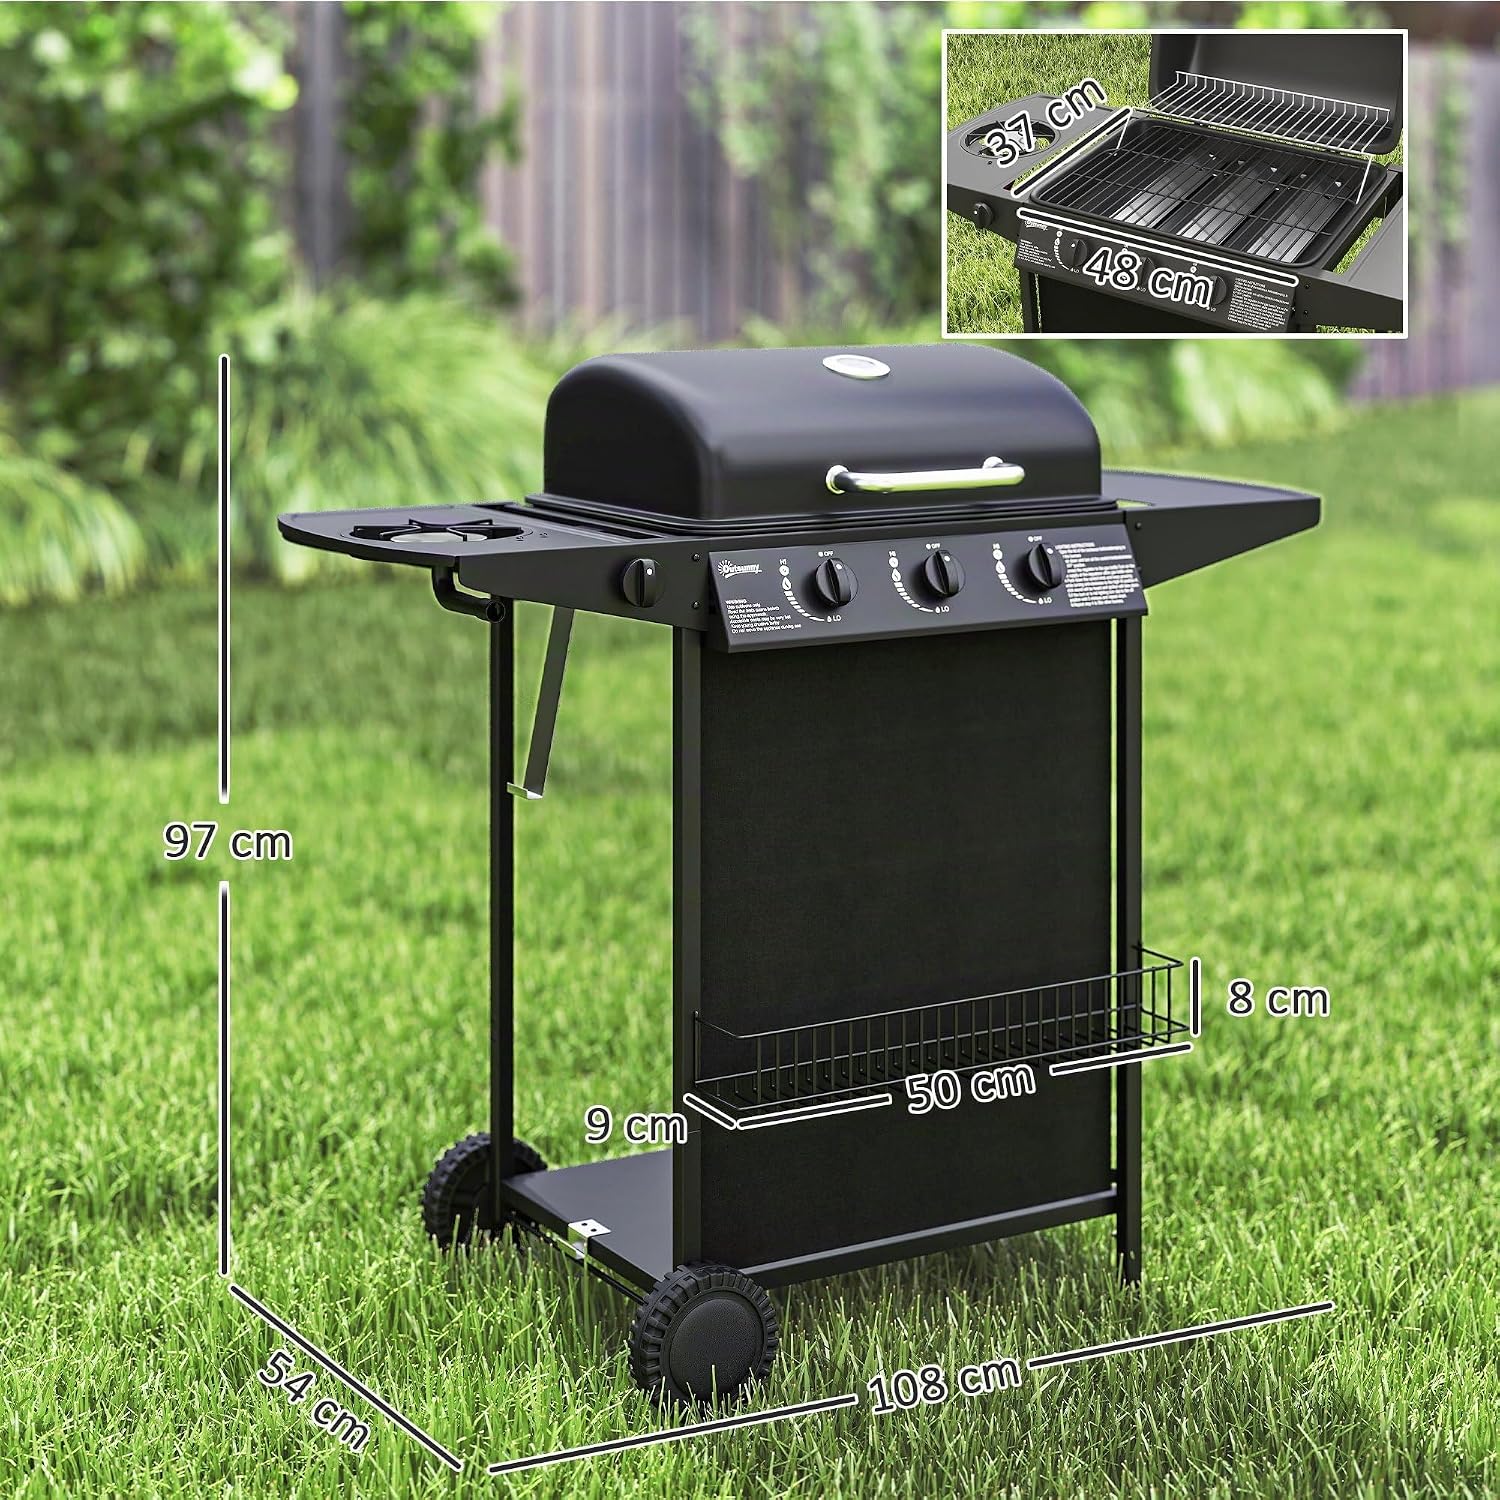
Image 3.1: Diagram illustrating the dimensions of the gas BBQ unit.
4. Assembly and Setup
Assembly is required for this product. Follow the steps below carefully. It is recommended to have two people for assembly.
- Unpack Components: Carefully remove all parts from the packaging. Lay them out on a clean, flat surface.
- Assemble the Frame: Attach the legs and bottom shelf to the main body of the grill using the provided hardware. Ensure all connections are secure.
- Install Wheels: Secure the two wheels to the designated side of the frame for portability.
- Attach Side Tables: Mount the side tables to the main grill body. The side burner will be integrated into one of these tables.
- Connect Burners and Gas Lines: Carefully connect the main burners and the side burner to the gas manifold. Ensure all connections are tight. Note: Some users have reported issues with side burner connection. Double-check for secure fit and no gas leaks.
- Place Grill Grates and Warming Rack: Position the main grill grates and the warming rack inside the cooking chamber.
- Install Grease Collector: Slide the removable grease collector into its designated slot beneath the cooking chamber.
- Connect Hose and Regulator: Attach the gas hose to the grill's gas inlet and the regulator to the gas cylinder. Ensure all connections are hand-tight, then use a wrench for a final snug fit. Do not overtighten.
- Gas Leak Test:
- Prepare a soap and water solution (50% soap, 50% water).
- Ensure all burner control knobs are in the "OFF" position.
- Connect the gas cylinder and open the gas supply valve.
- Apply the soap solution to all gas connections (hose, regulator, manifold, burner connections).
- If bubbles appear, there is a gas leak. Immediately close the gas supply, tighten the connection, and retest. If the leak persists, do not use the grill and contact customer support.
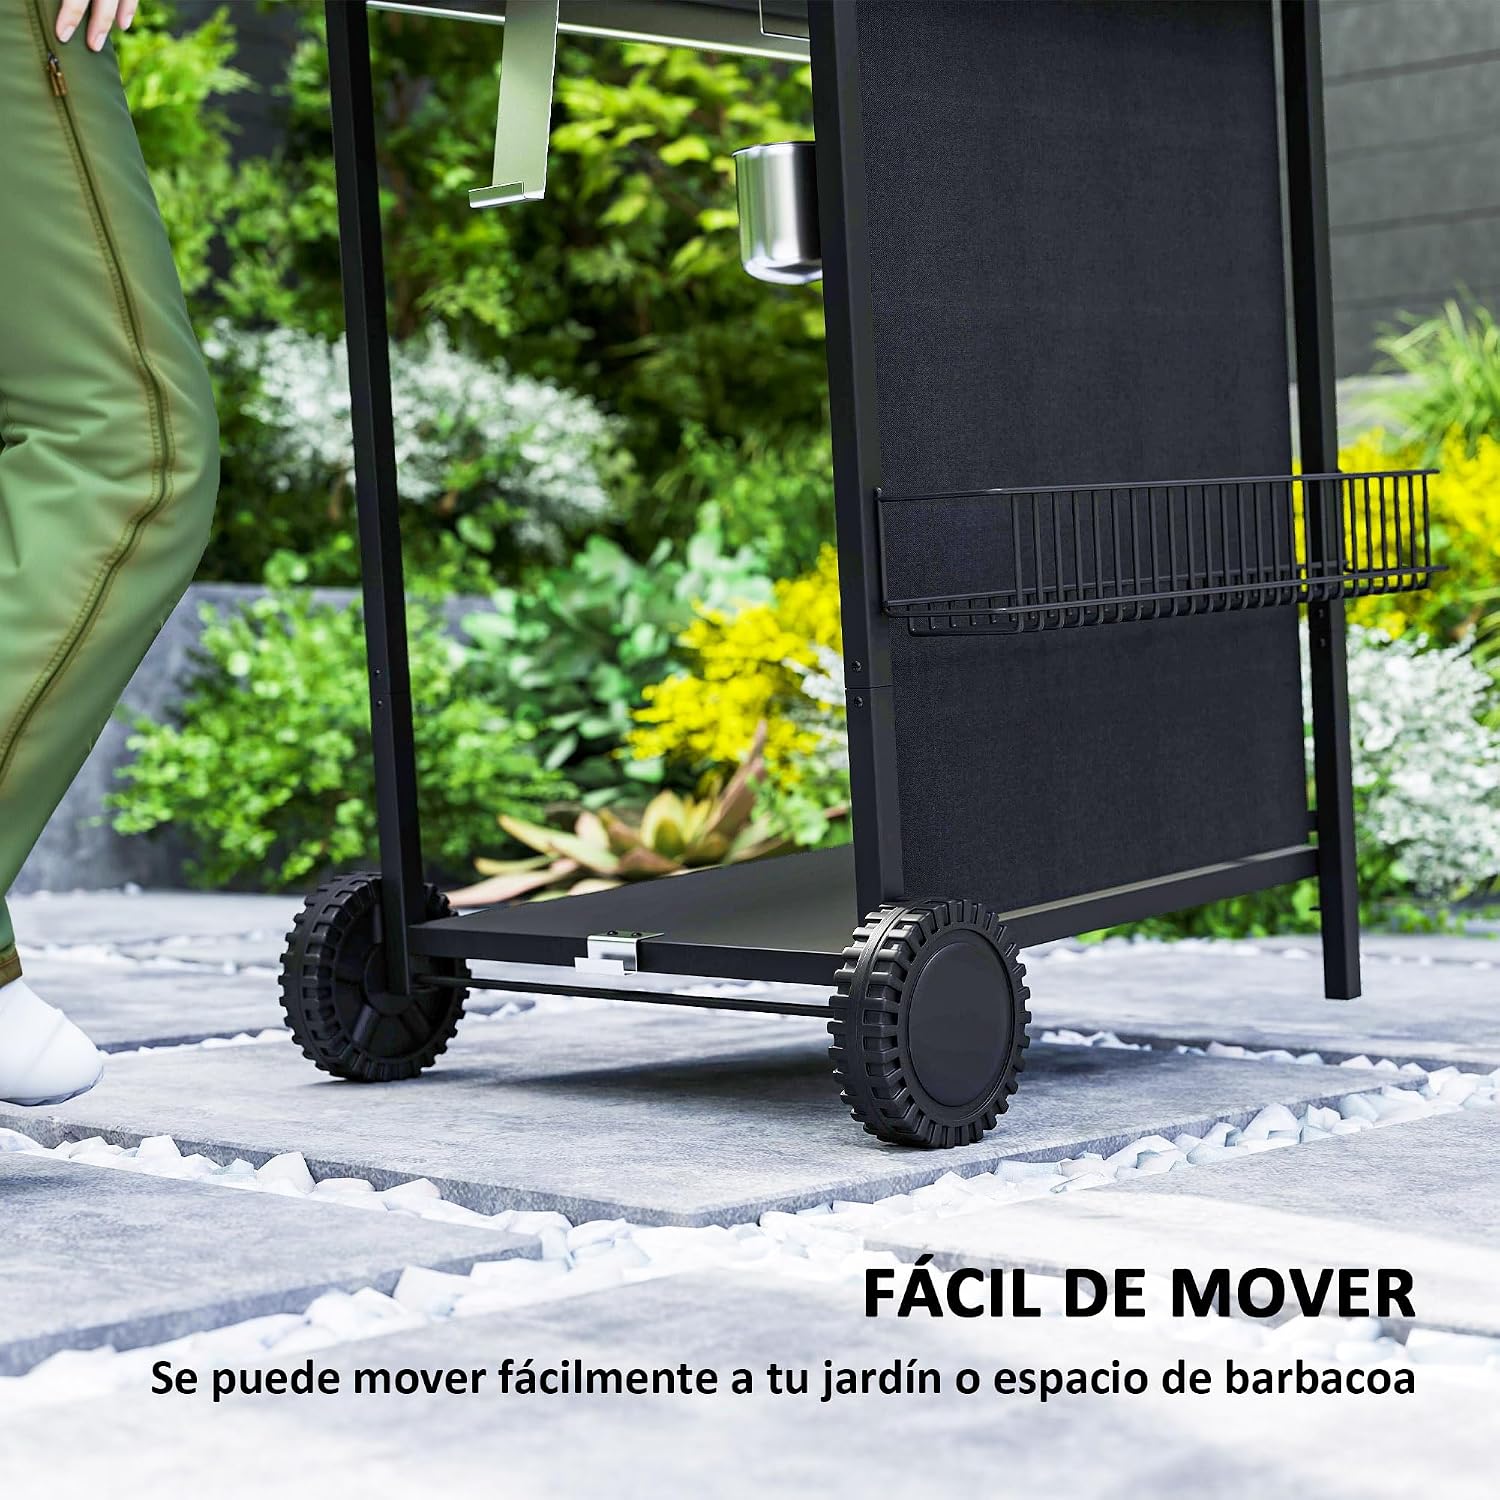
Image 4.1: The robust wheels allow for easy movement of the grill.
5. Operating Instructions
5.1. Lighting the Grill
- Ensure the gas cylinder is connected and the gas supply valve is open.
- Open the grill lid.
- Turn one main burner control knob to the "HIGH" position.
- Press and hold the electronic ignition button (if applicable) or use a long lighter to ignite the burner.
- Once the first burner is lit, you can turn on other burners by rotating their control knobs to the desired setting.
- To light the side burner, turn its control knob to "HIGH" and use the electronic ignition or a long lighter.
5.2. Cooking
- The grill features a large cooking surface of 1776 cm² suitable for cooking multiple items simultaneously, such as up to 6 hamburgers and 10 sausages.
- The side burner is ideal for preparing side dishes or sauces while grilling.
- The lid helps to concentrate heat and infuse a smoky flavor into your food.
- Use the integrated thermometer on the lid to monitor the internal temperature for precise cooking control.
- Each burner can be adjusted independently, allowing for different cooking zones and precise temperature control for various foods.

Image 5.1: The spacious cooking area of 1776 cm² accommodates various foods.

Image 5.2: The lid features an integrated thermometer for temperature monitoring, and burners have independent controls.
6. Maintenance
6.1. Cleaning
- After Each Use: Allow the grill to cool completely. Scrape off any food residue from the grill grates using a grill brush.
- Grease Collector: The removable grease collector should be emptied and cleaned regularly to prevent grease fires. Pull out the tray, dispose of grease, and wash with warm soapy water.
- Exterior Surfaces: Wipe down exterior surfaces with a damp cloth and mild detergent. Avoid abrasive cleaners.
- Burners: Periodically check burner ports for blockages (e.g., spider webs, food debris). Use a wire brush or paperclip to clear any obstructions.
6.2. Storage
- When not in use, disconnect the gas cylinder and store it in a well-ventilated area, away from direct sunlight or heat sources.
- Store the grill in a dry, protected area. Using a grill cover is recommended to protect it from weather elements.

Image 6.1: The practical design includes a removable grease tray for easy cleaning and an Oxford 600D fabric cover for the lower shelf.
7. Troubleshooting
| Problem | Possible Cause | Solution |
|---|---|---|
| Burner fails to light | No gas flow; clogged burner port; faulty igniter. | Check gas cylinder connection and supply valve. Perform a gas leak test. Clean burner ports. Ensure igniter electrode is clean and properly positioned. |
| Low flame or uneven heat | Low gas pressure; partially clogged burner ports; regulator issue. | Ensure gas cylinder is not empty. Clean burner ports. Check regulator for proper function and connection. |
| Gas smell detected | Gas leak. | Immediately turn off gas supply. Perform a gas leak test (Section 4). Do not use the grill if a leak is present. Contact customer support. |
| Side burner connection issues | Improper assembly; damaged gas line. | Carefully re-check all connections for the side burner. Ensure the gas line is not bent or damaged. If issues persist or gas escapes, discontinue use and contact customer support. |
| Missing or damaged parts | Manufacturing defect; shipping damage. | Do not attempt to use the product. Contact Outsunny customer support for replacement parts or assistance. |
8. Specifications
| Brand | Outsunny |
| Model Number | 846-167V40BK |
| Product Dimensions (L x W x H) | 108 cm x 54 cm x 97 cm |
| Cooking Surface Area | 1776 cm² |
| Total Heating Power | 9.5 Kilowatts |
| Number of Main Burners | 3 |
| Number of Side Burners | 1 |
| Fuel Type | Butane, Propane |
| Ignition System | Piezoelectric |
| Material | ABS, Alloy Steel, Stainless Steel |
| Color | Black |
| Product Weight | 15.5 Kilograms |
| Assembly Required | Yes |
| Recommended Use | Outdoors |
| Country of Origin | China |

Image 8.1: The grill features a side table, spice rack, and lower shelf for efficient storage.

Image 8.2: Detail of the integrated spice rack for convenient access to seasonings.
9. Warranty and Support
- Product Warranty: This Outsunny Gas BBQ comes with a 2-year product warranty. Please retain your proof of purchase for warranty claims.
- Spare Parts Availability: Spare parts for this product are available in the EU for a duration of 3 years from the date of purchase.
- Customer Support: For any questions, missing parts, or warranty claims, please contact Outsunny customer support or the retailer from whom you purchased the product. Refer to your purchase documentation for specific contact details.
Ask a question about this manual
Ask about setup, troubleshooting, compatibility, parts, safety, or missing instructions. Manuals+ will review the question and use this page’s manual context to help answer it.