1. Introduction
The XAUCY V521 OBD2 Diagnostic Scanner is a professional automotive tool designed to assist car owners and mechanics in diagnosing vehicle issues. This manual provides detailed instructions on how to set up, operate, and maintain your V521 scanner to effectively read and clear engine fault codes, monitor real-time data, and perform various diagnostic tests.
This device is compatible with most cars based in the United States (1996 and newer), EU and Asia (2000 and newer) that support OBD II and CAN protocols.
2. Product Overview
2.1 Key Features
- Comprehensive engine diagnostics including fault code reading and clearing.
- MIL (Malfunction Indicator Lamp) reset.
- Freeze frame data display.
- I/M readiness status check.
- Real-time data streaming for various engine parameters.
- Vehicle information retrieval.
- Battery voltage reading.
- Mode 6 diagnostics for advanced on-board monitoring.
- Oxygen sensor testing.
- Performance testing (acceleration, braking, distance).
- Cloud print function for diagnostic reports.
- Multi-language support (11 languages including English, German, French, Spanish, Italian, Russian, Finnish, Dutch, Chinese, Japanese, Portuguese).
2.2 Device Components and Interface
The V521 scanner features a 2.8-inch color display and intuitive button layout for easy navigation.

Image 1: Front view of the XAUCY V521 OBD2 Diagnostic Scanner, showing the screen and control buttons.
- Display Screen: 2.8-inch color display for viewing diagnostic data.
- OBDII+EOBD+CAN Indicator Lights:
- Green Light: Indicates a successful connection to the vehicle.
- Yellow Light: Indicates connection failure or a pending fault code.
- Red Light: Indicates a fault code has been found.
- F1 Button: Quick access to read current fault codes.
- F2 Button: Quick access to I/M readiness state.
- EXIT Button: Used to go back or exit current menu.
- OK Button: Used for confirmation.
- Direction Keys (Up, Down, Left, Right): For navigating through menus and options.
- OBD-II Connector: Standard 16-pin connector for connecting to the vehicle's OBD-II port.

Image 2: The V521 scanner highlighting its support for 9 diagnostic modes and 9 protocols, along with various functions like reading fault codes, vehicle information, and performance tests.
3. Setup and Initial Connection
- Locate the OBD-II Port: The OBD-II port is typically located under the dashboard on the driver's side of the vehicle. Refer to your vehicle's owner's manual if you cannot find it.
- Connect the Scanner: Insert the V521 scanner's OBD-II connector firmly into the vehicle's OBD-II port.
- Start the Vehicle: Turn the vehicle's ignition to the "ON" position or start the engine. The scanner will power on automatically.
- Verify Connection: Observe the indicator lights on the scanner. A green light indicates a successful connection. If the yellow or red light illuminates, check the connection or refer to the troubleshooting section.
Video 1: This video demonstrates the initial setup process, including connecting the V521 scanner to the vehicle's OBD-II port and starting the car to establish a connection. It also shows the indicator lights and basic menu navigation.
4. Operating Instructions
4.1 Reading and Clearing Fault Codes
- From the main menu, select "OBD/EOBD" or press the F1 button to quickly read fault codes.
- The scanner will link to the vehicle and display any detected trouble codes.
- To clear codes, navigate to the "Erase Codes" option from the main menu or within the "OBD/EOBD" section and confirm. This will turn off the Malfunction Indicator Lamp (MIL).
4.2 Data Stream
The "Data Stream" function allows you to view real-time operational parameters of the vehicle's engine. This can help in identifying intermittent problems or verifying repairs.
- From the main menu, select "Data Stream".
- Choose "View the data" to see a list of available parameters such as engine RPM, coolant temperature, fuel system status, vehicle speed, and more.
- Use the direction keys to scroll through the data.

Image 3: The V521 scanner displaying real-time data streaming, showing various sensor values and their graphical representation for intuitive monitoring.
4.3 DTC Lookup
The "DTC Lookup" feature provides definitions for diagnostic trouble codes (DTCs), helping you understand the meaning of a fault code without needing external resources.
- From the main menu, select "DTC LOOKUP".
- Enter the specific DTC using the direction keys to change digits and the OK button to confirm.
- The scanner will display the definition of the entered code.

Image 4: The V521 scanner demonstrating the fault code query function, showing how to input a code like P01A0 and receive its definition.
4.4 Cloud Print
The "Cloud Print" function allows you to generate a QR code containing diagnostic data. You can then scan this QR code with your mobile phone to view, save, or print the diagnostic report.
- From the main menu, select "Cloud Print".
- Choose the type of data you wish to print (e.g., DTC, Data Stream, Freeze Frame).
- A QR code will be displayed on the scanner screen.
- Scan the QR code with your smartphone to access the diagnostic report.

Image 5: The V521 scanner demonstrating its Cloud Printing function, where a QR code is generated for diagnostic data, which can then be scanned by a phone to view a detailed report.
4.5 Battery Voltage Reading
Monitor your vehicle's battery voltage directly from the scanner.
- From the main menu, select "Voltage".
- The current battery voltage will be displayed on the screen.
4.6 System Setup
Customize the scanner's settings to your preference.
- From the main menu, select "Setup".
- Options include:
- Language: Select your preferred language.
- Unit of Measure: Switch between metric and imperial units.
- Contrast: Adjust screen contrast.
- Beep: Turn the audible beep on or off.
- Color Scheme: Change the display's color theme.
- About: View device information.
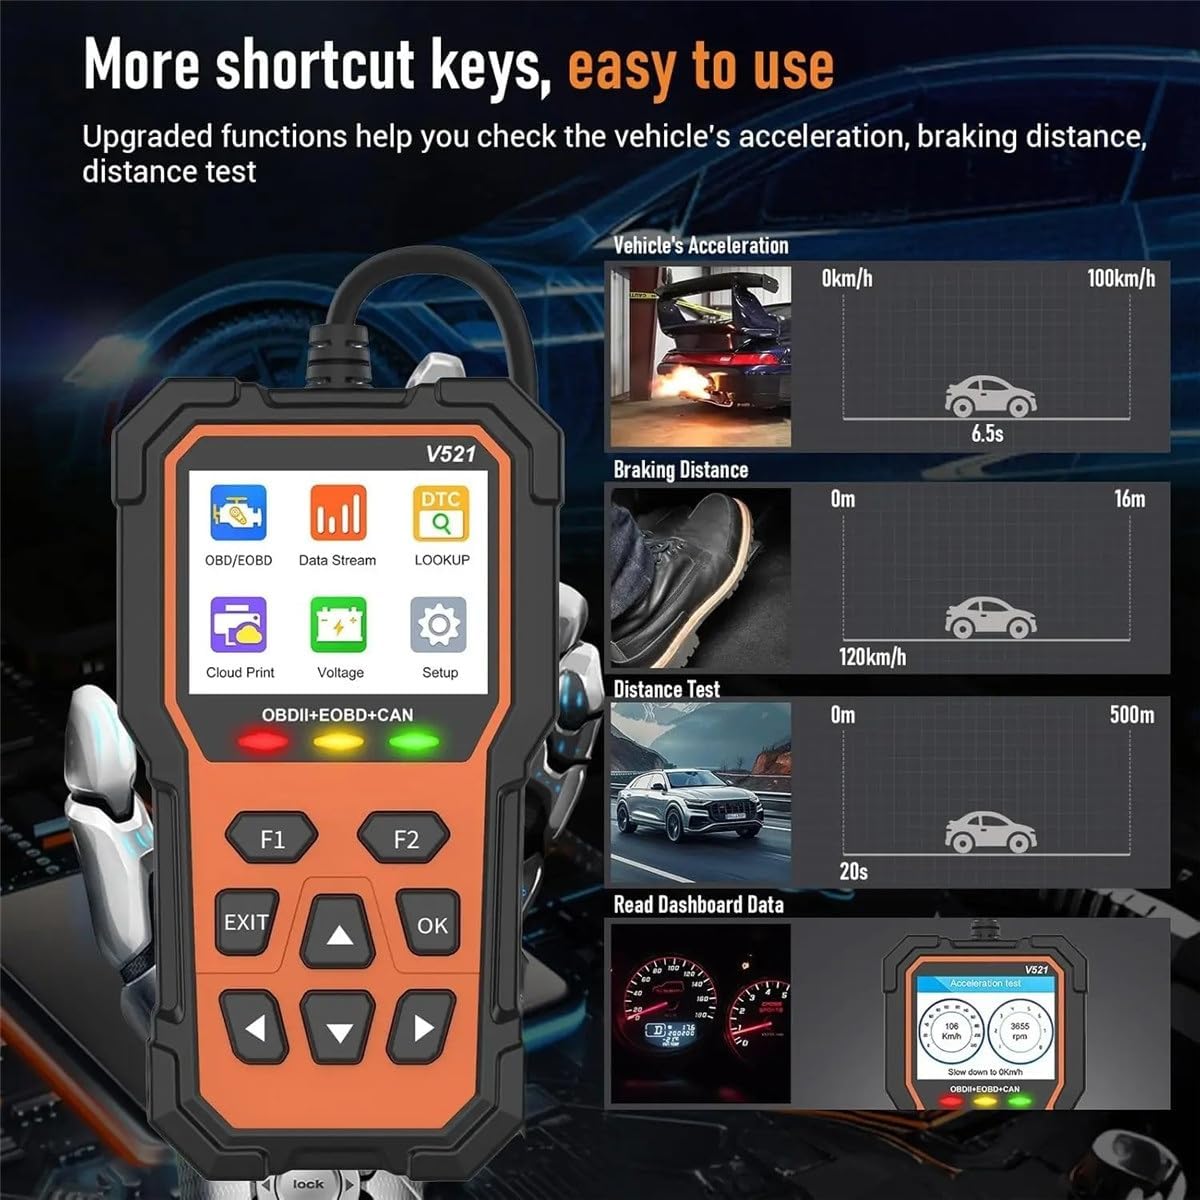
Image 6: The V521 scanner displaying its shortcut keys and illustrating performance testing features like vehicle acceleration, braking distance, and distance tests.
5. Specifications
| Working Voltage | DC 9-16V |
| Operating Current | 34~51mA |
| Operating Environment Temperature | -20℃ ~ 60℃ |
| Storage Temperature | -20℃ ~ 60℃ |
| Overall Dimensions | 173 x 91.7 x 25mm |
| Supported Languages | English, German, French, Spanish, Italian, Russian, Finnish, Dutch, Chinese, Japanese, Portuguese |
| Item Weight | 10.6 ounces |
6. Troubleshooting
- No Power/Screen Blank:
- Ensure the OBD-II connector is securely plugged into the vehicle's port.
- Verify the vehicle's ignition is in the "ON" position or the engine is running.
- Check the vehicle's fuse for the OBD-II port (refer to your vehicle's manual).
- Connection Error (Yellow Light):
- Unplug and re-plug the scanner.
- Ensure the vehicle supports OBD-II protocols (most vehicles from 1996 onwards in the US, 2000 in EU/Asia).
- Try the scanner on another compatible vehicle to rule out a scanner issue.
- Cannot Clear Codes:
- Ensure the ignition is in the "ON" position (engine off or running, depending on vehicle).
- Some persistent faults may require multiple drive cycles or professional repair before codes can be permanently cleared. If the underlying issue is not resolved, the code will reappear.
- Slow Data Refresh:
- This can sometimes occur with older vehicles or specific vehicle protocols. Ensure no other diagnostic tools are connected.
7. Warranty and Support
For warranty information, please refer to the documentation included with your product packaging or contact XAUCY customer support directly. Keep your purchase receipt as proof of purchase.
If you encounter any issues not covered in this manual or require further assistance, please contact XAUCY customer service through their official website or the contact information provided with your product.