
Introduction
The VanSmaGo DWB-01 8th Gen Galaxy Star Projector transforms any room into a mesmerizing planetarium. This device projects realistic celestial scenes, including planets, galaxies, and nebulae, using interchangeable film discs. It features customizable mood lighting, a timer function, and adjustable projection settings to create a unique atmospheric experience.
Safety Instructions
- Ensure the projector is placed on a stable, flat surface to prevent accidental falls.
- Do not look directly into the projection lens when the device is operating, as the bright light may cause eye discomfort.
- Keep the device away from water or other liquids to avoid electric shock or damage.
- Do not disassemble or attempt to repair the device yourself. Contact customer support for assistance.
- Use only the provided Type-C data cable for power. Ensure the power source meets the specified voltage (5 Volts).
- Keep out of reach of small children to prevent choking hazards from small parts like film discs.
- Operate the projector in a dark environment for optimal projection clarity. Avoid using it with other lights on.
Package Contents
Verify that all items are present in the package:
- 1 x VanSmaGo DWB-01 Galaxy Star Projector
- 10 x Film Discs (including Solar System, Earth, Moon, Saturn, Pillars of Creation, Virgo Supercluster, Wormhole, Spiral Galaxy-1, Spiral Galaxy-2, and Jellyfish)
- 1 x Type-C Data Cable
- 1 x User Manual

Image: The package contents laid out, showing the projector, a box of 10 film discs, a Type-C USB cable, and the user manual.
Setup
- Power Connection: Connect the provided Type-C data cable to the projector's power port and plug the other end into a compatible 5V USB power adapter (not included).
- Placement: Place the projector on a stable surface, such as a table or nightstand. The optimal projection distance is between 6.56 ft (2m) and 9.84 ft (3m) for a projection area of 135.19 sq.ft to 255.64 sq.ft.
- Angle Adjustment: The projector features a 360° rotatable angle, allowing you to project onto ceilings, walls, or floors. Adjust the projector head to your desired angle.
Video: Product Overview and Features
Video: This video provides a comprehensive overview of the VanSmaGo 8th Gen Galaxy Projector, demonstrating its features and various projection scenes.
Operating Instructions
Film Disc Installation
- Open the film disc tray located on the side of the projector.
- Carefully insert the desired film disc into the tray. Ensure the disc is properly seated.
- Close the film disc tray.

Image: A visual guide illustrating the steps to insert and remove film discs from the projector.
Controls and Functions
The projector features several buttons for easy control:
- Projection Power Button: Turns the main projection on/off.
- Timer Button (0.5H, 1H, 2H): Sets the automatic shut-off timer for 30 minutes, 1 hour, or 2 hours.
- Rotation Speed Button (S-, S+): Adjusts the rotation speed of the projected image.
- Night Light Brightness Adjustment Button: Controls the brightness of the base mood light.
- Night Light Color Adjustment Button: Cycles through 7 color gradients and static color options for the base mood light.
- Night Light Power Button: Turns the base mood light on/off.
- Focus Adjustment Knob: Rotate the top focusing head to adjust the clarity of the projected image.
- Film Disc Tray: Slot for inserting and removing film discs.

Image: An annotated diagram of the projector, pointing out the Projection Power Button, Timer Button, Rotation Speed Button, Night Light Brightness/Color/Power Buttons, Focus Adjustment Knob, and Film Disc Tray.
Projection Adjustment
To achieve the clearest image, rotate the top focusing head of the projector. This allows you to adjust the image clarity regardless of the projection distance. The projector supports a projection distance from 6.56ft to 9.84ft.
Mood Lighting
The projector includes a 7-color gradient mood lighting feature at its base. Use the Night Light Color Adjustment Button to cycle through various soothing gradients or select a static color to match your preference. The Night Light Brightness Adjustment Button allows you to control the intensity of this ambient light.
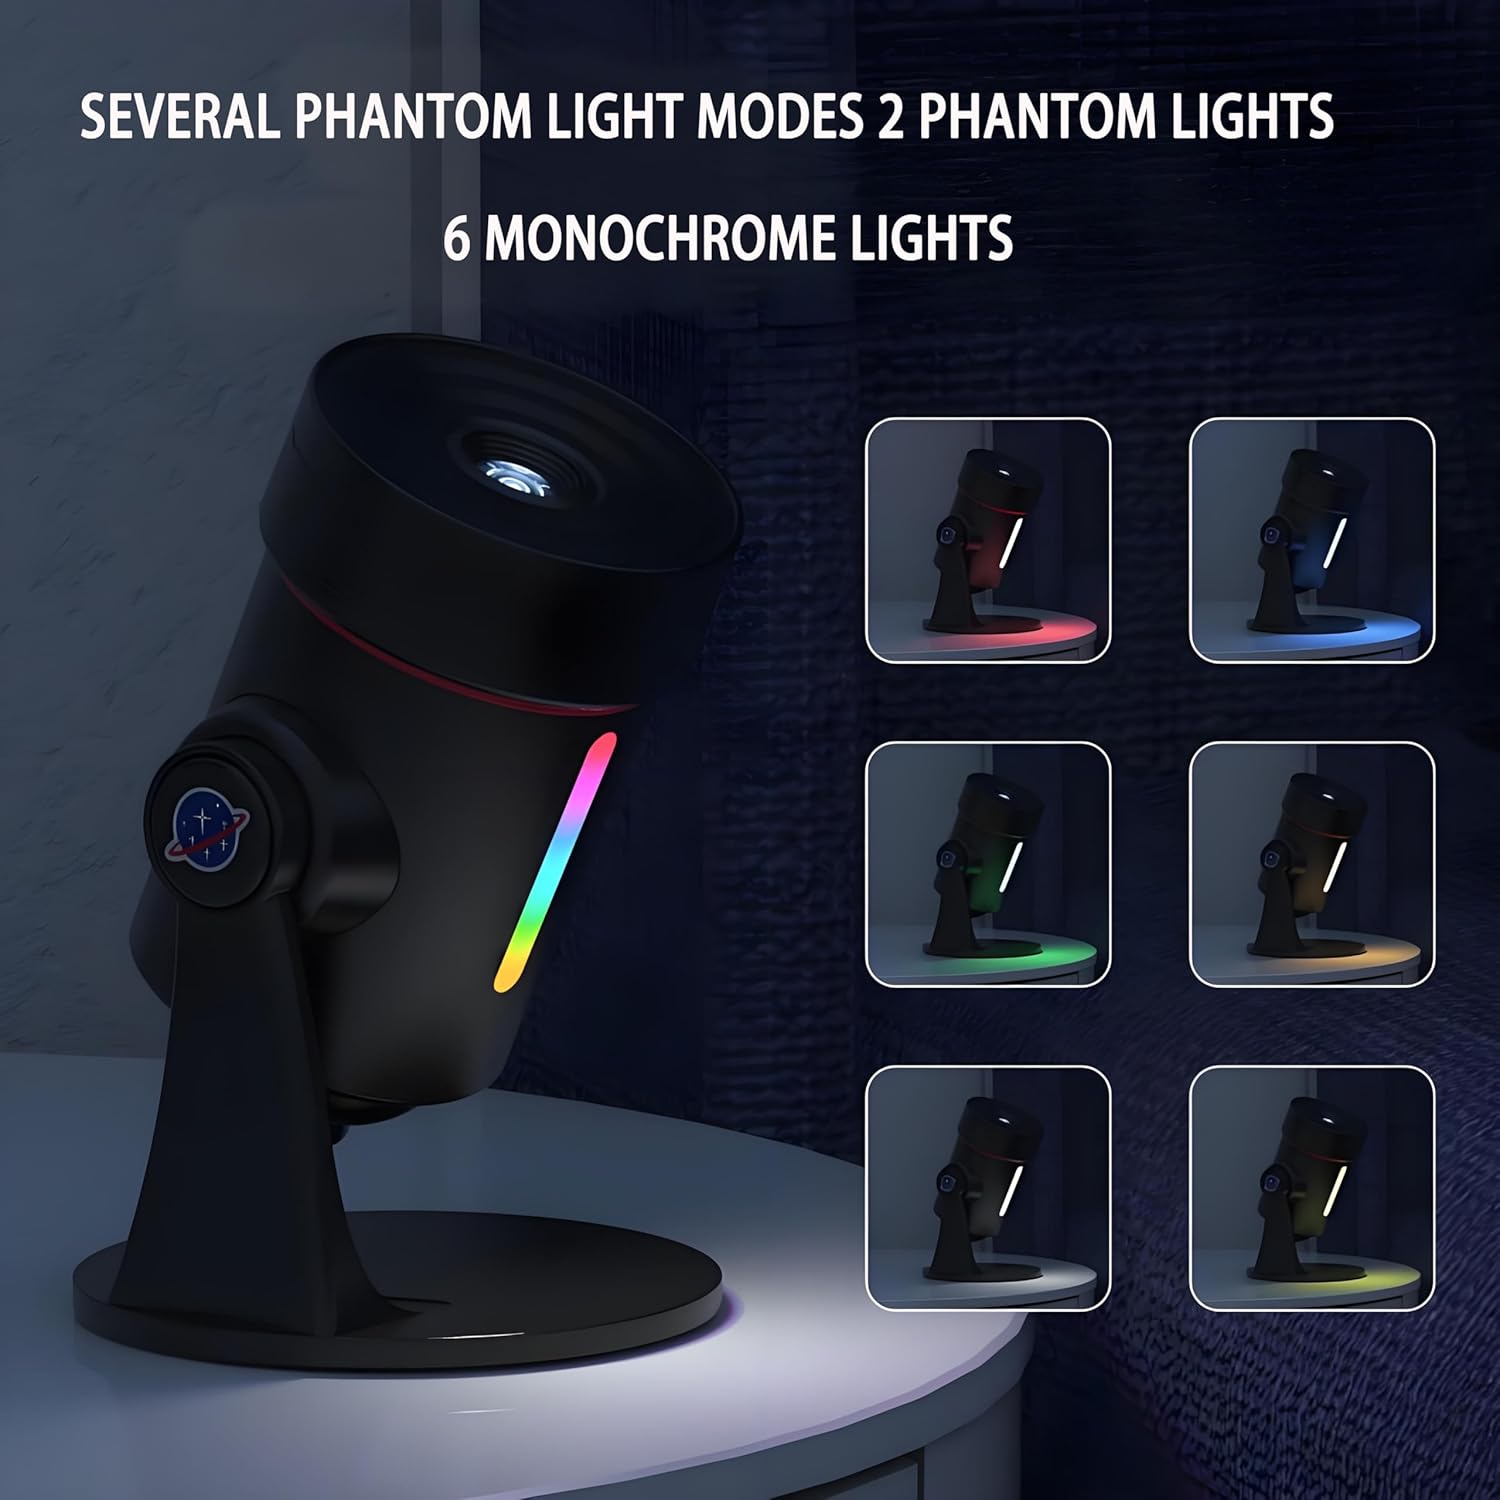
Image: The projector base illuminated with various colors, demonstrating the 7-color gradient mood lighting options.
Timer Function
Utilize the built-in timer to set the projector to automatically turn off after 0.5, 1, or 2 hours. This feature is ideal for use as a night light, allowing you to drift off to sleep without needing to manually turn off the device.
Maintenance
- Cleaning the Lens: Gently wipe the projection lens and film discs with a soft, dry, lint-free cloth to remove dust or smudges. Avoid using abrasive cleaners.
- Storage: When not in use, store the projector and film discs in a cool, dry place, away from direct sunlight and extreme temperatures. Keep film discs in their protective cases.
- General Cleaning: Wipe the exterior of the projector with a slightly damp cloth. Do not immerse the device in water.
Troubleshooting
| Problem | Possible Cause | Solution |
|---|---|---|
| No projection or dim image | Insufficiently dark room; incorrect focus; power issue. | Ensure the room is completely dark. Adjust the focus knob. Verify the power cable is securely connected and the power source is active. |
| Blurry or unclear image | Incorrect focus adjustment; dirty lens or film disc. | Rotate the focus adjustment knob until the image is clear. Clean the projection lens and film disc with a soft, dry cloth. |
| Image not rotating | Rotation function is off or speed is set to zero. | Press the Rotation Speed Button (S+ or S-) to activate rotation or adjust speed. |
| Mood light not working | Mood light is turned off. | Press the Night Light Power Button to turn on the mood light. |
Specifications
| Feature | Detail |
|---|---|
| Brand | VanSmaGo |
| Model Number | DWB-01 |
| Color | Black |
| Material | Plastic |
| Product Dimensions | 5.71"L x 4.92"W x 6.22"H |
| Item Weight | 12.3 ounces |
| Power Source | Corded Electric |
| Voltage | 5 Volts |
| Wattage | 5 watts |
| Light Source Type | Light Emitting Diode (LED) |
| Bulb Features | Color-changing, Rotation, Adjustable Speed and Timer |
| Mounting Type | Table Mount |
| Special Features | Timer |
Warranty and Support
For warranty information, technical support, or any inquiries regarding your VanSmaGo DWB-01 Galaxy Star Projector, please refer to the contact details provided with your purchase or visit the official VanSmaGo website. Keep your purchase receipt as proof of purchase for warranty claims.