1. Product Overview
The RUMDS ZD39 is an advanced digital voice recorder designed for clear audio capture in various environments, such as lectures and business meetings. It features advanced noise reduction technology and offers storage options of 32GB or 64GB.
This device is suitable for business professionals, students, and journalists who require reliable audio documentation. Its versatile design supports recording in diverse scenarios including meeting notes, classroom lectures, interviews, and memos.

Figure 1: RUMDS ZD39 Digital Voice Recorder. This image shows the device from an angled perspective, highlighting its sleek black design, display screen, and control buttons on the side.
2. Package Contents
Verify that all items are present in your package:
- 1PC ZD39 Digital Voice Recorder
- USB Cable (for charging and data transfer)
- User Manual (this document)
3. Device Layout

Figure 2: Close-up of the ZD39 recorder. This image provides a detailed view of the device's front, showing the color display, microphone icon, date/time, recording status, and playback controls. The textured grip on the lower half is also visible.
Familiarize yourself with the buttons and ports on your ZD39 recorder:
- Display Screen: Shows time, recording status, file information, and menu options.
- Recording Switch: Typically a slide switch for quick start/stop recording.
- Volume Buttons: Adjust playback volume.
- Navigation Buttons: For menu navigation and file selection.
- USB Port: For charging and connecting to a computer.
- Microphone: Integrated for audio input.
4. Setup
4.1 Charging the Device
- Connect the included USB cable to the recorder's USB port.
- Plug the other end of the USB cable into a USB power adapter (not included) or a computer's USB port.
- The battery indicator on the display will show charging status.
- Charge the device fully before first use.
4.2 Powering On/Off
- To Power On: Press and hold the Power button (or slide the power switch) until the display lights up.
- To Power Off: Press and hold the Power button (or slide the power switch) until the display turns off.
5. Operating Instructions
5.1 One-Button Recording and Saving
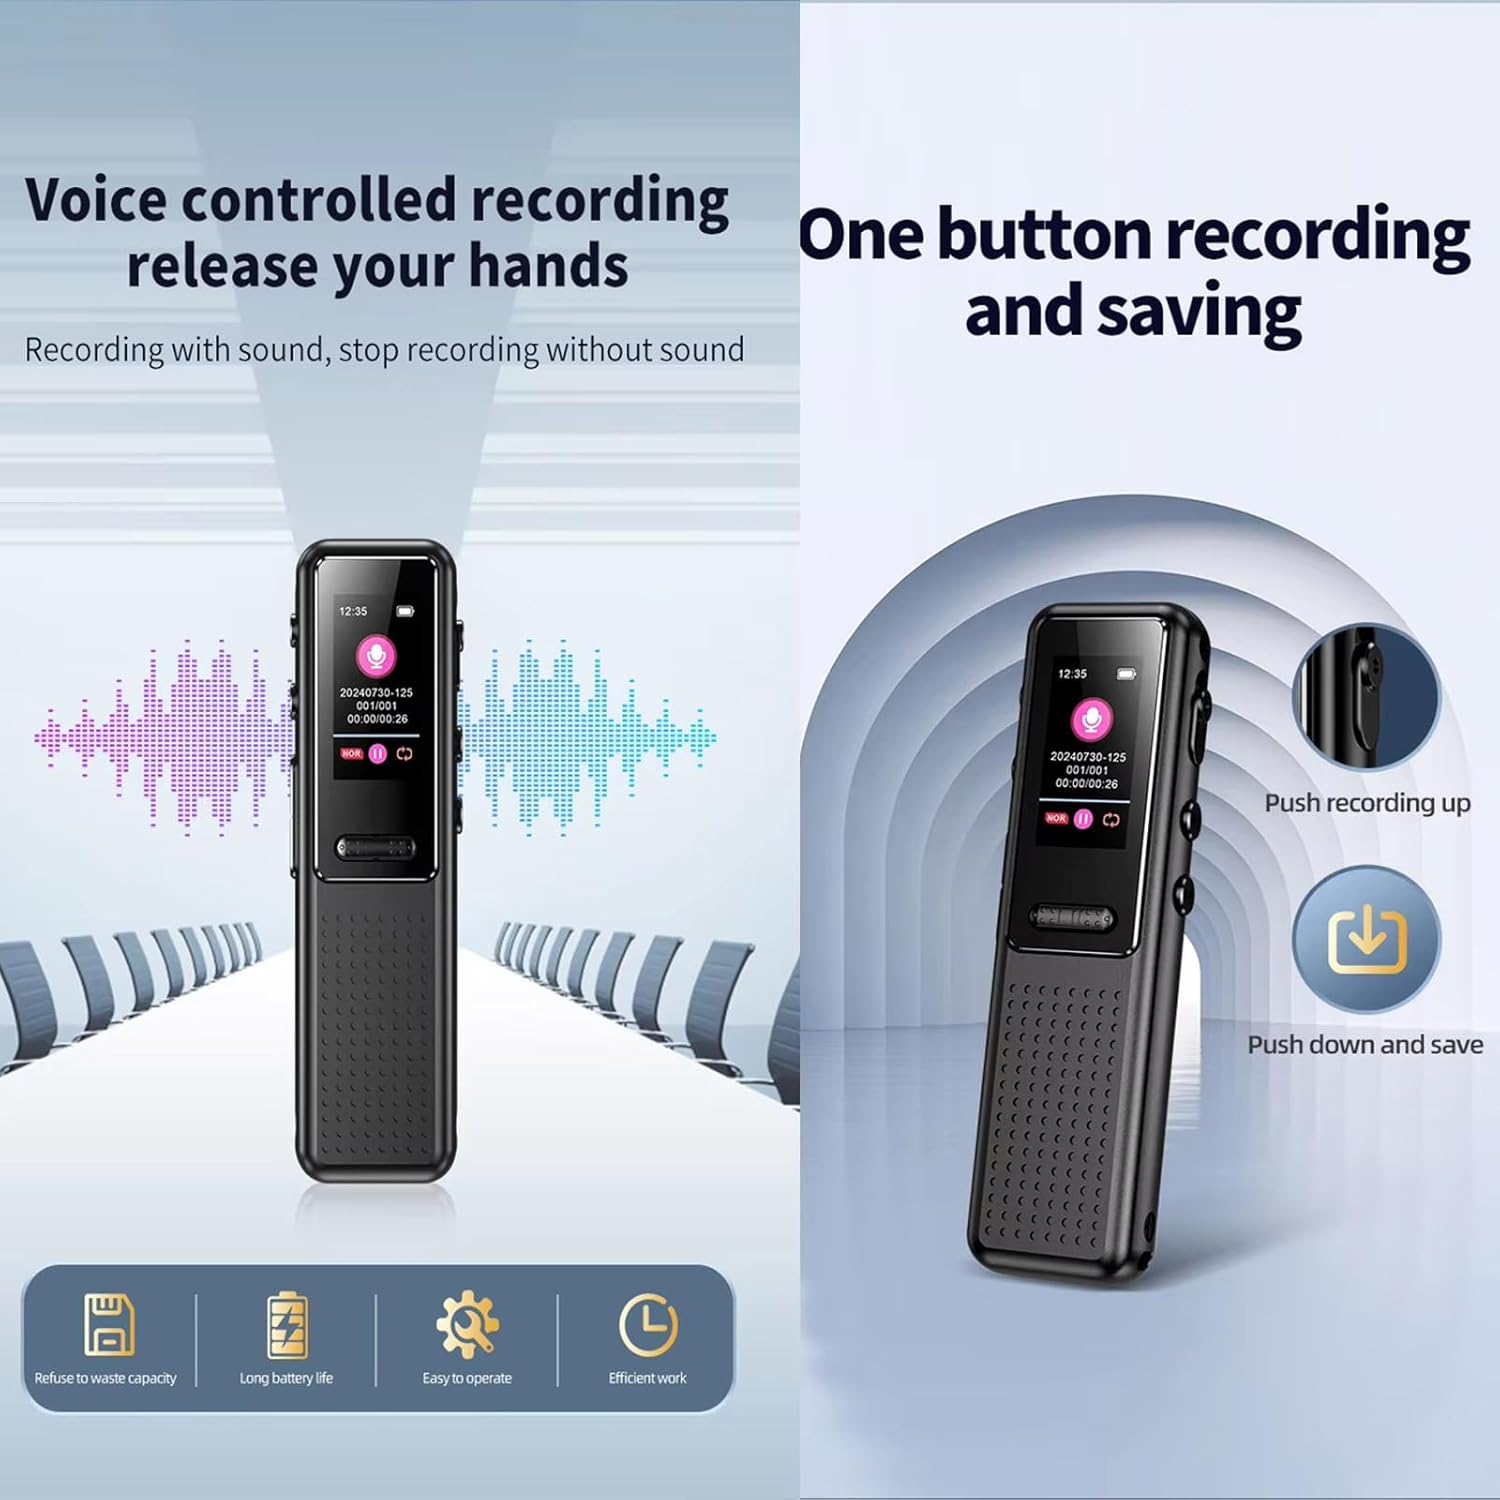
Figure 3: Voice-controlled recording and one-button recording. The left panel illustrates voice-controlled recording with a waveform, while the right panel shows the physical slide switch for 'Push recording up' and 'Push down and save'.
- To Start Recording: Locate the recording switch on the side of the device. Slide the switch upwards to initiate recording. The display will indicate that recording has started.
- To Save Recording: Slide the recording switch downwards. The current recording will be saved automatically, and the device will exit recording mode.
5.2 Voice-Controlled Recording (VOR)
The ZD39 features a voice-activated recording function, which starts recording when sound is detected and pauses when there is no sound, conserving storage space and battery life.
- Navigate to the device settings menu.
- Locate and select the 'Voice Activated Recording' or 'VOR' option.
- Enable the VOR function and adjust sensitivity if available.
- When VOR is active, recording will automatically begin when audio is present and pause when silent.
5.3 Playback
- From the main menu, navigate to 'Recordings' or 'Files'.
- Use the navigation buttons to select the desired audio file.
- Press the Play/Pause button to start playback.
- Use the Volume buttons to adjust the audio level.
5.4 Advanced Features

Figure 4: Advanced features of the ZD39 recorder. This image illustrates 'Segmented saving of audio files' (showing files saved at 30-120 minute intervals), 'Password protection function' (with a shield icon and 'Write password' prompt), and 'Appointment time recording' (showing a scheduled recording at 09:45).
- Segmented Saving: The device can be configured to automatically save audio files in segments (e.g., 30, 60, 90, 120 minutes). This helps manage long recordings. Refer to the settings menu for this option.
- Password Protection: Set a startup password to protect your audio files and prevent unauthorized access. This feature also includes low power automatic saving to prevent data loss.
- Appointment Time Recording: Schedule a single or repeated recording at a specific time. This is useful for capturing scheduled events automatically.
5.5 Noise Reduction Technology

Figure 5: 360-degree surround sound recording and AI noise reduction. This image shows the recorder in a meeting setting, emphasizing its ability to capture sound from all directions and reduce ambient noise for clearer audio.
The ZD39 incorporates advanced noise reduction technology, including AI noise reduction, to filter out environmental, human, and mechanical noise. This optimizes voice clarity, making it a reliable tool for professional use. It supports 360-degree surround sound recording and can capture clear audio from up to 100 meters.

Figure 6: Noise reduction performance. This graph illustrates the reduction of ambient noise compared to voice clarity, demonstrating the effectiveness of the 1536 kbps non-destructive recording and noise reduction technology.
6. Connecting to a Computer
To transfer files or manage recordings, connect the ZD39 to your computer:
- Ensure the recorder is powered on.
- Connect the recorder to your computer using the provided USB cable.
- The recorder will appear as a removable disk drive on your computer.
- You can now drag and drop files to and from the device.
- Safely eject the device from your computer before disconnecting the USB cable.
7. Maintenance
- Keep the device dry. Do not expose it to moisture or liquids.
- Clean the device with a soft, dry cloth. Do not use abrasive cleaners or solvents.
- Avoid extreme temperatures. Store the device in a cool, dry place.
- Do not drop or subject the device to strong impacts. Its metal construction provides durability, but excessive force can cause damage.
- Regularly back up important recordings to a computer or cloud storage.
8. Troubleshooting
- Device not powering on: Ensure the device is fully charged. Connect it to a power source and try again.
- Cannot record: Check if the storage is full. Delete unnecessary files or transfer them to a computer. Ensure the recording switch is in the correct position.
- Poor audio quality: Ensure the microphone is not obstructed. Reduce ambient noise if possible. Check the noise reduction settings.
- Device not recognized by computer: Try a different USB port or cable. Ensure the device is powered on when connected.
- Files lost: The device features low power automatic saving. However, always ensure the device has sufficient battery during critical recordings.
9. Specifications
| Feature | Description |
|---|---|
| Model | ZD39 |
| Dimensions | Approximately 77 x 22.60 x 13.30 mm (3.03 x 0.89 x 0.51 in) |
| Weight | Approximately 41g |
| Material | Metal construction |
| Storage Capacity | 32GB / 64GB (depending on model) |
| Display | Color display |
| Data Transfer | USB 2.0 |
| Noise Reduction | Advanced AI Noise Reduction |
| Recording Range | Up to 100 meters (Ultra Long Distance Recording) |
| Recording Features | Voice-controlled recording, One-button recording, Segmented saving, Appointment time recording |
10. Warranty and Support
For warranty information and technical support, please refer to the documentation provided at the time of purchase or contact RUMDS customer service through their official website or the retailer where the product was purchased.