
1. Introduction
Thank you for choosing the ESTE Ravix 10 Kg Front-Load Washing Machine. This manual provides essential information for the safe and efficient use, installation, operation, and maintenance of your appliance. Please read these instructions carefully before using the washing machine and keep them for future reference.
2. Safety Information
To prevent damage to the appliance or injury to persons, observe the following safety precautions:
- Ensure the washing machine is properly grounded to prevent electrical shock.
- Do not allow children to play with or operate the appliance. Activate the child safety lock feature when necessary.
- Do not install the washing machine in areas exposed to freezing temperatures.
- Always unplug the appliance before cleaning or performing any maintenance.
- Do not overload the washing machine beyond its 10 Kg capacity.
- Keep flammable materials away from the appliance.
- Ensure water inlet and drain hoses are securely connected to prevent leaks.
3. Product Overview
3.1 Components
- Control Panel: For program selection and function settings.
- Detergent Dispenser: For adding detergent and fabric softener.
- Drum: Stainless steel drum for washing laundry.
- Door: Front-loading door for accessing the drum.
- Drain Filter: Located at the bottom front for easy access and cleaning.
3.2 Control Panel
The control panel features a central program selection dial and various function buttons. Refer to the images below for a visual guide.

Figure 1: Front view of the ESTE Ravix washing machine, showing the main body, control panel, and front-loading door.
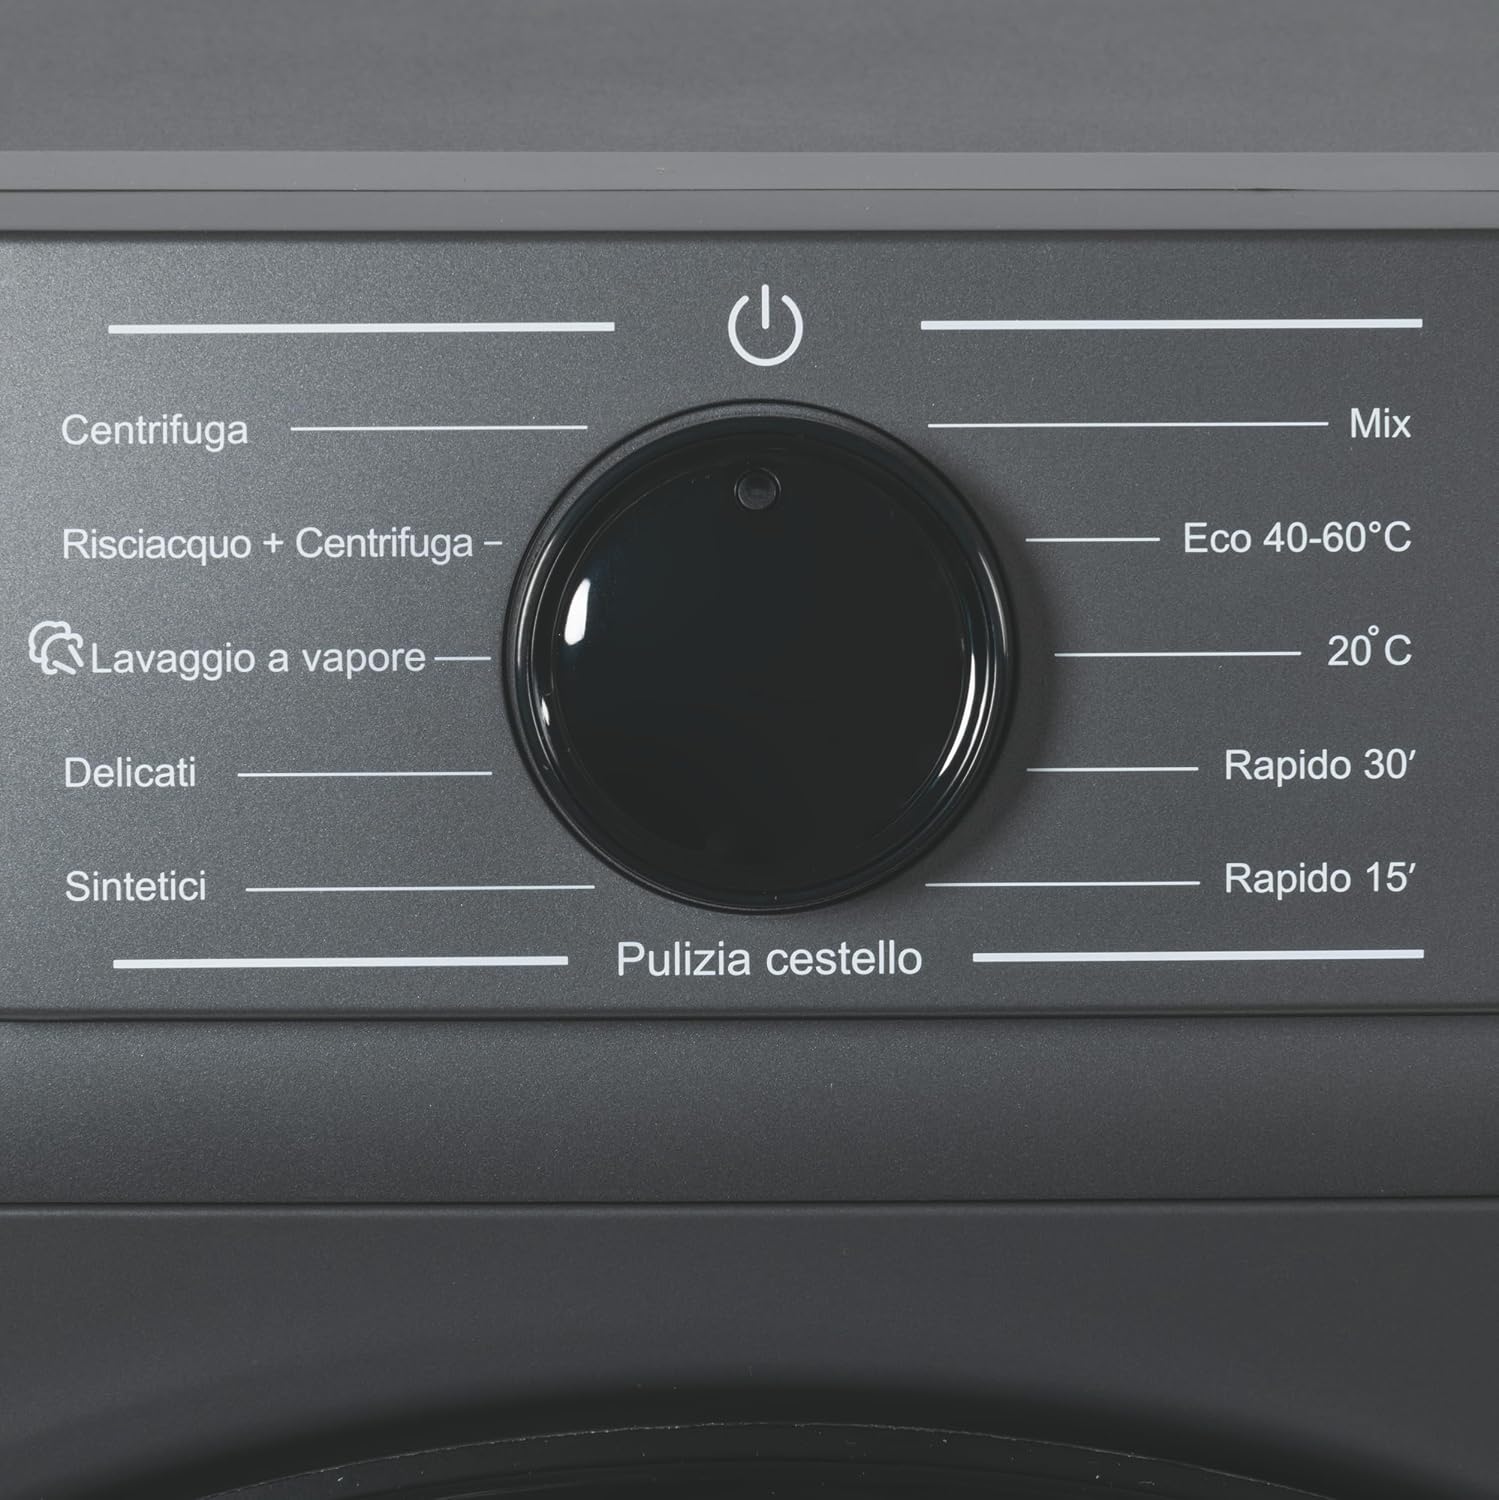
Figure 2: Detailed view of the program selection dial, indicating various wash cycles such as Centrifuga, Lavaggio a vapore, Delicati, Sintetici, Mix, Eco 40-60°C, 20°C, Rapido 30', and Rapido 15'.

Figure 3: Close-up of the control buttons, including Temperature (Temp.), Delayed Start (Avvio ritardato), and Start/Pause (Avvio/Pausa) with an instruction for pausing to add/remove laundry.

Figure 4: Diagram showing the control panel layout with labels for each program and function, including load capacity (10 KG), delayed start function, and energy class A.
4. Installation
4.1 Unpacking
Carefully remove the washing machine from its packaging. Ensure all packing materials, including transit bolts at the rear, are removed before installation. Keep packaging for potential future transport.

Figure 5: The washing machine packaging box, displaying the Kooper brand, 10 Kg capacity, and various handling symbols.
4.2 Placement and Leveling
Place the washing machine on a firm, level floor. Adjust the leveling feet to ensure the appliance is stable and does not wobble. This prevents excessive vibration and noise during operation.
4.3 Water Connection
Connect the water inlet hose to a cold water tap with a 3/4-inch thread. Ensure the connection is tight to prevent leaks. The washing machine is designed for cold water fill only.
4.4 Drain Connection
Position the drain hose into a standpipe or over the edge of a sink, ensuring it is securely fixed to prevent displacement during draining. The drain hose should be at a height between 60 cm and 100 cm from the floor.

Figure 6: Side view of the washing machine, illustrating the corrugated design of the side panel and the attached water inlet and drain hoses at the rear.
4.5 Electrical Connection
Plug the power cord into a grounded electrical outlet. Ensure the voltage and frequency match the specifications of your appliance. Do not use extension cords or adapters.
5. Operating Instructions
5.1 Loading Laundry
Open the washing machine door and load laundry into the drum. Do not exceed the maximum 10 Kg capacity. Overloading can reduce washing performance and damage the machine. Close the door firmly.
5.2 Adding Detergent
Pull out the detergent dispenser drawer. Add the appropriate amount of detergent to the main wash compartment and, if desired, fabric softener to its designated compartment. Close the drawer gently.
5.3 Program Selection
Turn the program selection dial to choose one of the 11 available wash programs:
- Centrifuga: Spin cycle only.
- Risciacquo + Centrifuga: Rinse and spin cycle.
- Lavaggio a vapore: Steam wash for enhanced cleaning and hygiene.
- Delicati: For delicate fabrics.
- Sintetici: For synthetic items.
- Pulizia cestello: Drum cleaning program.
- Mix: For mixed loads.
- Eco 40-60°C: Energy-efficient wash for cottons and mixed items at 40-60°C.
- 20°C: Cold wash program.
- Rapido 30': Quick wash program (30 minutes).
- Rapido 15': Super quick wash program (15 minutes).
5.4 Special Functions
After selecting a program, you can choose additional functions using the buttons:
- Temperature (Temp.): Adjust the wash temperature.
- Delayed Start (Avvio ritardato): Postpone the start of the wash cycle by 2, 4, 6, or 8 hours.
- Child Safety Lock: Press and hold the relevant button combination (refer to control panel diagram) to activate/deactivate.
5.5 Starting a Cycle
Press the Start/Pause (Avvio/Pausa) button to begin the selected wash cycle. The indicator light will illuminate.
5.6 Ending a Cycle
Once the cycle is complete, the machine will signal with an audible alert or indicator light. The door will unlock after a short delay. Unload the laundry promptly.
6. Maintenance and Cleaning
Regular maintenance ensures optimal performance and extends the lifespan of your washing machine.
6.1 Drum Cleaning
Use the dedicated 'Pulizia cestello' (Drum Cleaning) program periodically to clean the drum and remove detergent residues and odors. Run this cycle without laundry.
6.2 Detergent Dispenser Cleaning
Remove the detergent dispenser drawer and rinse it under running water to clear any accumulated detergent or softener residue. Clean the housing of the dispenser with a brush.
6.3 Exterior Cleaning
Wipe the exterior surfaces of the washing machine with a soft, damp cloth. Do not use abrasive cleaners or solvents.
6.4 Drain Filter Cleaning
Regularly check and clean the drain filter located at the bottom front of the machine. This prevents blockages and ensures proper drainage. Refer to the detailed instructions in the full manual for safe removal and cleaning.
7. Troubleshooting
Before contacting customer service, refer to the following table for common issues and their solutions:
| Problem | Possible Cause | Solution |
|---|---|---|
| Washing machine does not start | Power cord unplugged; Door not closed; Program not selected; Start/Pause button not pressed. | Check power connection; Close door firmly; Select a program; Press Start/Pause. |
| No water intake | Water tap closed; Water inlet hose kinked; Water supply cut off. | Open water tap; Straighten hose; Check water supply. |
| Water not draining | Drain hose kinked or blocked; Drain filter clogged. | Straighten or clear drain hose; Clean drain filter. |
| Excessive vibration/noise | Transit bolts not removed; Appliance not level; Overloaded drum. | Remove transit bolts; Adjust leveling feet; Reduce laundry load. |
8. Specifications
Key technical specifications for the ESTE Ravix washing machine:
| Feature | Specification |
|---|---|
| Brand | ESTE (Kooper) |
| Model Name | Ravix |
| Model Number | 5920739 |
| Capacity | 10 Kg |
| Maximum Spin Speed | 1400 rpm |
| Energy Efficiency Class | A |
| Noise Level (Spin) | 76 Decibel |
| Dimensions (W x D x H) | 60 cm x 52 cm x 85 cm |
| Installation Type | Under worktop |
| Drum Material | Stainless Steel |
| Number of Programs | 11 |
| Special Features | Steam Wash, Drum Cleaning, Quick Wash, Delayed Start |

Figure 7: Dimensions of the washing machine, showing a width of 60 cm, a depth of 52 cm, and a height of 85 cm.

Figure 8: EU Energy Label for the Kooper washing machine, indicating an energy class A, 51 kWh per 100 cycles, 10.0 kg capacity, 3 hours 58 minutes cycle duration, 42 liters of water consumption, and a noise level of 72 dB. For more details, visit eprel.ec.europa.eu/qr/2178761.
9. Warranty and Support
This ESTE Ravix washing machine is covered by the legal warranty applicable in your region. Please retain your proof of purchase for any warranty claims.
For technical assistance, spare parts, or further information, please contact your retailer or the authorized service center. Contact details can typically be found on your purchase receipt or the brand's official website.