Important Safety Information
Please read all instructions carefully before using this monitor. Keep this manual for future reference.
- Do not expose the monitor to rain or moisture to prevent fire or electric shock hazards.
- Do not open the monitor casing. There are no user-serviceable parts inside. Refer all servicing to qualified personnel.
- Place the monitor on a stable, flat surface to prevent it from falling.
- Ensure proper ventilation around the monitor. Do not block ventilation openings.
- Use only the power adapter and cables provided by the manufacturer.
- Unplug the monitor from the power outlet during lightning storms or when unused for long periods.
Package Contents
Verify that all items are present in your package:
- abytespark 34-inch Curved WQHD 165Hz Gaming Monitor
- DisplayPort (DP) Cable (x1)
- HDMI Cable (x1)
- Power Adapter (x1)
- Power Cord (x1)
- Monitor Stand Components (Base and Neck)
- User Manual (This document)
Product Overview
Monitor Ports
The monitor features various ports for connectivity to your devices.
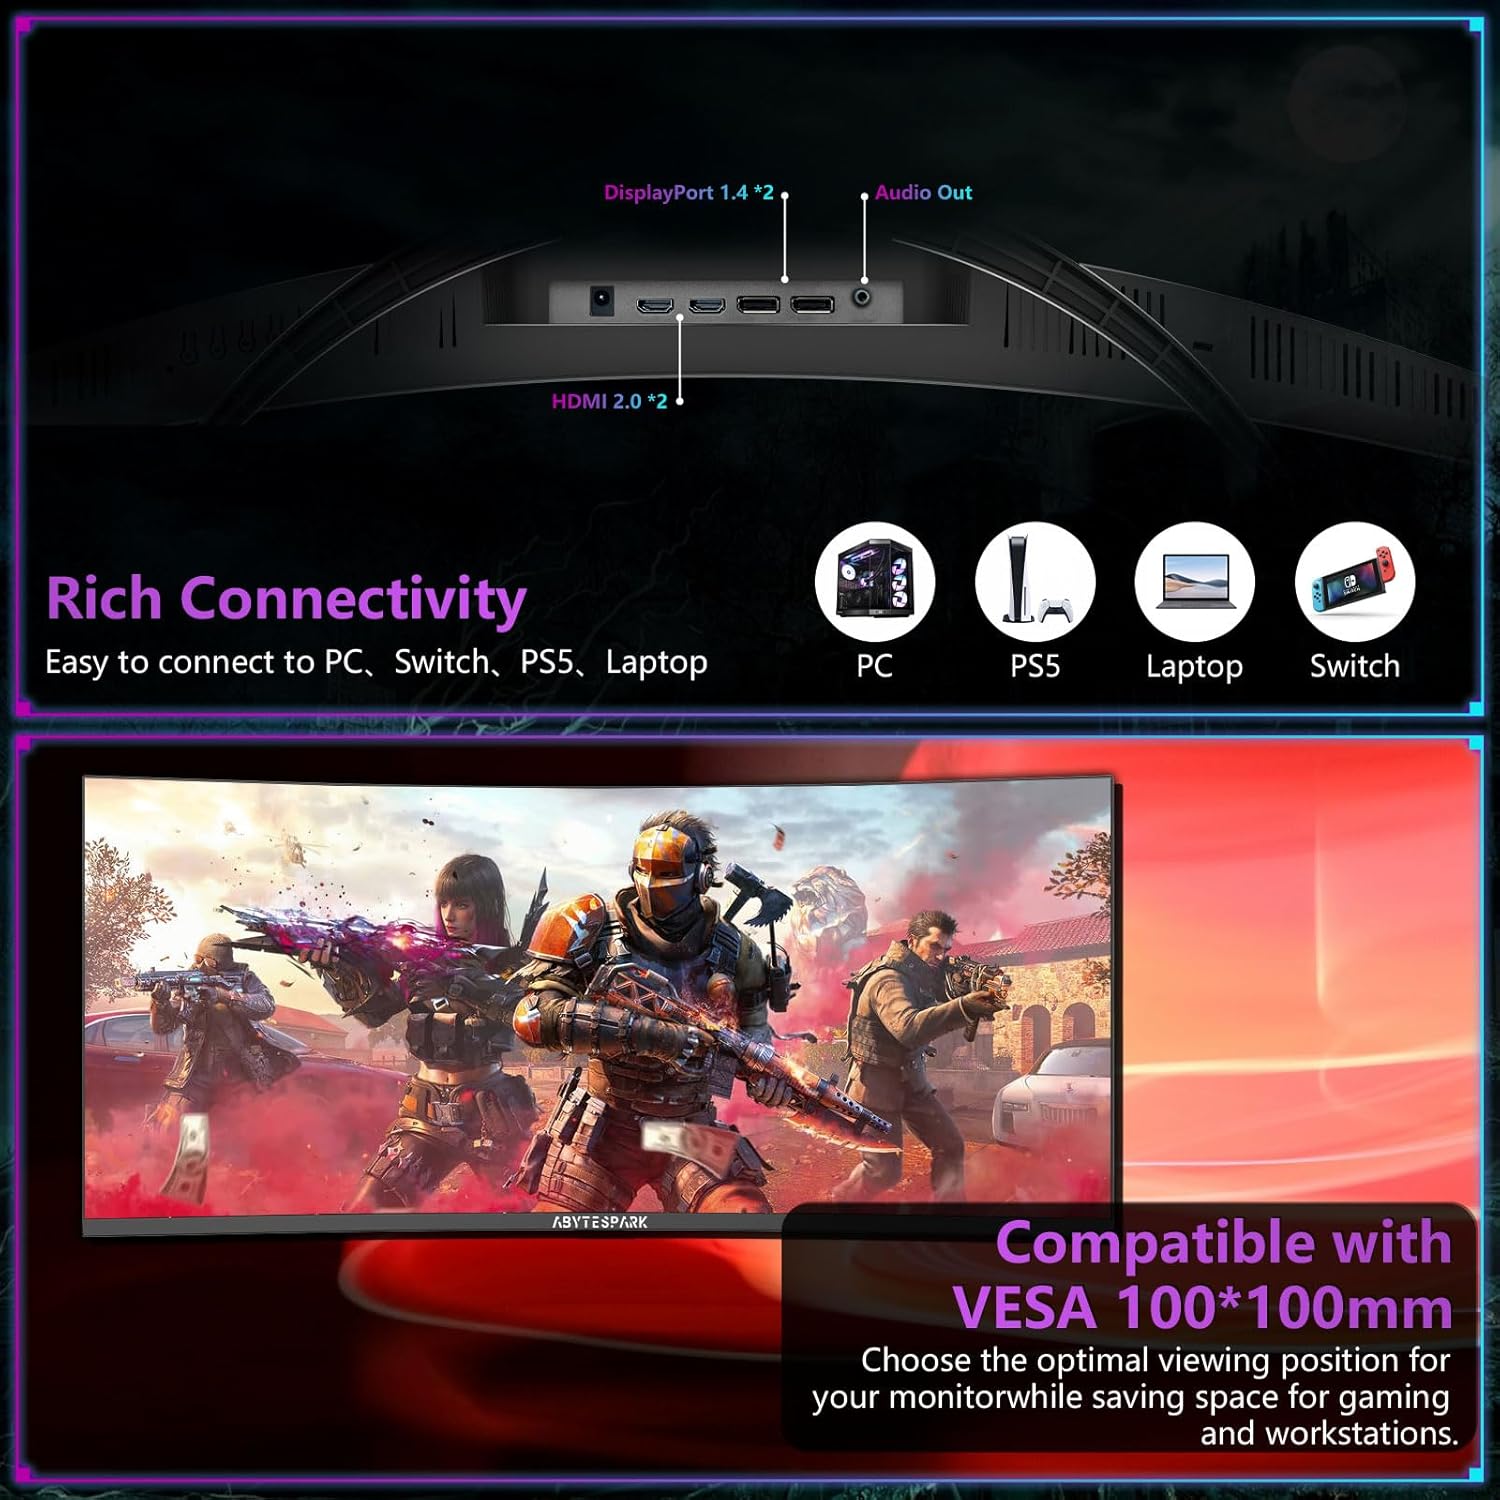
Figure 1: Monitor Connectivity Ports. Includes DisplayPort 1.4 (x2), HDMI 2.0 (x2), and Audio Out.
- DisplayPort 1.4 (x2): Connects to a computer's graphics card for high-resolution and high-refresh-rate video input.
- HDMI 2.0 (x2): Connects to computers, gaming consoles (e.g., PS5, Switch), or other multimedia devices.
- Audio Out: Connects to external speakers or headphones.
- Power Input: Connects to the provided power adapter.
Control Buttons
The monitor's On-Screen Display (OSD) menu is controlled by buttons located on the bottom right side of the monitor.

Figure 2: Monitor Control Buttons. From left to right: Menu/Select, Down/Volume, Up/Brightness, Exit/Input Menu, and Power On/Off.
- M (Menu/Select): Opens the OSD menu or confirms a selection.
- < (Down/Volume): Navigates down in the OSD menu or decreases volume.
- > (Up/Brightness): Navigates up in the OSD menu or increases brightness.
- E (Exit/Input Menu): Exits the OSD menu or opens the input source selection menu.
- Power Button: Turns the monitor on or off, or puts it into standby mode.
Setup
Stand Assembly
- Carefully remove the monitor and stand components from the packaging.
- Attach the stand neck to the monitor panel. Ensure it clicks securely into place or is fastened with screws if applicable.
- Attach the stand base to the stand neck. Tighten any screws to secure the base.
- Place the assembled monitor on a stable, flat surface.
VESA Mounting
The monitor supports VESA 100 x 100mm mounting for alternative stands or wall mounts.

Figure 3: Monitor Rear View with VESA Mounting Points and Dimensions.
- If the stand is already attached, remove it by following the reverse of the assembly instructions.
- Attach your VESA-compatible mount (not included) to the 100 x 100mm mounting holes on the back of the monitor using appropriate screws.
- Ensure the mount is securely fastened before releasing the monitor.
Connecting to a Device
- Connect one end of the provided DisplayPort or HDMI cable to the corresponding port on your computer's graphics card or gaming console.
- Connect the other end of the cable to an available DisplayPort or HDMI input on the monitor (refer to Figure 1).
- For audio output, connect external speakers or headphones to the Audio Out jack on the monitor (optional).
Power On
- Connect the power adapter to the monitor's power input.
- Plug the power cord into a wall outlet.
- Press the Power Button on the monitor to turn it on.
Operating Instructions
On-Screen Display (OSD) Menu
Use the control buttons (Figure 2) to navigate and adjust monitor settings.
- Press the M button to open the OSD menu.
- Use the < and > buttons to navigate through menu options.
- Press the M button to select an option or enter a sub-menu.
- Use the < and > buttons to adjust values or select settings.
- Press the M button to confirm changes.
- Press the E button to exit the current menu or the OSD entirely.
Input Source Selection
To switch between connected devices:
- Press the E button when the OSD is not active to open the input source menu.
- Use the < and > buttons to select the desired input (e.g., DP1, DP2, HDMI1, HDMI2).
- Press the M button to confirm your selection.
Picture-in-Picture (PIP) and Picture-by-Picture (PBP)
The monitor supports displaying content from multiple sources simultaneously.
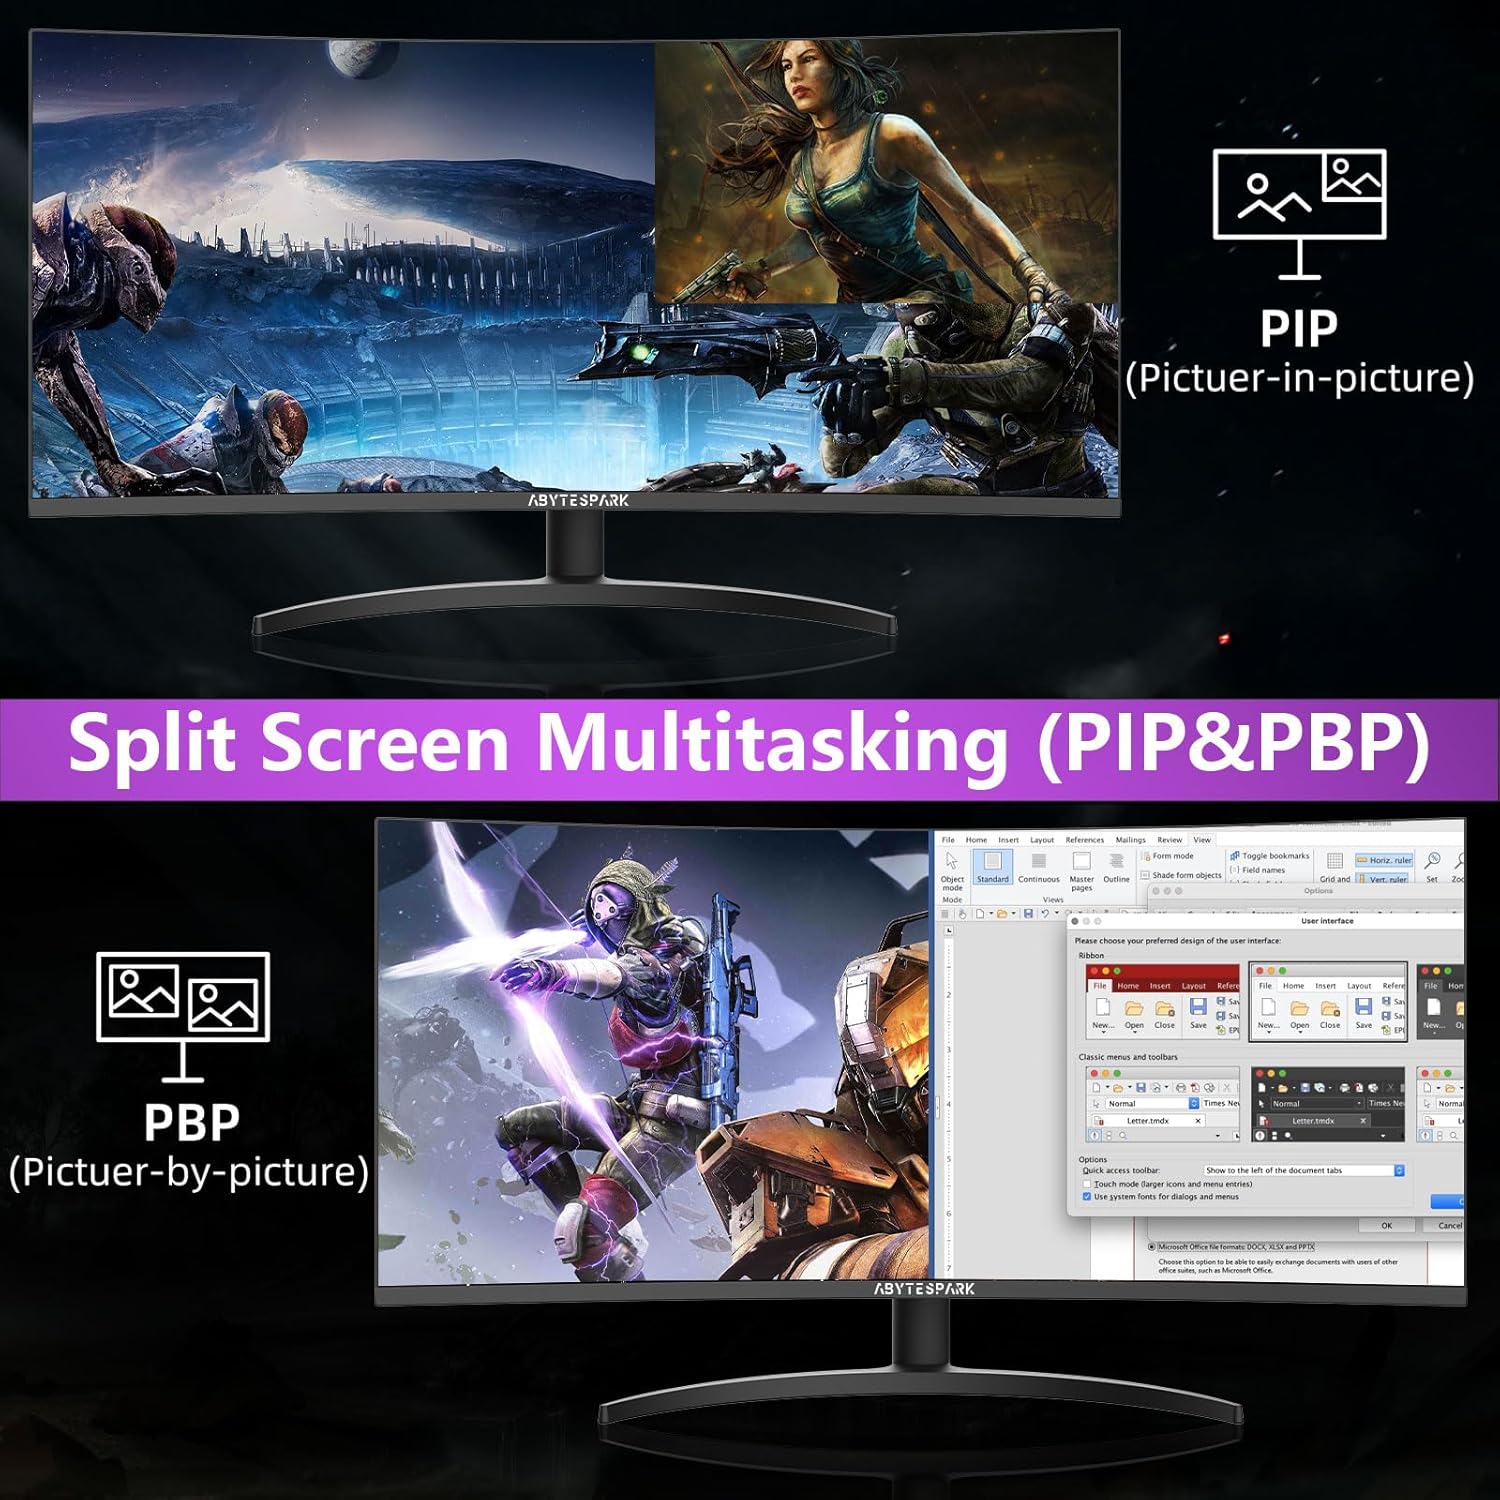
Figure 4: PIP (Picture-in-Picture) and PBP (Picture-by-Picture) Modes.
- PIP: Displays the main input source across the full screen, with a secondary input source shown in a smaller window.
- PBP: Divides the screen into multiple sections, each displaying a different input source.
- Access PIP/PBP settings through the OSD menu to configure modes, sizes, and positions.
Refresh Rate and Adaptive Sync
The monitor supports a 165Hz refresh rate and Adaptive Sync technologies (AMD FreeSync and NVIDIA G-Sync compatible) for smoother visuals.

Figure 5: Adaptive Sync (FreeSync/G-Sync) in action, reducing stutter and tearing.
- Ensure your graphics card supports Adaptive Sync (FreeSync or G-Sync).
- Enable Adaptive Sync in your graphics card control panel and in the monitor's OSD menu (if available).
- For optimal performance, use a DisplayPort cable.
Display Modes
The monitor offers various preset display modes optimized for different content types, including Game, Movie, Photo, and Standard. Select your preferred mode via the OSD menu to enhance your viewing experience.
- Game: Optimized for gaming with enhanced contrast and response times.
- Movie: Enhances color and brightness for cinematic viewing.
- Photo: Provides accurate color reproduction for image viewing and editing.
- Standard: General-purpose mode suitable for everyday use.
Ergonomic Adjustments
Adjust the monitor for optimal viewing comfort. The stand allows for tilt and height adjustments.
- Tilt: Gently tilt the monitor screen forward or backward (-5° to 15°) to find your preferred viewing angle.
- Height Adjustment: Adjust the monitor's height up or down to align the top of the screen with your eye level.
Maintenance
Cleaning the Monitor
- Always unplug the monitor before cleaning.
- Use a soft, lint-free cloth lightly dampened with water or a non-abrasive screen cleaner.
- Do not spray cleaner directly onto the screen.
- Avoid using benzene, thinner, ammonia-based cleaners, or abrasive materials.
Storage
- If storing the monitor for an extended period, unplug it and store it in a cool, dry place.
- Use the original packaging for protection during storage or transport.
Troubleshooting
| Problem | Possible Cause | Solution |
|---|---|---|
| No image on screen |
|
|
| Image flickering or tearing |
|
|
| No sound from built-in speakers or Audio Out |
|
|
| Dead pixel(s) on screen |
|
|
| Cannot achieve 165Hz refresh rate |
|
|
Specifications
| Feature | Detail |
|---|---|
| Screen Size | 34 inches (33.99 inches standing screen display size) |
| Panel Type | Curved Ultra Wide WQHD |
| Curvature | 1500R |
| Resolution | 3440 x 1440 pixels |
| Aspect Ratio | 21:9 |
| Refresh Rate | 165Hz |
| Response Time | 1ms (MPRT) |
| HDR Support | HDR400 |
| Color Gamut | DCI-P3 95%, 99% sRGB |
| Display Colors | 1.07 Billion |
| Brightness | 350 Candela (cd/m²) |
| Adaptive Sync | AMD FreeSync & NVIDIA G-Sync Compatible |
| Connectivity | 2 x DisplayPort 1.4, 2 x HDMI 2.0, 1 x Audio Out |
| Ergonomics | Tilt (-5° to 15°), Height Adjustment (0-110mm) |
| VESA Compatibility | 100 x 100mm |
| Built-in Speakers | Yes |
| Product Dimensions (L x W x H) | 31.8 x 8.7 x 17.2 inches (with stand) |
| Item Weight | 15.27 pounds |
Warranty and Support
abytespark provides the following warranty and support for this product:
- Refund Policy: Please refer to the retailer's refund policy for details.
- Free Replacement Warranty: A free replacement is offered within 30 days from the order date for qualifying issues.
- Lifetime Technical Support: Contact abytespark customer service for technical assistance throughout the product's lifespan.
For warranty claims or technical support, please contact abytespark customer service through the platform where the product was purchased or visit the official abytespark website for contact information.