
Introduction
This manual provides detailed instructions for the assembly, operation, and maintenance of your iabifo 61" L Shaped Computer Gaming Desk. Please read all instructions carefully before beginning assembly and retain this manual for future reference. This desk is designed to provide a spacious and functional workspace with integrated features for gaming and home office use.

Image: The iabifo 61" L Shaped Computer Gaming Desk, showcasing its spacious design, monitor stand, integrated power outlets, and LED lighting. The desk is set up with a gaming PC, monitors, and various accessories.
Safety Information
- Ensure all parts are present and undamaged before assembly. Do not use if any parts are missing or broken.
- Assemble the desk on a soft, clean surface to prevent scratches.
- Tighten all screws and bolts securely, but do not overtighten. Periodically check and retighten fasteners as needed.
- Do not exceed the maximum weight capacity of the desk surfaces or shelves.
- Keep children and pets away during assembly. Small parts can be a choking hazard.
- For electrical components (USB ports, AC outlets, LED lights), ensure proper power supply and avoid liquid spills. Disconnect power before cleaning or moving the desk.
Package Contents
Before assembly, verify that all components listed below are included in your package. Refer to the assembly diagram for visual identification of parts.
- Desk Panels (Main Desk, Side Panel, Monitor Stand)
- Metal Frame Components (Legs, Support Bars)
- Drawers (Fabric Drawers, Small Drawer)
- Integrated Power Strip (2 AC Outlets, 2 USB Ports)
- LED Light Strip with Controller
- Adjustable Feet
- Hardware Pack (Screws, Allen Wrench, etc.)
- Assembly Manual
Assembly Instructions
Follow these steps carefully for proper assembly. It is recommended to have two people for certain steps.
Step 1: Understand Desk Orientation and Dimensions
The L-shaped design is reversible, allowing you to configure the longer side to your left or right. Familiarize yourself with the overall dimensions to plan your space.

Image: Detailed dimensions of the desk components, including the main desk (44.88"L x 19.69"W), side panel (43.31"L x 15.35"W), and overall height (29.5"H). This image helps in understanding the size and layout during assembly.

Image: Illustration demonstrating the reversible nature of the L-shaped desk, showing how the side panel with storage and drawers can be configured on either the left or right side to suit different room layouts.
Step 2: Assemble the Main Desk Frame
Attach the metal legs and support bars to the main desk panel using the provided screws. Ensure all connections are firm.
Step 3: Assemble the Side Panel with Storage
Construct the frame for the side panel, including the open storage shelves and the drawer compartments. This section can be attached to either the left or right side of the main desk.
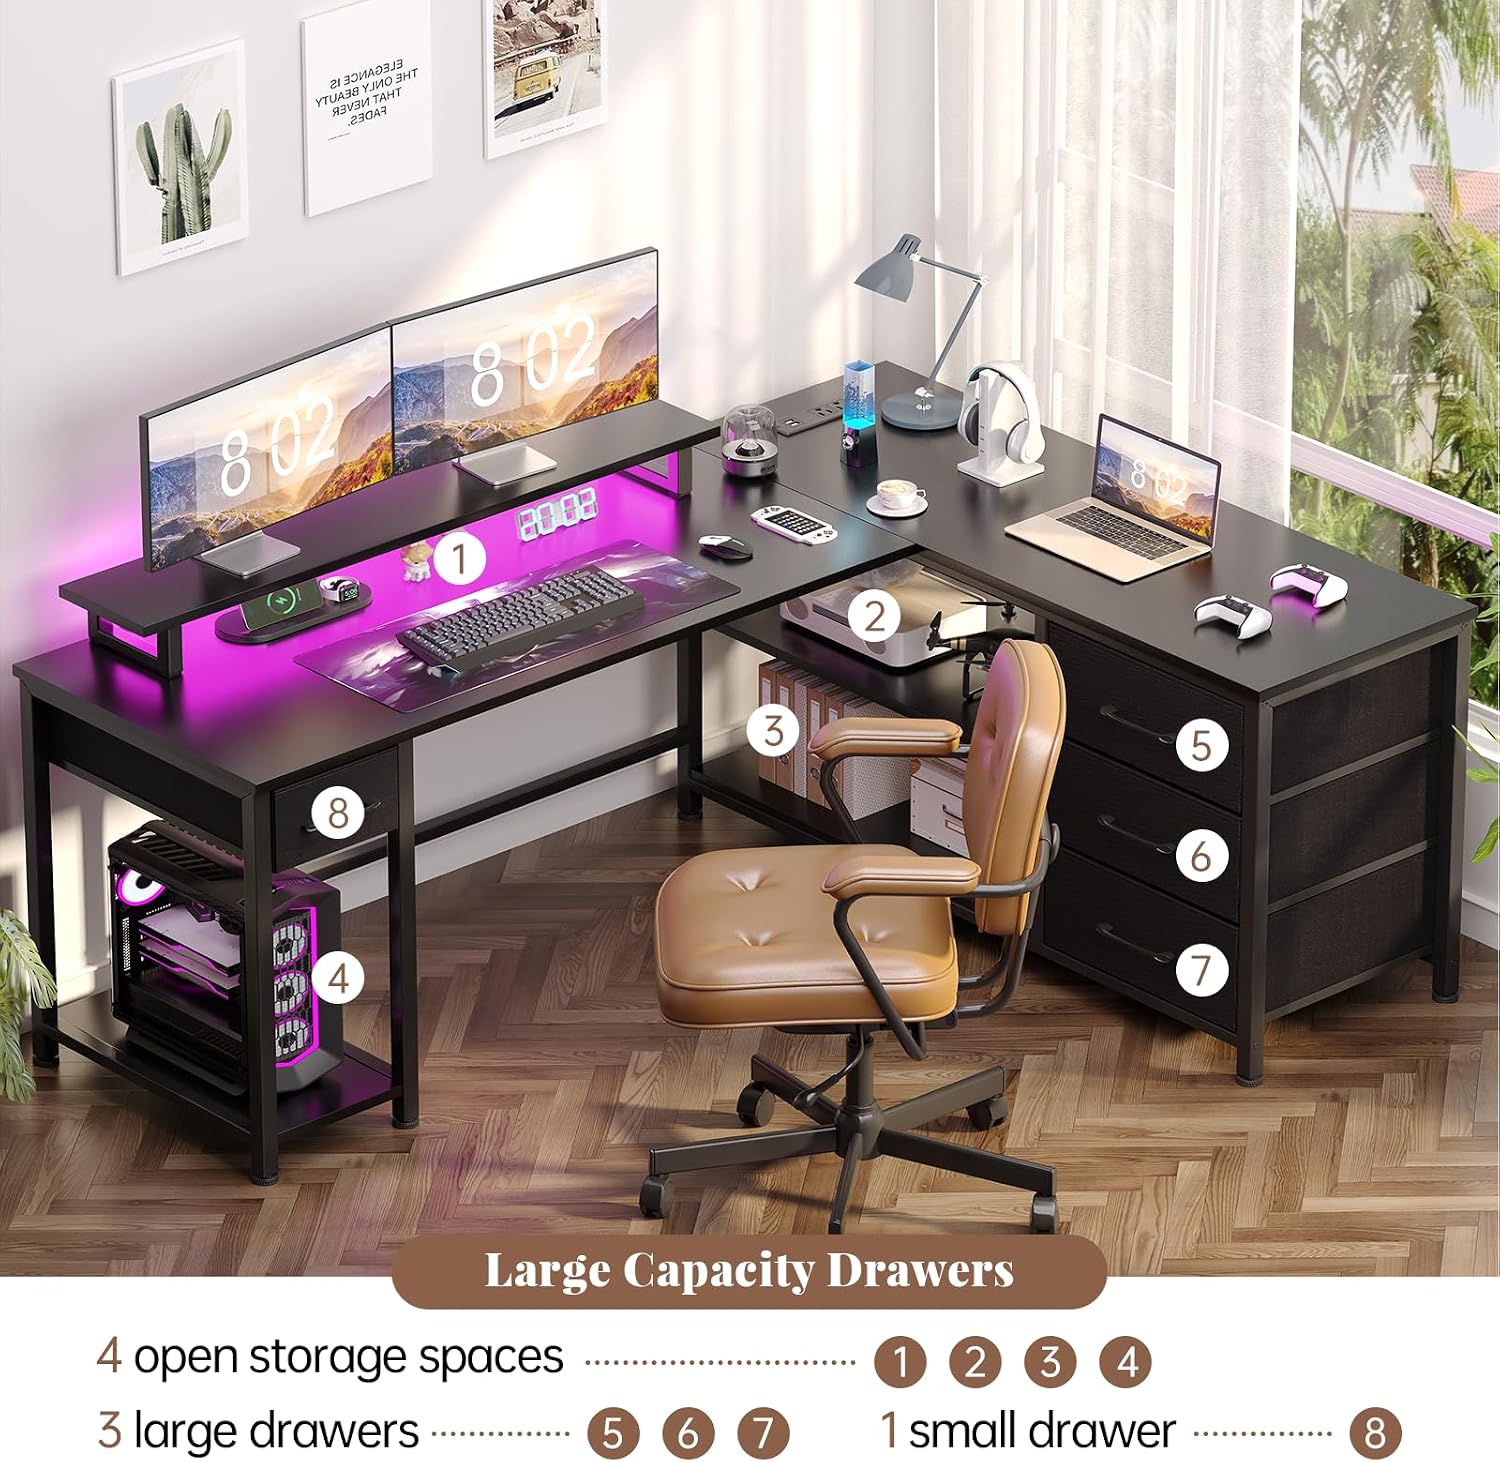
Image: A detailed view of the desk highlighting its various storage components. It shows four open storage spaces (labeled 1, 2, 3, 4), three large drawers (labeled 5, 6, 7), and one small drawer (labeled 8), illustrating the ample storage capacity.
Step 4: Install Fabric Drawers
The fabric drawers are designed for easy installation. Simply unfold them and insert the bottom panel to create a sturdy box. Slide them into the designated compartments.

Image: A three-step visual guide demonstrating the simple assembly of the fabric drawers. Step 1 shows the folded drawer, Step 2 shows it being opened, and Step 3 shows the fully assembled drawer ready for use.
Step 5: Attach Monitor Stand and Power Strip
Secure the monitor stand to the main desk surface. Install the integrated power strip into its designated slot. Ensure the power cable is routed safely.

Image: A close-up view of the desk's integrated power hub, featuring two AC outlets (125V/12A), one Type-C USB port (5V/2A), and one standard USB port (5V/2A). This allows for convenient charging of multiple devices directly from the desk.

Image: An illustration demonstrating the ergonomic benefits of the full-size monitor stand. It shows a comparison between incorrect posture (slouching) and correct posture (upright with eye-level monitor), highlighting how the stand promotes optimal comfort and productivity.
Step 6: Install LED Light Strip
Adhere the LED light strip to the underside of the monitor stand or desired location. Connect it to the power source and controller.
Step 7: Adjust Leveling Feet
Once the desk is in its final position, adjust the leveling feet at the bottom of the legs to ensure stability and prevent wobbling on uneven floors.

Image: A close-up of the desk's adjustable leveling feet, designed to provide stability and prevent wobbling on uneven surfaces. The image shows the 360-degree rotation capability for easy adjustment.
Operating Instructions
Using the Integrated Power Outlets and USB Ports
Plug the desk's main power cord into a standard wall outlet. You can then use the 2 AC outlets and 2 USB ports (1 Type-C, 1 standard USB) on the desk surface to power and charge your devices such as laptops, smartphones, and gaming equipment.
Controlling the LED Lights
The LED light strip offers multiple colors and modes. Control can be done via the included remote control or a dedicated mobile application (refer to the LED light manual for app download and pairing instructions). Features include:
- Over 60,000 DIY colors
- Built-in microphone for music sync mode
- Timing function for scheduled on/off

Image: This image illustrates the various features of the desk's LED lighting system, including over 60,000 DIY colors, built-in microphone for music sync, and a timing function. It also shows the two control methods: a mobile application and a physical remote control.
Utilizing Storage Spaces
The desk features a variety of storage options:
- Monitor Stand: Provides elevated space for monitors, freeing up desk surface.
- Open Storage Shelves: Ideal for books, decor, or frequently accessed items.
- Fabric Drawers: Three large drawers offer concealed storage for files, office supplies, or personal items.
- Small Drawer: Convenient for small accessories.
- Host Stand: Dedicated space for a computer tower.
Care and Maintenance
- Cleaning: Wipe surfaces with a soft, damp cloth. Avoid harsh chemicals or abrasive cleaners that could damage the finish. For fabric drawers, spot clean with a mild detergent if necessary.
- Dusting: Regularly dust all surfaces to prevent buildup.
- Fasteners: Periodically check all screws and bolts to ensure they remain tight. Retighten if any looseness is detected.
- Electrical Components: Keep the power strip and LED lights dry. Do not attempt to disassemble or repair electrical components yourself.
- Weight Distribution: Distribute weight evenly across the desk surface and shelves to maintain stability and prevent warping.
Troubleshooting
| Problem | Possible Cause | Solution |
|---|---|---|
| Desk is wobbly/unstable. | Uneven floor; loose fasteners. | Adjust the leveling feet at the bottom of the legs. Check and tighten all assembly screws. |
| LED lights not working. | Not plugged in; loose connection; remote battery dead; controller issue. | Ensure the LED strip is properly connected to the controller and power source. Check if the desk's main power is on. Replace remote battery. |
| USB ports/AC outlets not providing power. | Desk not plugged into wall outlet; power strip switch off; overloaded circuit. | Verify the desk's main power cord is securely plugged into a working wall outlet. Check if there's a power switch on the integrated power strip. Reduce the number of devices plugged in. |
| Drawers do not slide smoothly. | Improper assembly; obstruction. | Ensure fabric drawers are correctly assembled and inserted. Check for any items obstructing the drawer path. |
Product Specifications
| Feature | Detail |
|---|---|
| Brand | iabifo |
| Model Number | B0F4JN1MY7 |
| Overall Dimensions (L x W x H) | 60.2" x 43.3" x 29.5" |
| Main Desk Size | 44.9"L x 18.5"W |
| Side Panel Size | 43.3"L x 15.4"W |
| Color | Black |
| Material | Wood (Top), Metal (Frame), Fabric (Drawers) |
| Power Outlets | 2 AC Outlets (125V/12A) |
| USB Ports | 1 Type-C (5V/2A), 1 Standard USB (5V/2A) |
| LED Lights | Multi-color RGB with APP/Remote control, Music Sync, Timing Function |
| Storage | Monitor stand, Host stand, 2 Open shelves, 3 Large drawers, 1 Small drawer |
| Assembly Required | Yes |
| Special Features | Reversible design, Adjustable leveling feet |
Customer Support
If you encounter any issues with your iabifo gaming desk, or if you have questions regarding assembly, missing parts, or product functionality, please do not hesitate to contact our customer support team. We are committed to assisting you within 18 hours.
For assistance, please refer to the contact information provided on your purchase receipt or visit the official iabifo store page on Amazon:
Visit the iabifo Store on Amazon
Please have your model number (B0F4JN1MY7) and purchase details ready when contacting support.