Introduction
This manual provides detailed instructions for the setup, operation, and maintenance of your INNOLAND 48-Egg Incubator. Please read this guide thoroughly before operating the device to ensure optimal performance and successful hatching results.

Image: The INNOLAND 48-Egg Incubator, showcasing its transparent design, digital control panel, and external water bottle for humidity control.
Package Contents
Verify that all components are present in the package:
- Incubator Base
- Top Cover with Control Unit
- Egg Frame
- Adjustable Card Strips (for egg dividers)
- Hose Assembly (for automatic watering)
- Water Bottle (300ml)
- Power Cable
- User Manual
- A/B Water Hole Cover (yellow)

Image: A visual representation of all included components: the incubator base, top cover, egg trays, water bottle, power cable, and user manual.
Setup Instructions
- Place the Base: Place the incubator base on a flat, stable surface.
Video: "How to install the incubator" demonstrates base placement and grid installation.
Video Description: This video illustrates the initial steps of setting up the incubator, including placing the base and installing the internal grid.
- Install Grid and Egg Frame: Insert the grid into the base, ensuring the textured side faces upwards. Then, place the egg frame on top of the grid. Ensure the egg frame can slide freely left and right.
- Adjust Card Strips: Insert the provided card strips into the slots of the egg frame. Adjust the spacing of these strips according to the size of the eggs you intend to incubate. This allows for different egg types (chicken, duck, quail, goose, etc.).
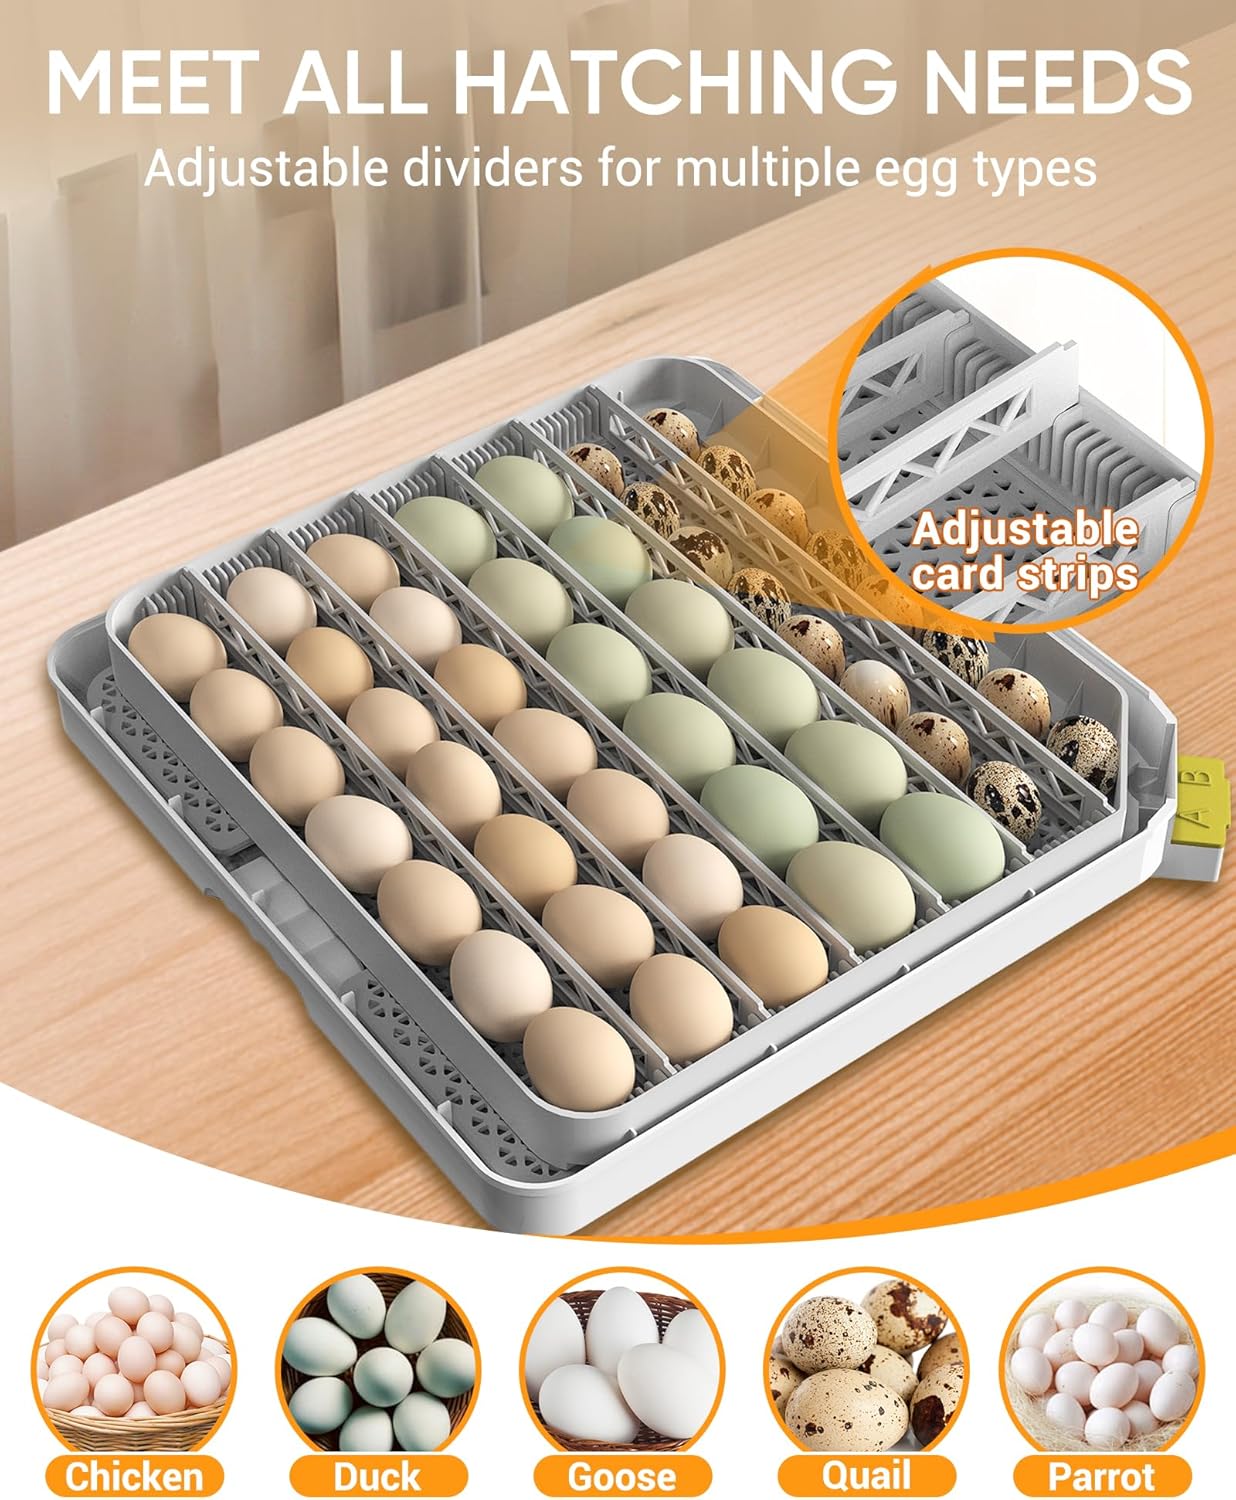
Image: The adjustable card strips within the egg tray, demonstrating how they can be configured to accommodate different egg sizes.
- Attach Hose Assembly: Take the hose assembly from the kit and install it onto the designated area on the incubator's control unit. Ensure the hose is not blocked.
- Connect Water Bottle: Fill the provided 300ml water bottle with water. Insert the long tube of the hose assembly into the water bottle, ensuring it reaches the bottom. This system provides automatic humidity control. Each refill typically lasts 5-7 days.
- Install A/B Water Tank: If additional humidity is required beyond the automatic system, or if humidity levels drop below preset, water can be manually added to the A/B tanks located at the side of the base. Use the yellow cover to access these tanks.

Image: A diagram illustrating both the smart humidity control with the external water bottle and the manual water addition points (A/B tanks).
- Close Top Cover: Carefully place the top cover onto the base. Ensure that the rotating shaft from the top cover is correctly inserted into the open slot of the egg tray. This is crucial for the automatic egg turning function.
Operating Instructions
The incubator features a digital control panel for easy monitoring and adjustment of settings.

Image: The digital control panel of the incubator, showing real-time temperature, humidity, and various setting options.
Control Panel Overview:
- Heater Indicator: Blinks during heating.
- Humidity Indicator: Blinks when adding water is in progress.
- Hatching Days Display: Shows the current incubation day (24 hours counts as 1 day).
- Auto Turning Indicator: On for auto turning eggs, blinking for turning in progress, off for the last 3 days.
- Quick Menu: Access settings for Temperature, Humidity, Hatch Days, and Egg Turning Interval.
- Egg Candling Button: Press once to turn on/off the built-in egg candler.
- Automatic Watering Test: Press once for a 20-second test. Press and hold for 3 seconds for 10 minutes of continuous watering.
- Egg Turning Test: Press the (+) button for 3 seconds to test the egg turner function.
- Factory Reset: Press (+) and (-) simultaneously for 3 seconds to reset to factory defaults.
Initial Settings:
Connect the power cable to the incubator. The unit will power on automatically. Use the Quick Menu to adjust settings as needed for your specific egg type.
Video: "How to set up the incubator function" provides a visual guide to adjusting settings.
Video Description: This video illustrates how to navigate the control panel to set temperature, humidity, hatch days, and egg turning intervals.
- Temperature Setting: Press the MENU button once. The temperature value will blink. Use the (+) or (-) buttons to set the desired temperature.
- Humidity Setting: Press the MENU button a second time. The humidity value will blink. Use the (+) or (-) buttons to set the desired humidity.
- Hatching Days Setting: Press the MENU button a third time. The hatch days value will blink. Use the (+) or (-) buttons to set the required number of days.
- Egg Turning Interval Setting: Press the MENU button a fourth time. The egg turning interval value will blink. Use the (+) or (-) buttons to set the desired egg turning interval (e.g., 60, 90, 120, 150, 180, or 210 minutes).
Egg Candler Usage:
The built-in egg candler allows you to monitor embryo development without opening the incubator.

Image: A visual guide to using the built-in egg candler, illustrating how to check embryo development at different stages.
- Place an egg over the candler light on the control panel.
- Press the Egg Candling button (light bulb icon) once to activate the light.
- Observe the egg for signs of development (e.g., visible embryo, spiderweb veins).
- Press the Egg Candling button again to turn off the light.
Ventilation:
During pre-incubation, keep the vents closed to help the incubator reach the required temperature and humidity. Open the vents during the last three days of incubation to prepare for hatching.

Image: Close-up of the ventilation switch on the incubator lid, showing its adjustable design.
Hatching Guidelines
Refer to the table below for recommended temperature and humidity levels during incubation and hatching for various egg types. Actual results may vary based on egg quality and fertilization rate.
| Egg Type | Hatching Days | During Incubation | During Hatching | Egg Weight (g) | ||
|---|---|---|---|---|---|---|
| Temp °F (±0.5) | Humidity % (±0.5) | Temp °F (±0.5) | Humidity % (±0.5) | |||
| Chicken | 21 | 100.0 (37.8°C) | 55-70 | 99.5 (37.5°C) | 65-85 | 50-60 |
| Duck | 28 | 100.0 (37.8°C) | 60-75 | 99.1 (37.3°C) | 65-85 | 80-100 |
| Goose | 30 | 99.7 (37.6°C) | 60-80 | 98.8 (37.1°C) | 65-85 | 100-120 |
| Quail | 18 | 101.3 (38.5°C) | 55-70 | 100.0 (37.8°C) | 65-85 | 30-40 |
| Pigeon | 18 | 99.5 (37.5°C) | 50-55 | 99.1 (37.3°C) | 65-70 | 17-20 |
Table: Recommended temperature and humidity levels for various egg types during incubation and hatching.
Maintenance and Cleaning
Regular cleaning ensures optimal hygiene and performance of your incubator.
- Easy Disassembly: The top control unit separates from the base, allowing for thorough cleaning.
- Washable Trays: The removable egg trays can be washed with water. Ensure they are completely dry before reassembly.
- Wipe Clean: The PVC shell of the incubator can be wiped clean with a damp cloth. Avoid direct water contact with the electrical components.

Image: Visual guide demonstrating the ease of cleaning the incubator, including wiping the top cover and washing the base.
Specifications
- Product Dimensions: 16 x 16 x 6.7 inches
- Item Weight: 8.49 pounds
- Item Model Number: 48H
- Manufacturer: Nanchang Edward Technology Co., Ltd
- Egg Capacity: 48 Chicken / 41 Duck / 96 Quail / 20 Goose eggs (approximate, varies by egg size)
- Temperature Range: 68°F to 104°F (20°C to 40°C)
- Humidity Range: 20% to 75%
- Automatic Egg Turning: Adjustable intervals (60/90/120/150/180/210 minutes)
- Features: Automatic temperature and humidity control, built-in egg candler, LED display, 360° clear view.


