1. Introduction
This manual provides detailed instructions for the installation, operation, and maintenance of your Cruxer Motion Sensor Alarm, Model 20R-PRO. This wireless motion detector system is designed to provide alerts for movement within its detection range, suitable for various applications including home security, business entry alerts, and caregiver reminders.
The system features a split unit design with independent sensors and receivers, offering flexible monitoring. It detects warm-blooded organisms and issues warnings. The sensor provides a wide detection range and can be adjusted to suit different environments.
2. Product Components
The Cruxer Motion Sensor Alarm system typically includes:
- Motion Sensor (Detector)
- Receiver (Chime Unit)
- Mounting accessories (double-sided glue, screws)
Note: USB power adapters and AAA batteries are not included.

Image: Rear view of the motion sensor showing the battery compartment for 3x AAA batteries and the USB-C interface for power. Batteries and USB cable are not included.
3. Setup and Installation
3.1 Powering the Device
Both the receiver and the sensor can be powered by either a USB power source (not included) or 3x AAA batteries (not included).
- USB Power: Connect a standard USB power adapter (5V/1A recommended) to the Micro USB port on both the sensor and receiver.
- Battery Power: Open the battery compartment on the back of the sensor and receiver and insert 3x AAA alkaline batteries, ensuring correct polarity.
3.2 Mounting the Sensor
The sensor can be mounted using either double-sided adhesive or screws, depending on the surface and desired permanence.
- Double-sided Adhesive: Clean the mounting surface. Apply the adhesive to the back of the sensor's bracket and firmly press it onto the desired location.
- Screws: Use the provided screws to secure the sensor's bracket to the wall or surface.
The sensor's angle is adjustable by 180 degrees vertically and 360 degrees horizontally to optimize the detection area.

Image: Illustrations demonstrating the sensor's 180-degree vertical and 360-degree horizontal adjustable angles, detection range (2-8m), and two mounting methods: fixed with double-sided glue and fixed with screws.
3.3 Pairing Procedure (Sensor with Receiver)
Before use, the sensor must be paired with the Cruxer receiver. Follow these steps:
- Press the power button on the receiver to turn it off.
- Long press the volume button on the receiver. Release it when you hear a "Du" sound.
- Wave your hand in front of the new sensor to trigger it.
- The receiver will blink and sound "Du" to indicate successful pairing.

Image: Four-step visual guide for pairing the motion sensor with the receiver. Steps include turning off the receiver, long-pressing the volume button, waving a hand in front of the sensor, and confirming successful pairing by receiver blink and sound.
4. Operating Instructions
4.1 Motion Detection
The sensor detects movement of warm-blooded organisms within its specified range. When motion is detected, it sends a signal to the paired receiver.
- Detection Range: Up to 8 meters (26 feet).
- Detection Angle: 100 degrees horizontally, 15 degrees vertically.
Adjust the sensor's angle to cover the desired monitoring area effectively.
4.2 Receiver Functions
Upon receiving a signal from the sensor, the receiver will:
- Emit an audible chime or melody.
- Flash its colorful LED indicator.
The receiver features a volume key to adjust the alert sound level and a music switching button to select different chimes or melodies.

Image: A Cruxer motion sensor mounted in a hallway, illustrating its detection beam (red light) covering an entry point, providing an alert for movement.
4.3 Power-off Memory
The device retains its last settings (e.g., chime selection, volume level) even after a power outage or battery replacement. It will resume these settings once powered on again.
5. Maintenance
To ensure optimal performance and longevity of your Cruxer Motion Sensor Alarm:
- Keep the sensor and receiver clean by wiping them with a soft, dry cloth.
- Avoid exposing the devices to extreme temperatures, direct sunlight, or moisture.
- Regularly check battery levels if using battery power and replace them when necessary.
- Ensure the sensor's detection lens is clear of obstructions.
6. Troubleshooting
- Device not responding:
- Check if the device is powered on.
- Ensure batteries are correctly inserted and not depleted, or that the USB power cable is securely connected.
- Sensor not detecting motion:
- Verify the sensor's detection angle and range are correctly set for the area.
- Ensure there are no obstructions blocking the sensor's view.
- Confirm the sensor is properly paired with the receiver (refer to Section 3.3).
- Receiver not chiming:
- Check the volume setting on the receiver.
- Ensure the receiver is powered on and paired with the sensor.
- Interference:
- Wireless signals can be affected by thick walls or other electronic devices. Try repositioning the sensor and receiver closer to each other or away from potential interference sources.
7. Specifications
| Model Number | 20R-PRO |
| Detection Range | Max 8 m (26 ft) |
| Detection Angle | 100° Horizontal, 15° Vertical |
| Power Source (Sensor) | 3x AAA Batteries or USB-C (5V/1A) |
| Power Source (Receiver) | 3x AAA Batteries or USB-C (5V/1A) |
| Product Dimensions | Sensor: 3.27 x 3.07 x 1.73 inches (approx.) Receiver: 4.25 x 2.48 x 0.87 inches (approx.) |
| Color | White |
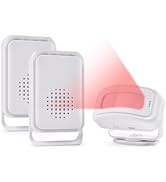
Image: Diagram showing the dimensions of both the Cruxer receiver and the motion sensor unit.
8. Warranty and Support
8.1 Warranty Information
Please refer to the product packaging or the official Cruxer website for specific warranty details and terms.
8.2 Customer Support
For any questions, technical assistance, or support regarding your Cruxer Motion Sensor Alarm, please contact Cruxer customer service. Contact information can typically be found on the product packaging or the official Cruxer website.