Introduction
Thank you for choosing the CNAPXAIA C10 Instant Kids Camera. This camera is designed to provide a fun and creative photography experience for children aged 3 to 12. It combines digital photography with ink-free instant printing, allowing children to capture memories and print them instantly. This manual provides detailed instructions for safe and effective use of your camera.
Safety Information: Not suitable for children under 3 years due to small parts.
What's in the Box
Upon unpacking, please ensure all items are present:
- CNAPXAIA C10 Instant Kids Camera
- 3 Rolls of Print Paper
- 6 Coloring Pens
- Lanyard
- USB-C Charging Cable
- 32GB Memory Card (pre-installed or separate)

Figure 1: Camera and Included Accessories
Product Overview
Camera Components
The CNAPXAIA C10 camera features a compact design with intuitive controls for children.
- 2.4-inch HD Screen: For viewing photos, videos, and navigating menus.
- Camera Lens: For capturing photos and videos.
- Print Output Slot: Where printed photos emerge.
- Control Buttons: Power, Shutter, Navigation, Menu, Print.
- USB-C Port: For charging and data transfer.
- Micro SD Card Slot: For memory expansion (32GB card included).

Figure 2: Front View of the Camera
Setup
1. Charging the Camera
- Connect the provided USB-C cable to the camera's USB-C port.
- Plug the other end of the cable into a standard USB power adapter (not included) or a computer's USB port.
- The charging indicator light will illuminate. The camera is fully charged when the light turns off or changes color (refer to screen indicator).
- A full charge provides approximately 3-4 hours of continuous use.
2. Inserting the Memory Card
The camera comes with a 32GB Micro SD card. Locate the Micro SD card slot on the side of the camera. Insert the card with the gold contacts facing down until it clicks into place. To remove, push the card in gently until it springs out.
3. Loading Print Paper
The camera uses ink-free thermal print paper. Follow these steps to load a new roll:
- Step 1: Open the paper compartment cover on the side of the camera.
- Step 2: Insert a new roll of print paper into the compartment, ensuring the paper feeds out from the top and a small portion extends beyond the slot.
- Step 3: Close the paper compartment cover firmly until it clicks.
- Step 4: The camera is now ready to print.

Figure 3: Loading Print Paper
Operating Instructions
1. Power On/Off
Press and hold the Power button to turn the camera on or off.
2. Taking Photos
- Turn on the camera. It will typically start in photo mode.
- Frame your shot using the 2.4-inch screen.
- Press the Shutter button to take a photo.
- After taking a photo, you will have the option to print it immediately or save it to the memory card.
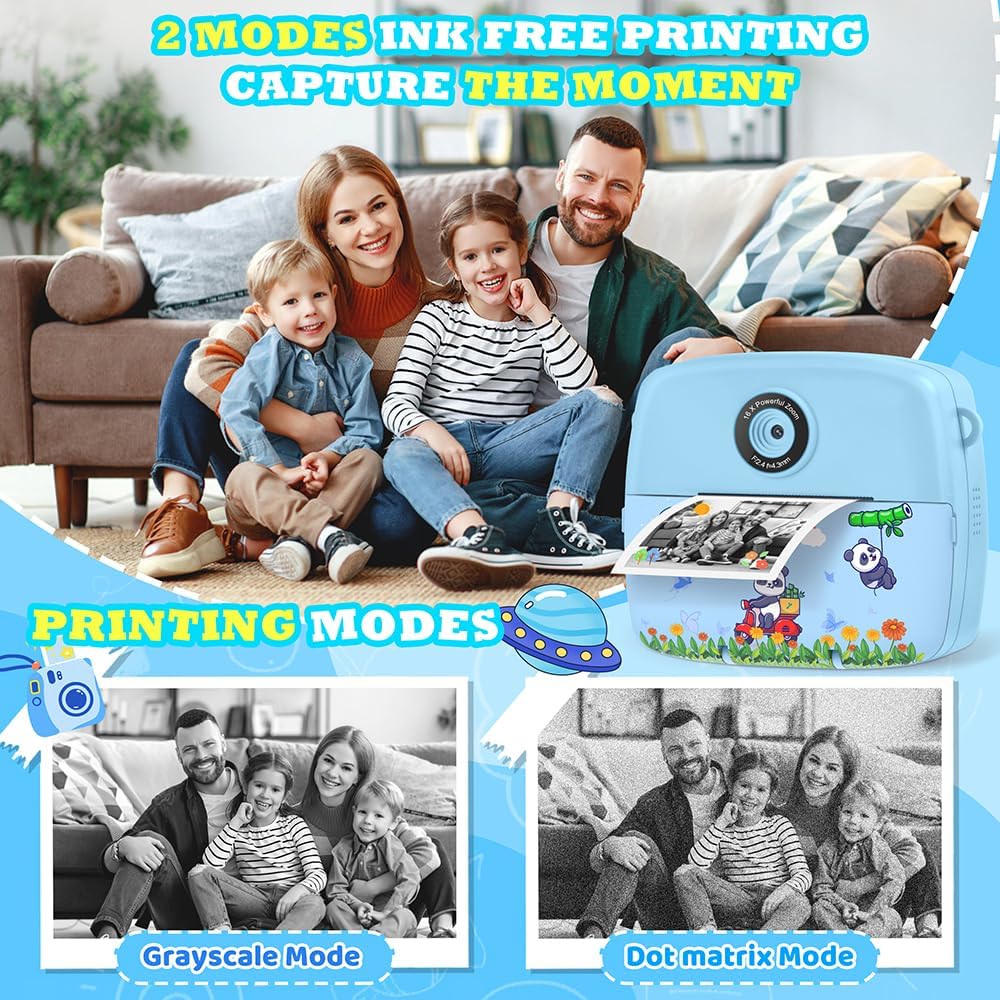
Figure 4: Ink-Free Printing Modes
3. Recording Videos
- From the main menu, navigate to the video recording mode.
- Press the Shutter button to start recording. A red 'REC' indicator will appear on the screen.
- Press the Shutter button again to stop recording. Videos are saved in 1080P resolution to the memory card.

Figure 5: Video Recording and Special Features
4. Using Filters, Frames, and Stickers
The camera offers various creative options:
- Filters: Apply different color effects to your photos.
- Frames: Add decorative borders to your pictures (12 photo frames available).
- Stickers: Overlay fun graphics onto your images (6 stickers available).
- Mirror Effects: Experiment with 8 different mirror effects.
Access these options through the camera's menu while in photo mode. Use the navigation buttons to select and apply your desired effect before taking a picture.

Figure 6: Creative Photo Options
5. Time-Lapse Photography
Capture sequences of photos over time. Select the time-lapse mode from the menu and choose intervals of 2, 5, or 10 seconds between shots.
6. Digital Zoom
The camera features up to 16x digital zoom. Use the zoom buttons (usually up/down navigation) to adjust the magnification before taking a photo or recording a video.
7. Burst Shooting
For capturing fast-moving subjects, activate burst shooting mode. The camera can take up to 5 frames per second (FPS).
8. Games and MP3 Player
The camera includes 5 puzzle games for entertainment and an MP3 player function. Access these features through the main menu.

Figure 7: Learning and Entertainment Features
9. Coloring Printed Photos (Graffiti DIY)
Use the included coloring pens to add a personal touch to your black and white instant prints.

Figure 8: DIY Coloring Activity
Maintenance
1. Cleaning the Camera
Wipe the camera body with a soft, dry cloth. Do not use liquid cleaners or solvents. For the lens, use a specialized lens cleaning cloth.
2. Replacing Print Paper
When the print quality degrades or no paper is dispensed, it's time to replace the paper roll. Refer to the "Loading Print Paper" section under Setup for detailed instructions.
3. Battery Care
To prolong battery life, avoid fully discharging the camera frequently. Charge the camera regularly, even if not in use for extended periods.
Troubleshooting
| Problem | Possible Cause | Solution |
|---|---|---|
| Camera does not turn on. | Low battery. | Charge the camera using the USB-C cable. |
| Cannot take photos/videos. | Memory card full or not inserted correctly. | Check memory card insertion. Delete unnecessary files or replace the card. |
| Photos are not printing. | No print paper or paper loaded incorrectly. | Ensure print paper is loaded correctly and there is enough paper. Refer to "Loading Print Paper". |
| Screen frozen or unresponsive. | Software glitch. | Hold the power button for 10 seconds to force a restart. If unresponsive, let the battery drain completely and then recharge. |
| Distorted audio from speaker. | Speaker malfunction. | This may indicate a hardware issue. Contact customer support if the problem persists. |
Specifications
| Feature | Detail |
|---|---|
| Model Number | C10 |
| Dimensions | 11 x 5 x 9 cm |
| Weight | 200 g |
| Screen Size | 2.4 inches LCD |
| Video Resolution | 1080P |
| Photo Resolution | 3 MP (Effective 12 MP) |
| Zoom | 16x Digital Zoom |
| Storage | 32GB Micro SD Card (included), expandable up to 32GB |
| Battery Type | 1 Lithium Polymer (included) |
| Charging Interface | USB-C |
| Printing Technology | Ink-free thermal printing |
| Supported File Formats | JPEG (images), MP4 (videos) |
| Continuous Shooting Speed | 5 FPS |
| Age Recommendation | 3-12 years |
Warranty and Support
For warranty information or technical support, please refer to the contact details provided with your purchase or visit the official CNAPXAIA website. Keep your proof of purchase for warranty claims.