DZQ ZQ-1X
DZQ ZQ-1X Multi-Directional Stereo Microscope User Manual
Model: ZQ-1X
Introduction
This manual provides detailed instructions for the assembly, operation, and maintenance of your DZQ ZQ-1X Multi-Directional Stereo Microscope. Designed for precise inspection and micro-setting tasks, this microscope offers 7X-45X continuous zoom magnification and a flexible spring bracket for ergonomic use. Please read this manual thoroughly before using the product to ensure proper function and longevity.
Safety Information
- Always handle the microscope with care to prevent damage to optical components.
- Ensure the microscope is placed on a stable, level surface to avoid tipping.
- Do not expose the microscope to direct sunlight or high temperatures.
- Keep the microscope away from dust, moisture, and corrosive chemicals.
- Disconnect power before cleaning or performing any maintenance.
- Avoid touching optical surfaces with bare hands. Use a lens cleaning cloth if necessary.
- Keep small parts and accessories out of reach of children.
What's in the Box
Carefully unpack all components and verify against the list below. If any items are missing or damaged, please contact customer support.
Video: Unboxing the DZQ ZQ-1X Microscope. This video demonstrates the unboxing process and shows all included components.

Image: An exploded view showing all parts of the DZQ ZQ-1X microscope, including the stand, microscope head, LED ring light, and accessories.
- Microscope Head (1)
- Microscope Stand (1)
- Eyepiece (2)
- 0.5X Objective Lens (1)
- 60-LED Ring Light (1)
- Headrest Mount (1)
- Handle (2)
- Headrest (1)
- Focus Block (1)
- Protective Cover (2)
- User Manual (1)
- Small Hardware (screws, wrenches)
Setup and Assembly
Follow these steps to assemble your microscope:
- Attach the Microscope Stand: Secure the main spring bracket stand to a stable workbench using the provided clamp or base. Ensure it is firmly tightened.
- Install the Focus Block: Slide the focus block onto the vertical pole of the stand. Tighten the securing screw on the focus block.
- Mount the Microscope Head: Carefully place the microscope head into the opening of the focus block. Secure it with the designated screw.
- Insert Eyepieces: Insert the two eyepieces into the microscope head.
- Attach 0.5X Objective Lens (Optional): If desired, screw the 0.5X objective lens onto the bottom of the microscope head for increased working distance.
- Install LED Ring Light: Attach the 60-LED ring light to the bottom of the microscope head, around the objective lens. Connect its power cable to the dimmer control unit and then to a power outlet.
- Assemble Headrest: Attach the headrest mount and handles to the spring bracket as shown in the diagram. The headrest provides comfort during extended use.

Image: The retractable arm of the microscope stand, demonstrating its flexibility and ease of adjustment.

Image: The multi-directional spring-adjustable stand with clamp, ready for microscope attachment.
Operating Instructions
1. Power On/Off
Connect the LED ring light power adapter to a suitable electrical outlet. Use the switch on the dimmer control unit to turn the light on or off.
2. Adjusting Magnification and Focus

Image: Close-up of the microscope head showing the diopter, magnification, and focus adjustment knobs.
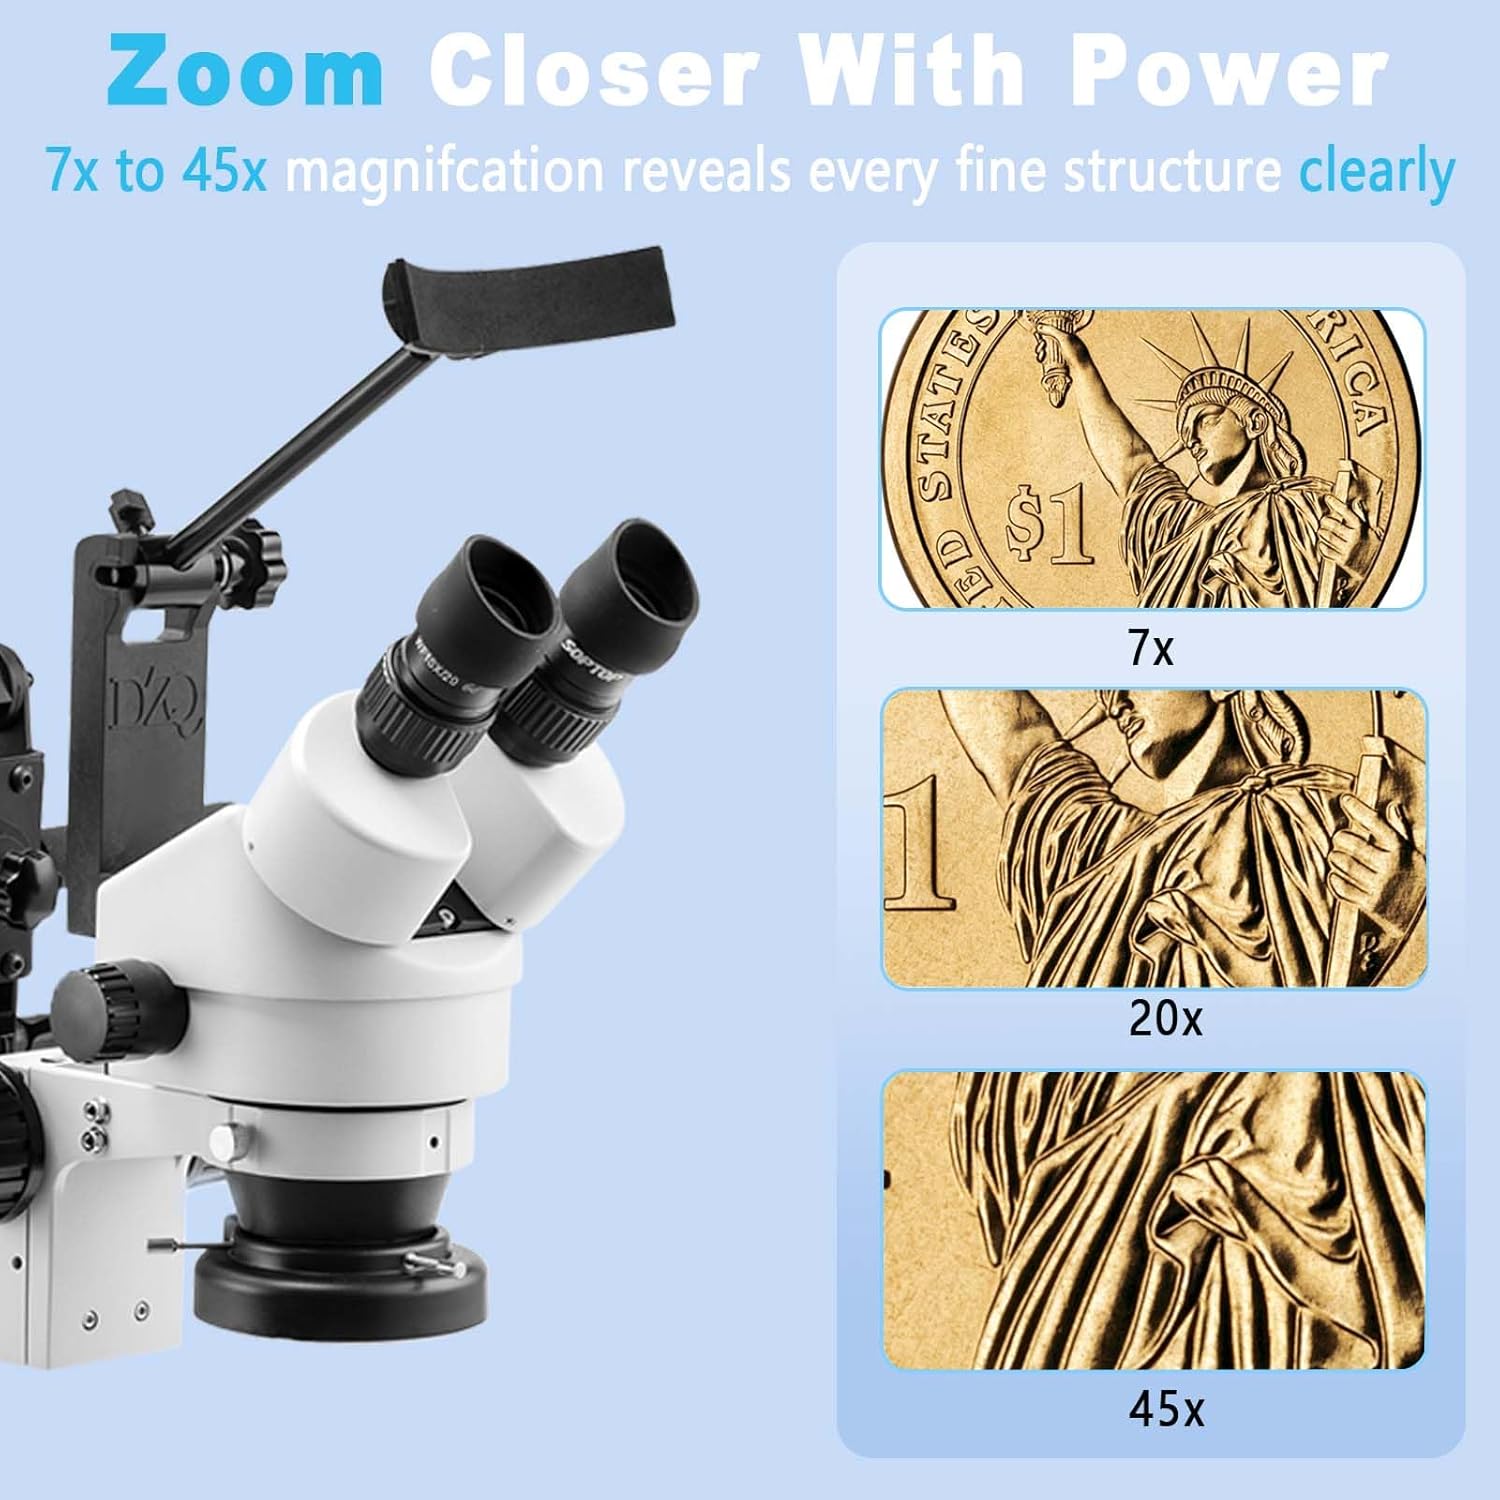
Image: Visual representation of 7x, 20x, and 45x magnification levels on a coin, illustrating the detail visible at each setting.
- Magnification: Rotate the zoom knob on the microscope head to adjust the magnification from 7X to 45X.
- Focus: Use the mechanical focus knob on the focus block to bring your specimen into sharp view.
- Diopter Adjustment: For optimal viewing, adjust the diopter on each eyepiece to compensate for differences in your eyes. Look through the eyepieces and adjust each diopter ring until the image is clear.
3. LED Ring Light Control

Image: The 60-LED ring light providing shadow-free illumination, with a dimmer control shown.
The 60-LED ring light provides bright, shadow-free illumination. Use the dimmer knob on the control unit to adjust the brightness from 0% to 100% to suit your viewing needs.
4. Adjusting the Stand and Headrest

Image: The microscope with its 45-degree inclined binocular head and various adjustment points on the stand for height and angle.

Image: A diagram illustrating the ergonomic headrest designed to reduce user fatigue during long working sessions.
- Spring Bracket Arm: The multi-directional spring bracket allows for flexible positioning of the microscope head. Adjust the arm to achieve the desired height and angle for your work.
- Headrest: Utilize the headrest to maintain a comfortable posture and reduce neck and eye strain during prolonged use. Adjust its position for optimal comfort.
- Working Distance: The microscope offers a working distance of 95-300mm, providing ample space for tools and hands under the objective lens.
Maintenance
- Cleaning Lenses: Use a soft, lint-free lens cleaning cloth and a specialized lens cleaning solution to clean optical surfaces. Avoid abrasive materials.
- Cleaning Body: Wipe the microscope body with a soft, damp cloth. Do not use harsh chemicals or solvents.
- Storage: When not in use, cover the microscope with the provided dust cover to protect it from dust and debris. Store in a dry, cool place.
- Lubrication: Moving parts are pre-lubricated. Do not attempt to lubricate them unless specifically instructed by a qualified technician.
Troubleshooting
| Problem | Possible Cause | Solution |
|---|---|---|
| No illumination from LED ring light. | Power cable disconnected, dimmer off, or faulty LED. | Check power connections. Ensure dimmer is turned on and brightness is adjusted. If problem persists, contact support. |
| Image is blurry or out of focus. | Incorrect focus adjustment, diopter not set, or dirty lenses. | Adjust the focus knob. Set diopter for each eyepiece. Clean objective and eyepiece lenses. |
| Difficulty adjusting magnification. | Zoom knob stiff or obstructed. | Ensure no obstructions. Apply gentle, even pressure when rotating the zoom knob. Do not force. |
| Microscope head is unstable. | Securing screws loose on focus block or stand. | Tighten all securing screws on the focus block and stand. Ensure the stand clamp is firmly attached to the workbench. |
Specifications
| Feature | Detail |
|---|---|
| Magnification Range | 7X - 45X (Continuous Zoom) |
| Working Distance | 95mm - 300mm |
| Light Source | 60-LED Ring Light with Dimmer (0-100%) |
| Head Type | 45-Degree Inclined Binocular |
| Stand Type | Multi-Directional Spring Bracket |
| Material | High-rigidity Aluminum Alloy (Stand) |
| Item Weight | 13.09 kg (28.8 lbs) |
| Package Dimensions | 23 x 19 x 9 inches |

Image: Detailed dimensions of the microscope head and the fully extended stand.
Warranty and Support
For warranty information, technical support, or service inquiries, please refer to the contact details provided with your purchase documentation or visit the official DZQ website. Keep your purchase receipt as proof of purchase.